T.Nr.
Important warnings This appliance of class 3 is designed to be built in a kitchen block. This appliance is produced in two versions (with and without grill): 1. Oven with grill version CBCG (door down hinged) Model description See schene of installation Oven with grill, without chimney, front flue of waste gas Page 7, Fig. 3 Oven with grill, with chimney horizontal – vertical Page 7, Fig. 4 Oven with grill, with chimney vertical and box for waste gas Page 8, Fig.
The user is responsible for arranging the test. The installer of the appliance has to inform in writing the user about this compulsory test. The appliance can be only used for baking and grilling under conditions mentioned hereinafter. It must not be used for other purposes than described in this manual (e.g. heating, etc.). Use of the appliance can cause creation of warmth and/or humidity in the room, where it is placed.
These openings have to be from time to time checked and/or cleaned by the user (e.g. clean the waste-gas output from snow and the combustion air inlet from melting snow in winter). The opening of the waste gas outlet must not be placed at the entry door and under ventilation openings. If waste gas is discharged through the roof it is necessary to check whether the waste gas line is installed in the upward position. 2.
ATTENTION! When replacing a gas cylinder the following safety measures have to be carried out: a) Close the taps on the appliance (turn the knob into position 0); b) Make sure that no flame or flaming articles are located close to it; c) Close the tap of the cylinder being replaced; d) Unscrew the pressure reducer from the empty cylinder, take the last one out of the case and replace it with a new gas cylinder – when connecting a new gas cylinder proceed in the reverse sequence.
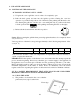
UNDER NO CIRCUMSTANCES MUST THE APPLIANCE BE CONNECTED TO 220 V POWER SUPPLY! IT MAY CAUSE TOTAL DAMAGE OF ELECTRICAL COMPONENTS AND DANGER FOR USERS. 6. GAS LEAKAGE To check gas leakage we recommend to use an electric gas detector of a verified type. In case of an accident close the gas inlet tap and refer to a gas-fitter, seller or specialised technician. 7. FIXATION OF THE APPLIANCE TO FURNITURE To build the appliance ino furniture a space with dimensions shown on fig.
Fig 3 Installation of oven without chimney, front flue of waste gas. Minimum distamce from combustible areas backward and towards right and left sides: 20 mm. Minimum distance from combustible areas upward: 50 mm. Section: the front side horizontally with building in (see installation drawing No. 39986) Fig 4 Installation of oven with chimney horizontal – vertical. Minimum distamce from combustible areas backward and towards right and left sides: 20 mm.
Fig 5 Installation of ovens with chimney vertical and with box for waste gas. Minimum distance from combustible areas backward and towards right and left sides: 20 mm. Minimum distance from combustible areas upward: 50 mm. Minimum distance of waste gas line box from combustible areas: 50 mm Section: the front side horizontally with building in ( see installation drawing No. 39986) Fig. 6 Installation of ovens with chimney horizontal and with box for waste gas.
ATTENTION: Installation of baking oven with chimney horizontal is allowed only with the waste gas line box, partnumber 43661 (new version ) and without chimney-adapter. ATTENTION: For the reason of saving of weight the oven for an OEM (producer of caravans or motorhomes) might be also delivered without the outer housing. The waste gas line through chimney pipe has to be in upward position. Maximum length of the waste gas line is 2.000 mm.
9. USE OF THE APPLIANCE 9.1 IGNITION OF THE APPLIANCE AUTOMATIC IGNITION: OVEN – GRILL a) To ignite the oven or grill the oven door has to be completely open. b) Push the knob gently and turn into the ignition position. Getting the oven into operation is possible in all positions 1-6 of the knob (after pushing turn the knob to the left). Getting the grill into operation (for ovens with grill only) is possible if the knob is in the position Grill (after pushing and turning the knob to the right).
b) The pan has 3 optional levels. Notice: When grilling using the rotisserie the pan has to be in the position „1“.. c) The grill shelf can be turned, thus allowing 2 levels 9.3. Handling of the grill (only for appliances with grill). a) The heat protecting sheet must be pulled out as far as possible during grilling. b) To ignite the grill burner the oven door must be completely open. c) When operating the grill the oven door has to be half-open.
ATTENTION: When operating the grill the appliance reaches high temperatures. Keep children away. 9.3.1. a) USING THE ROTISSERIE (only for appliances with grill). Place the pan with the assembled left-hand holder of the rotisserie in the oven. Insert the rotisserie ino the the grill motor shaft hole. Insert the left side of the rotisserie into the rack holder. Switch on the rotisserie motor by means of the switch for this purpose.