Installation Guide for STANDARD FRP and INNOVATIVE FINISHES FRP Wall, Ceiling and Laminated Panel Installations Where Tradition & Innovation Converge
Topics General Information 3 Installation Preparation 4 Pre-Installation Planning 6 Basic FRP Installation Steps 6 Cutting Instructions 6 Attaching to Wall 7 Seam Treatment Options 8 Specialty Installations 13 Safety Precautions, Supplies, Equipment and Storage Information Wall Preparation, Choose an Adhesive, Environmental Considerations FRP with Performance and Presence Adhesive, Spacing, Panel Sequence, Panel Finishing Moldings, Color Coordinating Caulk, Fasteners, Seam Sealant Ceil
General Information Safety Information WHEN CUTTING OR DRILLING, ALWAYS WEAR PROTECTIVE GLASSES OR GOGGLES AND A FACE MASK WHICH COVERS THE FACE AND MOUTH. Itching due to glass fibers may be avoided by the use of barrier creams on exposed skin areas. Hearing protection is also recommended. Supplies and Equipment Supplies will vary depending on wall substrate, adhesive choice and seam treatment selection.
Installation Preparation Pre-Conditioning Before beginning the installation, the installer must determine that the environment of the jobsite meets or exceeds all requirements specified in the installation guide. Prior to installing, remove the packaging and allow the panels to acclimate to the room temperature and humidity for 24 hours. Acclimation temperature range should be 60°F to 75°F (16°C to 24°C) and relative humidity should be 35% to 55%.
HIGH HUMIDITY ROOMS Acclimate panels in the operating humidity conditions. Carefully follow the guidelines in this installation guide for expansion/contraction spacing and sealing. (see Expansion Joint Chart, pg 5). Failure to seal moisture entry points with silicone sealant can cause swelling of the substrate resulting in warping, curling, delamination or bond line separation. Use an adhesive that is recommended for high humidity conditions. A vapor barrier (e.g. 6 mil poly sheet) may be required.
Pre-Installation Planning • • • Pre-fit each panel before fastening and/or adhering in place. All cutting and drilling should be done prior to the application of adhesive. Preplan for cove or base molding. FRP panels should be installed so that the base molding will not restrict normal panel movement during expansion and contraction. Cut panels 1/4” short of where the base molding will extend; poured acrylic floor with built-in base cove should be in place prior to installation.
Attaching to Wall Generally, FRP panels can be installed using adhesive alone, fasteners alone, or a combination of adhesive and fasteners. The method used should be determined by the room and wall conditions (see the wall conditions noted on pages 4 & 5). Check your local building codes for any restrictions or guidelines regarding approved installation methods. Before starting, determine which seam treatment is being used.
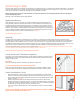
Seam Treatment Options Before starting, determine which seam treatment is being used. Moldings One-piece moldings with expansion control guides or two-piece moldings are available for installation with standard frp wall panels. Panels are inserted into the one-piece molding opening, while both parts of the two piece molding are installed on top of the panel (Figure 7). Panels beneath the two-piece molding should maintain the recommended expansion spacing.
Color Coordinating Caulk (Caulk not available for purchase from Crane Composites) 1. Start in an inside corner. Mark plumb line 48” (1.2 m) from corner. The first panel should be set true with a plumb line. NOTE: If panel is supplied with a protective tack film, leave film on during installation. 2. Apply 100% adhesive coverage to the entire back side of the panel using a “crosshatch” type pattern. Place panel against wall and align leading edge with plumb line.
Seam Sealant WALL PREPARATION 1. Surfaces should be free of grease, dirt, and other contaminants. Clean seams as necessary with a dry, lint free rag or a rag dampened with solvent if necessary. 2. Installed panels need to be adhered to the wall for at least 6 hours before beginning seams. 3. Remove any adhesive between the panels with a sharp edged screwdriver or small flat blade (Figure 12). 4. Prior to dispensing urethane sealant, each seam will need to receive painter’s tape on each side of the seam.
APPLY URETHANE SEALANT TO SEAMS/JOINTS General Process notes: 1. At end user discretion as to the number of operators used for the seam seal application process. A minimum of two operators is recommended. 2. If one operator is used, then each seam will have to be processed individually (filled and then smoothed by the same operator before moving on to the next seam). A new mixing tip will likely need to be used for each seam in this case. 3.
VERTICAL OUTSIDE CORNERS For Vertical outside Corners, repeat process steps 1-8 as listed in Vertical Flat Panel Seams VERTICAL INSIDE CORNERS 1. Repeat process listed in Vertical Flat Panel Seams except for the format to smooth the sealant 2. Smoothing the Sealant A. After the sealant has been dispensed, smooth the sealant beads flush with the panel surface using the Radial Seam Finisher if a rounded corner joint is desired. B.
Speciality Installations Ceiling Panel LAY-IN CEILINGS For lay-in ceiling grid systems, in order to avoid unacceptable deflection, purchase factory pre-cut ceiling panels. To install ceiling panels, lay into ceiling grid. Trim as necessary to accommodate lighting or other fixtures. Always leave a 1/8” gap between panel and grid or fixture to allow for normal panel expansion and contraction. FRP grid systems may require specially sized ceiling panels. See the FRP grid system installation guide.
Factory Laminated Panels Laminated panels may be installed following the FRP panel installation instructions. Laminated panels are commonly installed directly over a steel or wood studded wall. Stud spacing is recommended to be 16” or less on center. Stud spacing should be planned so that panel edges will occur on stud centers.
AN IMPORTANT NOTE ABOUT MOISTURE RESISTANT SUBSTRATES MOISTURE-RESISTANT GYPSUM VARIES TREMENDOUSLY, WHILE SOME OF THESE NEW SURFACES ALLOW MOISTURE TO PENETRATE, OTHERS RETARD OR TOTALLY PREVENT PENETRATION OF WATER OR SOLVENT.
www.FRP.com | 1.800.435.0080 | salesbp@cranecomposites.com Form #6876 | Rev. 09 | 04.