
User Manual
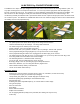
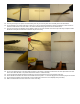


92. Hold your motor mounting base on the Formica plates, and use a pen to mark the holes for the screws.
93. Use a drill and a small bit to drill pilot holes in where you placed the marks.
94. Screw your motor mount base to the nose of the plane. Do not over-tighten the screws, as it may crack the Formica plates. Install
the dowels that will hold the rubber bands that secure the wing.
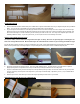
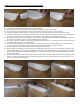
95. Measure back 9" from the nose of the plane and cut a 3/4" deep slit on the top with a sharp razorblade.
96. Press the dowel into the slit making sure it is straight and level.
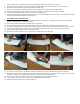
Installing the Wooden Dowels that hold the wing
97. Cut the front slit with a razor blade using a straight edge 9" back from the nose of the plane that is 3/4" deep into the foam.
98. Cut the rear slit ½” behind the back edge of the wing.
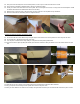
99. You can press a dowel into the slit by setting it on top of the slit and pressing downwards.
100. Secure the dowel in place by filling the slit with glue above the dowel and rolling the dowel to cover all surfaces before the glue
sets.
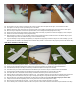
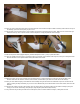
101. Find the pre-cut slit on the top of the fuselage where the horizontal tail and elevator will be attached.
102. Lay your square on the fuselage to line up with the front of the tail piece. Hold.
103. Use your razor blade to cut down into the fuselage until your blade meets the pre-cut horizontal slit. Remove this piece of foam.