
Instructions / Assembly


7
See WARNING and Figures
:
WARNING
This screen must be clear and free
of
obstructions at all times to ensure
proper
operation.
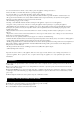
WARNING
The burner of the firebowl must be covered
by
lava rocks or fire glass completely.
Otherwise the
f
la
me
may be extinguished. See
the
Figure for
the CORRECT and INCORRECT ways
for reference.
CORRECT
INCORRECT
Perform leak test in a well-ventilated area outside and where no source of spark can
occur.
Remove battery from igniter. Open tank valve fully (counter-clockwise). Turn the on/off valve at the unit to the “OFF” position
to
pressurize the hose assembly. Use a soapy water solution to check all the connections fo r leaks before attempting to light the appliance.
If
a
leak is found, turn the tank valve off and do not use the appliance until repairs can be
made.
TIPS:
Before Starting
•
Read the instructions thoroughly.
•
Check and make sure that all parts are present.
•
For future reference, save this instruction manual.
TO LIGHT
Before each use, inspect the hoses. Replace hose if there are any signs of cutting, wear or abrasion.
(1) Turn the cylinder valve on the gas tank counter-clockwise to open the gas supply.
(2) Close the storage door on the firebowl for the gas tank.
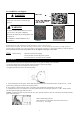
(3) Light the firebowl as below in the following image:
A. Press and hold the electric igniter. At the same time, push and turn the control knob counter-clockwise to the ‘LOW’
position. Keep pushing the control knob to light the burner.
B. After ignition, release the electric igniter. Continue to push and hold the control knob for 45 seconds.
C. If ignition does NOT occur within a few seconds, push and turn the control knob clockwise to ‘OFF’. Wait 5 minutes,
and then repeat the lighting procedure as above.
Caution: *If the burner does not ignite with the valve open, gas will continue to flow out of the burner and could accidently
ignite with risk of injury.
Observe flame height when lit:
Flame should be a yellow/blue colou
r and be from 5cm to
25.5 cm (2 in – 10 in) high.