Installation instructions for the Wi-Fi module for Ender 3, Ender 3 PRO, Ender 3 3D printers
Before you start... ATTENTION! In order to make the modifications presented in the manual it is necessary to have a SKR mini E3 motherboard. You must strictly follow the instructions in the manual. We have made every effort to ensure that the installation and start-up of the device goes smoothly. However, we do not take any responsibility for possible damage caused by improper modification. The device presented in the description is an extension of ESP 3D project. The project is available on GitHub pages.
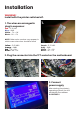
Installation WARNING! Install with the printer switched off. 1. The wires are arranged in plug in sequence: 1. Red - 5-12 VDC Blue – GND White – TX -> RX Black – RX ->TX NOTE: Other color versions may appear, in which case wire colors should be read: Yellow - 5-12 VDC Orange – GND Red – TX -> RX Brown – RX ->TX Purple - 5-12 VDC Grey – GND White – TX -> RX Black – RX ->TX 2. Plug the connector into the TFT socket on the motherboard. 2. 3. 3.
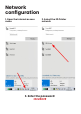
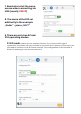
Network configuration 1. Open the Internet access menu 2. Select the 3D Printer network 3.
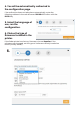
4. You will be automatically redirected to the configuration page. f the redirection does not take place automatically, enter the following address in the web browser: 192.168.0.1 Confirm with the ENTER key 5. Select the language of use, run the configuration. 5. 6. Choice the type of firmware installed in the printer. If the Ender printer has factory firmware, choose Repetier. If the software was changed, set the type of software currently loaded on board (usually Marlin) 6.
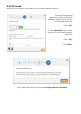
7. Baud rate set at the same we use when connecting via USB (usually 115200) 7. 8. The name of the ESP set arbitrarily in the example „Ender” - press „NEXT” 9. There are only two AP and STA operating modes. 9.1 AP mode creates its own wireless network. If you choose this type of connection, the printer will not be visible in our home WI-FI network. In this case, you will need to connect to the 3D Printer network. The configuration of this network is limited to entering a new access password. 9.
9.2 STA mode allows you to connect the printer to your home wireless network. Press the magnifying glass icon, select your home wireless network from the list of available networks. Click „Set”. In the „Password” field, enter the key of your home wireless network. Click „Set”. Click “Next” 9.2 The system will inform you that the configuration is complete.
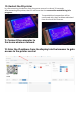
10. Restart the 3D printer by disconnecting the device from the power source for about 30 seconds. After restarting the printer, the LCD will show that the connection establishing is in progress. The established connection will be confirmed with the IP address obtained from the local DHCP server. 11. Connect the computer to the home wireless network. 12.