
User's Manual


Installing and Uninstalling Software
To take full advantage of your Sound Blaster X-Fi Notebook, you need to install device drivers and
applications. At times, you may also need to uninstall or reinstall some or all of the device drivers and
applications to correct problems, change configurations, or upgrade outdated drivers or applications. To
learn how to do so in all supported Windows operating systems, consult the following sections:
Installing Drivers and Applications
Reinstalling Drivers and Applications
Uninstalling Drivers and Applications
Installing/Uninstalling Selected Drivers and Applications
Installing Drivers and Applications
Ensure that your audio device is installed before proceeding. For instructions on installing your
audio device, consult your Quick Start leaflet.
After you have installed your audio device into the ExpressCard slot, turn on your notebook. Windows
automatically detects your audio device and searches for device drivers.
For Windows Vista
1. Insert the Installation and Applications CD into your CD-ROM/DVD-ROM drive. Your CD should
start automatically. If it does not, follow the steps below:
i. Click Start Computer.
ii. Right-click the CD-ROM/DVD-ROM drive icon, and then click Open Autoplay.
2. To complete the installation, follow the instructions on the screen.
3. When prompted, restart your notebook.
For Windows XP
When prompted for the audio drivers, click the Cancel button.
1. Insert the Installation and Applications CD into your CD-ROM/DVD-ROM drive. Your CD should
start automatically. If it does not, follow the steps below:
i. Double-click the My Computer icon on your desktop.
Alternatively, click Start My Computer.
ii. Right-click the CD-ROM/DVD-ROM drive icon, and then click Autoplay.
2. To complete the installation, follow the instructions on the screen.
3. When prompted, restart your notebook.
Reinstalling Drivers and Applications
For Windows Vista
1. Click Start Control Panel Uninstall a program.
2. Select the Sound Blaster X-Fi Notebook entry.
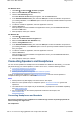
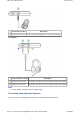
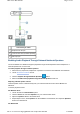
1.
Microphone In/Line In
jack
Connects to line-level sources (for example, MP3 players) or microphones with a
3.50 mm (1/8-inch) plug.
2.
Headphone/Line Out
jack
Connects to the Front Left and Front Right inputs on powered analog speakers or
stereo headphones with a 3.50 mm (1/8-inch) plug.
3. Connect LED button
Lights up green when wireless streaming is enabled and ready. Flashes green when
button is pressed to indicate pairing with a wireless receiver or other supported
device.
4. Power LED
Lights up blue when Sound Blaster X-Fi Notebook is connected to your notebook and
turned on.
Page
3
of
19
How to use this manual
17/4/2008
file://C:\Users\Lee Fong\AppData\Local\Temp\~hhC3B1.htm