Getting Started Thank you for choosing Creative Sound BlasterAxx, the next generation Sound Blaster® that incorporates the powerful SB-Axx1 sound and voice processor. It is equipped with speaker and microphone functions for both listening and conferencing capabilities. The SBX 200 (SB1530) model design provides portability and low power consumption without compromising your audio pleasure. The SBX 200 comprises both right and left drivers within a single tower structure.
More Help For the latest news and products for the Sound Blaster, please visit www.soundblaster.com. The site also includes information on making purchases, technical help and the latest software updates. Using Creative Software AutoUpdate Locating, downloading and installing updates for your Creative products is now simpler and faster with the web-based Creative Software AutoUpdate system.
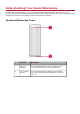
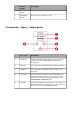
Understanding Your Sound BlasterAxx The SBX 200 is equipped with a variety of input and output jacks to enable connection to various devices. A touchscreen interface located at the top of the Sound BlasterAxx gives you basic control over the system's functions. This chapter looks at these features in detail. The Sound BlasterAxx Tower Indicator Description 1 Bluetooth Indicator The blue LED indicates that the Sound BlasterAxx is connected with a Bluetooth / NFC enabled device.
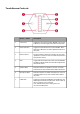
TouchScreen Controls Button / Slider Description 1 Voice Focus Toggles the Voice Focus function ON/OFF. Voice Focus is ON when the LED is lighted and dimmed otherwise. 2 Noise Reduction Toggles the Noise Reduction function ON/OFF. Noise Reduction is ON when the LED is lighted and dimmed otherwise. 3 Master Volume 8 segment slider indicates the speaker volume. Slide upwards to increase the volume or slide downwards to decrease the volume. 4 SBX Toggles SBX Pro Studio audio enhancements ON/OFF.
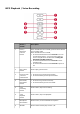
MP3 Playback / Voice Recording Button / Switch Description 1 Power / Bluetooth Connect Button When the SBX 200 is turned OFF, press the Power button once to power it ON; When the SBX 200 is turned ON, l Press and hold the button for 2 seconds to turn on the Bluetooth feature. You may choose to pair the device using Bluetooth or NFC. Refer to Using the Bluetooth and NFC Features. l Press and hold the button for 4 seconds to enter standby mode. l Press and hold the button for 8 seconds to power it off.
Button / Switch Description Switch 9 Megaphone Switch Slide to switch megaphone on / off. Connectivity - Input / Output Jacks Slot / Jack Description 1 MicroSD Slot Supports MicroSD card up to 32GB. You are able to save recorded voice files and playback MP3 files from the MicroSD card. 2 USB Port For charging your mobile devices, for eg. iPhone, iPad, etc. 3 Headphone Connects to stereo headphones with a 3.50mm (1/8inch) plug.
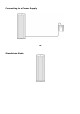
Setting Up Your Sound BlasterAxx The SBX 200 is a refined portable Sound BlasterAxx with built-in rechargeable battery, MP3 playback, Bluetooth connectivity and NFC feature. You can either connect the SBX 200 to a computer via the USB or by connecting it to the power supply. Or simply operate it in standalone mode, powered by the built-in battery. Connecting to a Computer Setting the default audio device (for Mac OS only) (i) Go to System Preferences and click Sound.
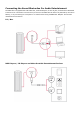
Connecting to a Power Supply OR Standalone Mode
Using Your Sound BlasterAxx Whether you wish to listen to your favorite tracks from MP3 players, experience realistic audio while playing games on your PC and game consoles or receive clear voice and audio outputs during video / audio conferencing without the hassle of an additional microphone or headset, your SBX 200 provides the ideal solution.
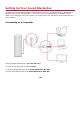
Connecting the Sound BlasterAxx For Audio Entertainment The SBX 200 is equipped with a MicroSD slot, a MicroUSB jack, an Aux In jack, and a build-in Bluetooth transceiver for connection to a wide array of devices. The SBX 200 can either be powered by its built-in battery, or by connecting to a computer or to a wall socket using a USB Power Adapter. This section illustrates the connection.
Bluetooth-Enabled Devices NFC-Enabled Devices
Video/Audio Conferencing, Karaoke and Recording Video / Audio conferencing via the various messaging applications available in the market is made simpler with the SBX 200's built-in stereo microphones. Equipped with configurable CrystalVoice technology, the Sound BlasterAxx, coupled with its microphone, delivers crystal clear voice and audio reception during conferencing. The Sound BlasterAxx is also equipped with a "What You Hear" feature, allowing you to turn your computer into a Karaoke station.
MP3 Playback, Voice Recording and Megaphone The built-in battery, MP3 playback and voice recording features on the SBX 200 offer a highly portable audio / music player with great audio quality to travelers. Your SBX 200 has various buttons behind it which you can select for your MP3 playback. Refer to Understanding Your Sound BlasterAxx for types of buttons available and their functions. 1. Insert a MicroSD card with MP3 files into the MicroSD slot. Note: The MicroSD slot supports up to 32GB card. 2.
Connecting Headphones / Headsets Headphones and headsets can be connected to the Sound BlasterAxx via the Headphone jack. Please note that the Sound BlasterAxx's speaker will be automatically muted when a headphone is connected.
Using the Software A specialized software for the Sound BlasterAxx is developed to provide additional enhancements to the audio and voice inputs and outputs of the product. The software bundle supports a range of operating systems including: l Windows 8, Windows 7, Windows Vista l Mac To take full advantage of your Sound BlasterAxx, we recommend downloading and installing this software into your computer. Note: Some applications are available only for certain operating systems.
This software includes a number of configurations that help you control the basic functions of your Sound BlasterAxx plus several software enhancement configurations that can be made to heighten your Sound BlasterAxx's performance. The menu column on the left of the interface allows you to navigate to the configuration interface for each of these enhancements. Uninstalling In the event that an uninstallation is required (such as for upgrades), please follow the following procedure. 1.
Installation and Uninstallation - Mac For Mac OS, the following applications are included in the software bundle: l Sound BlasterAxx Control Panel l Product Registration l Creative Uninstaller Installing Note: Please ensure that your product is connected to the computer running the installation. 1. Using your web browser, visit www.creative.com/support and locate the software package for the Mac OS. 2. Download this package into your local hard disk. 3.
Using the Sound BlasterAxx Control Panel The rest of this chapter explains how to use the Sound BlasterAxx Control Panel to view and adjust the various features of your Sound BlasterAxx product. The examples and screenshots below uses Windows as an example. The UI for other operating systems may differ slightly. Managing Your Profiles The Sound BlasterAxx Control Panel comes equipped with a set of pre-configured profiles to suit your different needs including gaming, movies/videos, music, etc.
Adjusting Speaker Volume Via Software A master volume slider is available at the bottom left corner of the interface. Drag the slider to adjust the master volume. You can also mute / unmute the speaker by clicking the speaker icon to the left of the slider. Mixer Settings A mixer is also available via the software, allowing you to adjust the volume levels of individual outputs and channels including the microphone, speakers, etc.
Enhancing the Audio - SBX Pro Studio SBX Pro Studio enhances the audio output of your Sound BlasterAxx using software optimizations. To configure SBX Pro Studio, click the "SBX Pro Studio" menu option on the left. Follow the steps below to toggle on SBX Pro Studio and adjust the level of enhancements. 1. Click the power button to toggle ON SBX Pro Studio. 2. Select the type(s) of enhancements to apply and drag the sliders to adjust the level for each enhancement. 3.
Enhancing the Microphone - CrystalVoice The SBX 200 is equipped with built-in stereo microphones, allowing you to easily carry out video/audio conferencing using popular VoIP applications such as Ventrilo® etc. CrystalVoice enhancements help to further this experience by enhancing the clarity of such communications. To configure CrystalVoice settings, Click the "CrystalVoice" menu option on the left. 1. Click the power button to turn on CrystalVoice. 2.
View Speakers / Headphones Settings Each SBX 200 is equipped with a headphone jack, allowing you to connect your favorite headphones to the Sound BlasterAxx for audio output. Connecting headphones to the Sound BlasterAxx automatically mutes the speaker. From the software, you can check whether audio is played via speakers or headphones. 1. View the current settings for the speakers / headphones. 2. Click [Test] to hear a sample audio clip played back based on the settings.
Understanding Other Advanced Features The software also provides other advanced features including: l Equalizer Settings l Bluetooth Auto Connect Equalizer Settings Equalizers allows you to filter various audio frequency, thus controlling the tone of your audio output. The Sound BlasterAxx Control Panel comes equipped with a range of preset equalizer settings, helping you to select different audio tones easily. You can also manually modify or add equalizer presets.
Bluetooth Auto Connect The Bluetooth Auto Connect feature allows a paired Bluetooth device to be connected to the Sound BlasterAxx automatically. When the feature is enabled, the Sound BlasterAxx detects and reconnects to the previously paired Bluetooth device when it is turned on. To enable Bluetooth Auto Connect, select the Bluetooth Auto Connect checkbox.
Using the Bluetooth and NFC Features You can stream music from your Bluetooth enabled devices to your SBX 200. Enjoy audio from your Bluetooth enabled devices Enjoy your favorite music from your Bluetooth devices; simply follow these steps to connect them. Action LED Status Status Press the Power button once to turn on the Sound BlasterAxx SBX 200. SBX 200 top panel and battery indicator are lit. SBX 200 is powered ON. Press and hold Power / Bluetooth Connect button for 2 seconds.
Easy one-touch pairing with NFC You may now pair your NFC-enabled devices with the SBX 200 with a single tap using the NFC technology; simply follow these steps to connect them. Action LED Status Status Press the Power button once to turn on the Sound BlasterAxx SBX 200. SBX 200 top panel and battery indicator are lit. SBX 200 is powered ON. Turn ON the NFC feature on your device. Touch the NFC area of your device with the NFC area of the SBX 200.
General Specifications Capacitive Touchscreen User Interface l Master Volume Slider with LED Backlit l Voice Focus On / Off button with LED Backlit l Noise Reduction On / Off button with LED Backlit l SBX Pro Studio Master On / Off button with LED Backlit l Speaker Mute button with LED Backlit l Mic Mute with button LED Backlit l “Call” button with LED Backlit Controls and Indicators l 3 white LEDs for power / battery indication l Blue LED for Bluetooth indication l Power / Bluetooth Conn
Bluetooth Profiles: l A2DP (Wireless Stereo Bluetooth) l AVRCP (Bluetooth Remote Control) l HFP (Hands-Free Profile) Audio Codec: AAC, SBC, aptX Bluetooth Operating Frequency: 2402 - 2480 MHz Bluetooth Operating Range: Up to 10 meters / 33 feet (Measured in open space. Walls and structures may affect range of device.) Operating Temperature range: 0°C to 45°C Lithium Ion Battery: 3.7 V 5200 mAh (19.24 Wh) USB Power Adapter Input: 100-240 VAC 50/60 Hz, Output 5 VDC 2.
Troubleshooting and Support This chapter provides solutions to issues that may be encountered during the installation or usage of your Sound BlasterAxx. 1. The Sound BlasterAxx SBX 200 does not power on. The Sound BlasterAxx is designed to be powered on by connecting to a PC / laptop via USB or through a physical power socket using a USB Power Adapter. It can also be powered on simply by the built-in battery. Make sure the built-in battery for SBX 200 is charged.
Audio transmitted from your Sound BlasterAxx may be slightly delayed; this is due to the characteristics of Bluetooth technology. 5. No sound from headphones. Please check the following: l l Headphones are securely connected to the headphone jack. Headphones it recognized as the output device in the Speakers / Headphones interface on the Control Panel. 6. There is no audio output from the SBX 200. Please check the following: l l Headphones are not connected to the Sound BlasterAxx.
Then, check that the correct microphone is selected as the system sound input device. For Windows systems, i. Navigate to Control Panel > Sound > Recording tab. ii. In Recording tab, ensure that the correct microphone is selected. For example, if you are using the built-in microphone, the Internal Microphone Array should be selected. If you are using an external microphone, the Microphone should be selected instead. For Mac systems, i. Go to System Preferences and click Sound. ii.
Regulatory Information The following sections contains notices for various countries. Caution: This product is intended for use with FCC/CE certified computer equipment. Please check the equipment operating/installation manual and/or the equipment manufacturer to verify/confirm if your equipment is suitable prior to the installation or use of the product.
1. This device may not cause harmful interference, and 2. this device must accept any interference received, including interference that may cause undesirable operation. Cet appareil est conforme avec Industrie Canada RSS standard exempts de licence. Son fonctionnement est soumis aux deux conditions suivantes : 1. Le matériel ne peut étre source D’interférences et 2. Doit accepter toutes les interférences reques, Y compris celles pouvant provoquer un fonctionnement indésirable.
Vietnam RoHS Statement This product is in compliance with Circular 30/2011/TTBCT of the Ministry of Trade of the Socialist Republic of Vietnam (“Circular”), it does not contain the following substances in concentration greater than the Maximum Limit value as specified in the Circular.
o It is recommended to remove the rechargeable batteries when they are fully discharged. o Precaution needs to be taken on metal parts of the battery by covering them with isolation materials such as scotch tape. o Refer to the homepage of JBRC for information on recycling and recovery of rechargeable batteries and supporting shops. (http://www.jbrc.
Safety Information Refer to the following information to use your product safely, and to reduce the chance of electric shock, short-circuiting, damage, fire, hearing impairment or other hazards. Improper handling may void the warranty for your product. For more information, read the warranty available with your product. l Do not dismantle or attempt to repair your product. Refer all servicing to authorized repair agents.
Avoiding Hearing Damage Permanent hearing loss may occur if the headphone is used at high volume. Set the volume to a safe level. You can adapt over time to a higher volume of sound that may sound normal but can be damaging to your hearing. If you experience ringing in your ears or muffled speech, stop listening and have your hearing checked. The louder the volume, the less time is required before your hearing could be affected.
License and Copyright Information in this document is subject to change without notice and does not represent a commitment on the part of Creative Technology Ltd. No part of this manual may be reproduced or transmitted in any form or by any means, electronic or mechanical, including photocopying and recording, for any purpose without the written permission of Creative Technology Ltd. Copyright © 2013 Creative Technology Ltd. All rights reserved.