SB1510 User’s Guide
Introduction Congratulations on your purchase of Creative's latest audio revolution, Sound Blaster ZxR! The Sound Blaster ZxR is the flagship of the ultra high-performance Z-Series of Sound Blaster® PCI-Express sound cards. Designed to deliver the ultimate audio playback and creation solution for the PC, Sound Blaster ZxR personifies the ultimate gaming and entertainment performance for a sound card.
More Help For the latest news and products for Sound Blaster, visit www.soundblaster.com. The site also includes information on making purchases, technical help, and the latest driver updates. Using Creative Software AutoUpdate Locating, downloading, and installing updates for your Creative products is now simpler and faster with the web-based Creative Software AutoUpdate system.
About Your Hardware For instructions on installing your Sound Blaster ZxR, consult the Quick Start leaflet. To learn more about your product, consult the following sections: l Your Sound Blaster ZxR Audio cards l Audio Control Module Notes Actual products may differ slightly from those shown in this chapter. Your Sound Blaster ZxR Audio cards Your Sound Blaster ZxR audio cards have the jacks and connectors below to enable the attachment of a wide variety of devices.
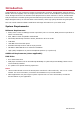
DBpro Daughter Board DBpro offers optical output for amazing audio playback; and professional grade 123dB analog-to-digital converters (ADCs) with RCA Aux-in and optical input for studio-grade recording quality. 5 1 2 3 4 Jack or Connector Description 1. RCA Aux-In 1 jack (L) Connects to the Left output line-level sources (for example, MP3 players) with an RCA plug. 2. RCA Aux-In 2 jack (R) Connects to the Right output line-level sources (for example, MP3 players) with an RCA plug. 3.
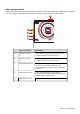
Audio Control Module An external ACM (Audio Control Module) provides a built-in beamforming microphone and microphone/headphone I/O connections. 1 2 3 5 4 6 Jack, Connector or Component Description 1. Volume Control Knob Controls the playback volume of the sound cards. 2. Beamforming Microphone Built-in Sound Blaster Beamforming Microphone 3. 6.3mm Microphone In jack Connects to microphones with a 6.3mm plug. 4. 6.3mm Headphone jack Connects to stereo headphones or headsets with a 6.
Note: The ACM Volume Control Knob allows you to adjust headphone levels conveniently based on the maximum level set by your computer's master volume control. We recommend that you determine the desired maximum volume on your computer before using the ACM.
Connecting Speakers and Headphones The connectors and associated components shown here may be different from that of your speaker system. Consult the documentation of your speaker system to identify similar input connectors. You can upmix your stereo sources (for example, CD Audio, MP3, WMA, MIDI and Wave) to enjoy multi-channel sound on your speakers or headphones.
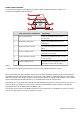
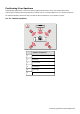
Positioning Your Speakers Good speaker placement is crucial to getting optimal performance from your audio system and achieving an enhanced listening experience. Below are our recommendation for 5.1 channel speakers. For detailed speaker placement tips, consult the documentation of your speaker system. For 5.1 channel speakers: 1 3 2 4 6 5 Speaker Component 1. Subwoofer 2. Front left 3. Front Center 4. Front Right 5. Rear Right 6.
Connecting Analog Speaker Systems Your audio cards support analog speaker systems of up to 5.1 channels. To learn more about connecting different channel speaker systems, consult the following sections: l 2.1 channel analog speakers l 5.1 channel analog speakers 2.1 channel analog speakers 3 4 1 2 5 audio inputs speakers audio inputs Jack, Connector or Cable 1. RCA Line Out 1 jack (Front L) 2. RCA Line Out 2 jack (Front R) 3. Y-Splitter cable (available separately) 4.
5.1 channel analog speakers 5 6 1 7 2 8 3 4 10 9 11 audio inputs front rear center/ subwoofer front speakers audio inputs center speaker front rear center/ subwoofer rear speakers Jack, Connector or Cable 1. RCA Line Out 1 jack (Front L) 2. RCA Line Out 2 jack (Front R) 3. 3.5mm Line Out 1 jack (Rear L/R) 4. 3.5mm Line Out 2 jack (Center/Subwoofer) 5. Y-Splitter cable (available separately) 6. 2 channel audio cable (available separately) 7.
Connecting Digital Speaker Systems Your Sound Blaster ZxR comes with an Optical S/PDIF Out jack which allows you to connect your digital speaker system. Most digital speakers systems connect the audio cards to the subwoofer or an external unit. For more information on your digital speaker connections, consult the documentation of your digital speaker system.
Connecting Home Theater Systems Your Sound Blaster ZxR comes with an Optical S/PDIF jack which allows you to connect your home theatre system. Most home theater systems connect the audio cards to an A/V receiver. For more information on your A/V receiver's speaker connections, consult the documentation of your A/V receiver.
Connecting your A/V Receiver using Line Level inputs If your A/V receiver supports multi-channel line-level inputs, you can connect them directly to your audio cards' Line Out jacks instead of the Optical S/PDIF Out jack as shown below. Connect to RCA Line Out 1 and Line Out 2 (Front L/R) 3 4 1 5 2 6 Jack, Connector or Cable Description 1. RCA Line Out 1 jack (Front L) Connects to the Front Left jack on your A/V receiver, using a 3.5mm (1/8-inch) stereoto-RCA cable. 2.
Connect to 3.5mm Line Out 1 (Rear L/R) 2 3 1 4 Jack, Connector or Cable Description 1. 3.5mm Line Out 1 jack (Rear L/R) Connects to the Rear Left and Rear Right jacks on your A/V receiver, using a 3.5mm (1/8-inch) stereo-to-RCA cable. 2. 3.5mm (1/8-inch) Stereo-toRCA cable Connects your audio cards and A/V receiver. 3. Rear Right jack Connects to the Line Out 2 jack on your audio cards, using a 3.5mm (1/8-inch) stereo-to-RCA cable. 4.
Connect to 3.5mm Line Out 2 (Center/Subwoofer) 2 3 1 4 Jack, Connector or Cable Description 1. 3.5mm Line Out 2 jack (Center/Subwoofer) Connects to the Center and Subwoofer jacks on your A/V receiver, using a 3.5mm (1/8-inch) stereo-to-RCA cable. 2. 3.5mm (1/8-inch) Stereo-toRCA cable Connects your audio cards and A/V receiver. 3. Subwoofer jack Connects to the Line Out 3 jack on your audio cards, using a 3.5mm (1/8-inch) stereo-to-RCA cable. 4.
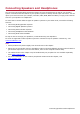
Connecting Headphones and Headsets Do not listen to audio on your headphones or headsets at high volumes for prolonged periods of time as hearing loss may result. Connecting your headphones and headsets to the Sound Blaster ZxR For headphones: 2 3 1 Jack, Connector or Cable Description 1. 6.3mm Headphone jack Connects to stereo headphones with a 3.5mm (1/8-inch) plug via an adapter. 2. 6.3mm to 3.5mm Adapter Converts 6.3mm (1/4-inch) stereo jack to 3.5mm (1/8-inch) stereo jack. 3. 3.
For headsets: 3 4 1 2 5 Jack, Connector or Cable Description 1. 6.3mm Microphone In jack Connects to the 3.5mm (1/8-inch) microphone plug of your headset via an adapter. 2. 6.3mm Headphone jack Connects to stereo headphones with a 3.5mm (1/8-inch) plug via an adapter. 3. 6.3mm to 3.5mm Adapter Converts 6.3mm (1/4-inch) stereo jack to 3.5mm (1/8-inch) stereo jack. 4. 3.5mm Microphone In Plug Connects to the 6.3mm Microphone In jack on your audio card via an adapter. 5. 3.
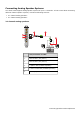
Connecting Audio Control Module The Sound Blaster ZxR comes with an external ACM that incorporates a 600 ohm headphone amplifier, built-in microphone array and mic/headphone I/O connections and a volume control knob. Connecting your ACM to the Sound Blaster ZxR 3 1 2 Jack, Connector or Cable Description 1. 6.3mm Microphone In jack Connects to the 3.5mm (1/8-inch) microphone plug of your ACM. 2. 6.3mm Headphone jack Connects to your ACM with a 3.5mm (1/8-inch) plug. 3. 6.3mm to 3.
Connecting your headphones and headsets to the ACM 2 OR 1 Jack, Connector or Cable Description 1. 3.5mm Headphone jack Connects to stereo headphones or headsets with a 3.5mm (1/8-inch) plug. 2. 3.5mm Microphone In jack Connects to microphones with a 3.5mm (1/8-inch) plug. Note: When two headphones are being connected to the 6.3mm and 3.5mm Headphone jacks simultaneously, you will be able to hear both headphones with the same output.
Installing and Uninstalling Software To take full advantage of your Sound Blaster ZxR audio cards, you need to install device drivers and applications. At times, you may also need to uninstall some or all of the device drivers and applications to correct problems, change configurations, or upgrade outdated drivers or applications.
To remove DTS Connect: Note Carry out the following steps ONLY IF there are no other Creative applications on your system that requires the DTS Connect encoder. For Windows 7: 1. Return to the Start > Control Panel > Uninstall a Program window. 2. Select the DTS Connect Pack entry. 3. Click the Uninstall button or option. When the Confirm Uninstall dialog box appears, click the OK button. For Windows 8: 1. At the right toolbar, click Settings > Control Panel > Uninstall a Program. 2.
Installing Drivers and Applications Ensure that your audio cards are installed before proceeding. For instructions on installing your audio cards, consult your Quick Start leaflet. After you have installed your audio cards, turn on your computer. Windows automatically detects your audio cards and searches for device drivers. For Windows 7: 1. Insert the Installation CD into your CD or DVD drive. Your CD should start automatically. If it does not, follow the steps below: i. Click Start > Computer. ii.
Using Your Sound Blaster ZxR Sound Blaster ZxR delivers the ultimate audio playback solution for the PC. Studio-grade components, which include external digital-to-analog converters (DACs) that deliver 127dB signal-to-noise ratio (SNR), sockets for swappable OP-Amps, a high-end 80mW into 600 ohm headphone amplifier and 197kHz pass through, deliver phenomenal audio quality. Your Sound Blaster ZxR works seamlessly with many external devices to perform different tasks.
Dolby Digital Live Dolby Digital Live is a real-time encoding technology from Dolby Laboratories that converts any audio signal into a Dolby Digital bitstream for transport and playback through your home theatre or digital speaker system. Transform your gameplay into an exciting and realistic experience using Dolby Digital Live. Audio cues and effects that follow the onscreen action are reproduced, immersing you in 5.1 channel surround sound that puts you at the center of the action.
Playing / Recording Music Add studio quality audio sound tracks or voice tracks to your video clips or home videos with studiograde components which include 123dB analog-to-digital converters (ADCs) with RCA Aux-in and optical input for outstanding recording quality. Connecting your external device to the Sound Blaster ZxR You can play music from, and/or record music to external devices (for example, Digital Audio Tape player/recorder) by connecting them to your Sound Blaster ZxR.
Creating Music You can set up a home music studio using your Sound Blaster ZxR. Put together your own productions consisting of multiple music tracks from a MIDI synthesizer or an electric guitar. Alternatively, connect your electric guitar using a pre-amp box to the RCA Aux-In jacks. Use a converter if your pre-amp box comes with a larger (for example, a 6.35mm (1/4-inch)) connector. You can also connect a microphone to your Sound Blaster ZxR. 2 3 1 4 5 Jack, Connector or Cable Description 1. 6.
Online Chatting Your Sound Blaster ZxR can also be connected to hands-free microphones or the Sound Blaster Beamforming Microphone, making over-the-Net chatting a hassle-free affair. Now you can enjoy clear voice chat for gaming and other online chatting purposes. 2 3 1 Jack, Connector or Cable Description 1. 6.3mm Microphone In jack Connects to microphones or the Sound Blaster Beamforming Microphone with a 3.5mm (1/8-inch) plug. 2. 6.3mm to 3.5mm Adapter Converts 6.
Using the Creative Software Suite The following software is designed for you to access the basic as well as the advanced features of your audio cards. We recommended that you familiarize yourself with their functions in order to make full use of the rich features of your audio cards. To learn more about each application, consult its Online Help. Depending on the application, you can do this by clicking on the toolbar of the application, or selecting Help Topics from the Help menu.
Sound Blaster Z-Series Control Panel Managing Your Profiles Click the button to display the Profiles pane. Activate a profile by clicking the Click and selecting it from the list. to save all settings to the current profile or create a new profile. Click to delete the active profile. Sharing Profiles You can export your custom settings and share them with others, or import other gamers' custom settings. Customizing Your Avatar You can customize the avatar for each profile.
Adjusting Your Master Volume Settings Drag the master volume slider to adjust the volume level. You can mute/unmute the volume by clicking the speaker icon. Configuring Your Software Settings Click each feature to access its settings page. More information on each feature can be found in their respective sections in this manual. Configuring Your General Settings You can change the language settings or restore settings to their default values. You can also check for software updates.
SBX Pro Studio Settings 1. SBX Pro Studio enhancements Select to turn on or turn off each enhancement. You can hover your mouse cursor over each enhancement to display a brief explanation. 2. Enhancement Level sliders Adjust the amount of enhancement to apply. 3. Audio Test controls Play/Pause or Stop the demo video. Enhancing Your Listening Experience You can adjust the amount to apply for each enhancement by dragging its slider left to decrease or right to increase.
CrystalVoice Settings 1. First select the recording device. 2. Next, turn on CrystalVoice and select to turn on or turn off each of the available enhancements. Having Fun with CrystalVoice After configuration, click and speak into your microphone to hear how your voice sounds with CrystalVoice applied. Readjust as desired.
Scout Mode Scout mode transforms your hearing and enables you to hear your opponents from further away, giving you a distinct tactical advantage in combat. 1. Scout mode Select to turn on or off Scout mode. Click to configure hotkeys for turning on and turning off Scout mode.
Speakers/Headphones Settings 1. Switch between Speakers or Headphones mode. 2. Speakers / Headphones Configuration Select your current physical speakers or headphones configuration. 3. For headphones, select the gain for headphone out: l Normal Gain (32/300 ohm headphones) l High Gain (600 ohm headphones) Note: Setting to high gain may damage your headphones if their impedance does not match the specified level of 600 ohms. 4. Option to set to high gain by default.
Testing Your Audio Playback Select the appropriate configuration based on your setup, then click clip being played back through your setup. to hear a sample audio Note: Stereo Direct is an option for direct playback to stereo speaker channel sampled at 192kHz.
Cinematic Settings 1. Encoder settings Select No Encoder if you wish to turn off encoding or select Dolby Digital Live or DTS Connect to turn on the respective encoders.
Mixer Settings 1. Volume sliders Adjust the playback and recording volume for your various inputs and outputs. Adjusting Your Mixer Settings Slide the volume level sliders right to increase and left to decrease. Click the the input/output. You can click the icon to mute/unmute icon to adjust the settings for your input/output.
Equalizer Settings 1. EQ presets Select an equalizer preset to apply to your audio. 2. EQ sliders Adjust the equalizer settings. Customizing Your EQ Settings Select the EQ checkbox to enable this feature, then click the EQ drop-down arrow and select a preset from the list. Selecting a preset will move the EQ sliders to the appropriate values. You can then adjust the equalizer setting by dragging the sliders up or down to the desired level. Click configuration as a new preset.
Advanced Features Settings 1. Play stereo mix to digital output Select the checkbox to down mix the audio with its effects to a stereo PCM stream to be channeled to digital output. Note You must first select Speaker as the playback device to use this feature.
Using Your Audio Device Playing Games Your audio device is equipped with cutting edge audio technologies and software to enhance the audio in your games. SBX Pro Studio will elevate your gaming experience to the next level, allowing you to hear sound details in games you have never heard before! For details on the various SBX Pro Studio enhancements and its configuration, please refer to SBX Pro Studio Settings.
Communicating with Voice over Internet Protocol (VoIP) Use a headset with your audio device to enjoy outstanding acoustic performance in popular VoIP applications like Ventrilo® and TeamSpeak®. Hear and be heard clearly by teammates during multiplayer games to get the tactical edge. You can enhance such voice communications using CrystalVoice enhancements. For more details, please refer to CrystalVoice Settings.
Creating Your Audio 'Sweet Spot' with the Sound Blaster Speaker Setup Generally, for a 5.1 speaker configuration, there is an ideal speaker placement that allows you to position yourself in the audio sweet spot, giving you the best surround and audio pleasure possible. Please refer to Positioning Your Speakers or your speaker system documentation for details on the recommended placement.
Polarity Selection If you have an audio/video (A/V) receiver, your speakers must be wired appropriately (in-phased) in order to reproduce sound fields correctly. The Polarity Selection tab helps you correctly connect all negative and positive output terminals on the A/V receiver to the inputs on the speakers. Click the Start button and follow the on screen procedure to check your the speaker wiring.
Speaker Level This set of configurations enables you to achieve a balanced level for each speaker. Speaker level is affected mainly by the distance between the speaker and the listener. Click the Level Test button and adjust the speaker level for each speaker accordingly.
General Specifications This section details the specifications of your Sound Blaster ZxR audio cards. PCI Bus Mastering l PCI Express Specification Version 1.
Troubleshooting This section provides solutions to problems you may encounter during installation or normal use. This includes: l Problems with Digital Audio Devices l Problems with Dolby Digital Live or DTS Connect l Problems with Multiple Audio Devices l Problems with Sound If you have any other technical problems with this product, you can also consult our self-help tool "Knowledge Base" for online troubleshooting and solutions. Visit www.soundblaster.com and select your region.
Note If Dolby Digital Live or DTS Connect is enabled, only PCM audio and certain compressed audio (for example, MP3) can be played, which will be encoded by Dolby Digital Live or DTS Connect through your selected output device. Problems with Multiple Audio Devices If there are other audio cards on the system. You may have an existing audio device installed in your computer. The audio device may be an audio card or an onboard audio chipset.
Safety Information Refer to the following information to use your product safely, and to reduce the chance of electric shock, short-circuiting, damage, fire, hearing impairment or other hazards. Improper handling may void the warranty for your product. For more information, read the warranty available with your product. l Do not dismantle or attempt to repair your product. Refer all servicing to authorized repair agents.
License and Copyright Information in this document is subject to change without notice and does not represent a commitment on the part of Creative Technology Ltd. No part of this manual may be reproduced or transmitted in any form or by any means, electronic or mechanical, including photocopying and recording, for any purpose without written permission of Creative Technology Ltd. Copyright © 2012 Creative Technology Ltd. All rights reserved.