
Instructions

S
T
R
Q
U
O
O
Bead
Cut this
side of
the line
Use the corner from
the 9" moulding to
return 14" moulding
to the skirtboard
P
Open
Side of
Stair
Closed
Side of
Stair
Subriser
Subtread
N
P
V
U
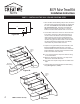
PART 4 -- INSTALLING THE FALSE TREADS ON THE OPEN SIDE OF THE STAIR
1. Place the false treads on the open side of the stair and mark the length needed from
the face of one false riser to the face of the next false riser. NOTE: Always place the
false tread on the stair with the non-grooved edge towards the middle of the
stair. Also note that the tread has a Bottom side as indicated with a stamp. Cut
andtthefalsetreadstolengthfortheopensideofthestairN. (See Figure 4d.)
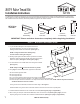
2. Cut the miter from the end of the 9" piece of moulding that will be towards the
middle of the stair O. (See Figure 4a & 4d.) Take care when cutting this miter off,
to make a cut that will leave a corner without the bead O. (See Figure 4a.) This
corner will be used to return the side moulding to the skirtboard at the back of the
tread P & V. (See Figure 4a & 4d.)
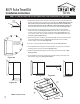
3.Finishtrimmingthe9"mouldingtotthefalsetreadQ. Fit and install the moulding
to the false treads R using glue. (See Figure 4c.) Be sure that the moulding
remains square to the tread. (See Figure 4c.)
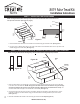
4.Trimthe14"sidemouldingtotthefalsetreadlengthS. (See Figure 4b.)
5. Fit and install the side moulding to the false treads T using glue. Be sure that the
mouldings remain square to the tread. (See Figure 4c.)
6.InstalltheassembledfalsetreadstothestairusingglueandnishnailsU. (See
Figure 4c & 4d.)
7. Fit and install the miter return moulding P to the side moulding at the rear of the
false treads V using glue. (See Figure 4a & 4d.)
Figure 4a
Figure 4b
Figure 4c
Figure 4d
S
T
R
Q
U
O
O
Bead
Cut this
side of
the line
Use the corner from
the 9" moulding to
return 14" moulding
to the skirtboard
P
8079 False Tread Kit
Installation Instructions
NOTE: For interior use only
3