
Installation Guide

ARTIFICIAL HEDGE PANEL WITH LIGHTS INSTALLATION GUIDE
PLEASE KEEP FOR FUTURE REFERENCE
TOOLS AND MATERIALS REQUIRED (NOT INCLUDED)
For wire mesh, chain link and iron fences:
• Green zip ties
• Scissors
For concrete and brick walls:
• 3/16 in x 1 ¾ in (0.47 cm x 4.45 cm) in washer head concrete screws and drill
• Scissors
For drywall and wood walls:
• 1/2 in x 1/2 in (1.27 cm x 1.27 cm) crown 20-gauge staples and stapler
• Scissors
For aluminium and metal walls:
• 3/4 in (1.90 cm) truss head self-tapping screws and drill
• Scissors
PREPARATION:
• Measure the installation area prior to beginning the installation.
• Plan the placement of each hedge panel.
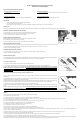
• Hedge panels can be cut using scissors, or by simply detaching the hedge panels where they connect. See the image below.
INSTALLATION:
Always begin the installation at the top of the installation surface and work horizontally until a row is completed. Ensure the hedge is properly secured as you progress.
WIRE MESH, CHAIN LINK, AND IRON FENCE INSTALLATIONS
1. Hold the hedge panel in place. Use the zip ties to fasten the hedge directly to the fence.
2. Place one zip tie in each corner of a panel or approximately every 6 in (15.24 cm).
3. Continue placing zip ties to the fence and secure as needed.
DRYWALL AND WOOD WALL INSTALLATIONS
1. Staple the plastic mesh in the back of the panel to the wall to hold it securely in place.
2. Staple the hedge approximately every 6 in (15.24 cm).
3. Continue to staple the hedge to the drywall or wood wall and secure as needed.
CONCRETE AND BRICK WALL INSTALLATIONS
1. Hold the hedge panel in place. Drill one hole in the top left and top right corner of each panel, placing a screw at least once every 6 in (15.24 cm).
2. Secure the artificial hedge to the surface by screwing a washer head anchor in each hole on the corner of each panel.
3. Continue and secure the hedge as needed.
ALUMINUM AND METAL WALL INSTALLATIONS
1. Hold the hedge panel in place and secure a 3/4 in (1.90 cm ) truss head self-tapping screw every 6 in (15.24 cm).
2. Continue and secure the hedge as needed.
INSTALLATION FOR LED LIGHTS
J.Sonic Artificial Hedge Panel comes with 100 warm white LED lights. The lights are ETL-certified and IP44-rated and suitable for indoor and outdoor
use. Each LED light comes with an adapter with a multi-mode switch, and 2 connectors (prong and receptacle).
Instructions for Individual Panels
1. Insert the prong into the adapter and screw the cap on at the back of the prong.
2. Test and inspect the lights before installing the hedge panel. Follow the instructions listed above to install the hedge panel.
3. Plug the adapter into the outlet and turn on the switch. If you install the hedge panels outdoors, please make sure to use a covered Class A
Ground Fault Circuit Interrupting (GFCI) outlet that has a weatherproof enclosure with the adapter inserted or removed. If one is not provided,
contact a qualified electrician for proper installation. Do not use with outlets that are weatherproof only when the adapter is not plugged in or
the outlet cover is closed.
Instructions for Connecting Sets End to End (for connecting multiple products)
1. Prior to installing the hedge panels, please make sure to always unplug the adapter(s) from the power source before assembling or
disassembling.
2. Lay the hedge panels on the floor and make sure the prongs are all facing one way and the receptacles the other way. Connect them by simply
plugging the prongs into the receptacles and screwing the cap tight.
3. Connect a maximum of 10 hedge mats together; do not exceed 10 interconnected hedge panels with lights. If more hedge mat connections are
needed, please use another outlet as a power source. Please note the brightness may dim slightly with more interconnected panels.
4. Insert the first mat’s prong into the adapter and screw the cap on at the back of the prong.
5. Test and inspect the lights before installing the hedge panels. After the lights are tested, follow the instructions listed above to install the hedge
panels.
6. Plug the adapter into the outlet and turn on the switch. If you install the hedge panels outdoors, please make sure to use a covered Class A
Ground Fault Circuit Interrupting (GFCI) outlet that has a weatherproof enclosure with the adapter inserted or removed. If one is not provided,
contact a qualified electrician for proper installation. Do not use with outlets that are weatherproof only when the adapter is not plugged in or the outlet cover is closed.
CAUTION
1. Always unplug the adapter(s) from the power source before assembling or disassembling.
2. This product is for use on 120 V outlets.
3. Unplug the product when leaving the house, or when retiring for the night or if left unattended.
4. This is an electrical product. To avoid the risk of fire, burns, electrical shock or personal injury, it should not be played with or placed where small children can reach it.
5. Do not use the product for purposes other than its intended use.
6. Do not mount the hedge panels near gas or electric heaters, fireplace, candles or any sources of fire or heat.
7. The lights are IP44-rated and should be installed and used following IP44 guidelines.
8. Do not hang any ornaments or objects from the cord, wire or light string.
9. Do not apply any sort of tape to any of the connections.
10. Keep the lights, cords, and connections off of the floor so they do not touch the ground.
11. Do not secure the wiring of the product with staples or nails or place the product on sharp hooks or nails.
12. Before using or reusing the hedge panels, inspect the product carefully and discard any products that have cut, damaged or frayed wire insulation or cords, cracks in the lamp holders and or
enclosures, loose connections or exposed wires.
13. When storing the product, carefully remove the product from its location to avoid any undue strain and stress on the product conductors, connections, and wires.
14. When not in use, store neatly in a cool, dry location protected from sunlight.
15. The artificial hedge panels must be installed according to the instructions provided by the manufacturer for guaranteed performance and appearance.
16. Flashing lights may cause seizures in individuals with photosensitive epilepsy; avoid direct exposure to eyes.
17. The panel’s detachable leaves can be a choking hazard for children aged 3 and under. Use caution around children of this age group as this product contains small parts. Please avoid placing it in
areas where the product can be reached by children aged 3 and under, as well as areas designed for children of this age group; this panel is not a toy.