Sound Blaster Wireless Headphones User’s Guide
Congratulations! Your Sound Blaster® Wireless Headphones works with Sound Blaster Wireless transmitters like Sound Blaster X-Fi™ Notebook and Sound Blaster Wireless for iTunes®. Together, your transmitter and headphones enable you to enjoy your favorite music, wherever you are in your home, wirelessly. For a list of supported devices, visit www.soundblaster.com.
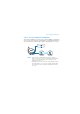
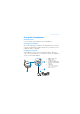
Getting Started 2 Getting Started Step 1: Charge your headphones For first use, charge the headphones for at least 12 hours. Turn off the headphones while charging. The Power LED lights up red when charging, and turns off when fully charged. OFF ON 3 2 4 12 hrs 1 1 2 3 4 USB connector DC-to-USB cable Power adapter Power outlet IMPORTANT Use only the charger supplied with your headphones.
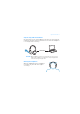
Turn on headphones and Auto pair 3 Step 3: Turn on headphones and Auto pair Turn on your headphones. If you have two or more headphones, simply turn on all of them. Your transmitter and headphones should pair automatically. The Link LED flashes and then lights up green when pairing is successful. OFF ON US B NOTE • If your transmitter and heaphones do not pair, simply reset them. On one unit at a time, press and hold the Connect button for five seconds.
Play and stream music 4 Step 4: Play and stream music Once paired, you can use your headphones up to 30 meters away from your transmitter. Play music from your transmitter to check that the headphones is receiving the music wirelessly. <30 metres CAUTION Adjust headphones volume to a comfortable level. Do not listen to audio on your headphones at high volumes for prolonged periods of time as hearing loss might result.
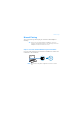
About Broadcasting and Zone Control 5 About Broadcasting and Zone Control Control your headphones remotely from your transmitter, using the Broadcast and Zone Control buttons found on your transmitter’s software. For more information on using these features, refer to your transmitter’s documentation. Broadcasting R R R T R T Transmitter R Receiver Use Broadcast mode to stream music to all your receivers* simultaneously.
Manual Pairing 6 Manual Pairing This section shows you how to pair your transmitter and headphones manually. TIP For more effective pairing, bring the headphones close to the transmitter when pairing the devices. Once paired, you can use the headphones at another location in the house. Step 1: Press the Connect button on your transmitter Press the Connect button on your transmitter’s hardware or software. The transmitter’s Link LED flashes.
Press the Connect button on your first headphones 7 Step 2: Press the Connect button on your first headphones This must be done within three minutes after pressing the Connect button on the transmitter (Step 1). Once the transmitter and headphones are paired successfully, the Link LED on both units light up green and remain on. The first receiver to be paired will be assigned to Zone 1. US B NOTE If your transmitter and heaphones do not pair, simply reset them.
Using Your Headphones 8 Using Your Headphones Adjusting volume Press the Volume Up or Down buttons on your headphones. Charging your headphones After initial charging, your headphones take approximately three (3) hours to be fully charged using the supplied charger. You can continue to use the headphones while it is charging. Using Wireless Off mode Your headphones can be used as normal wired heaphones.
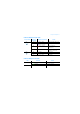
Using Your Headphones 9 Understanding the Power LED Power switch ON OFF Charger connected LED color & behavior No / Yes ON ● Blue - Flashing (beep every min) No OFF OFF ON Blue - Stable ❊ ❊ Red - Flashing No Status Turned on and ready for use Battery low On standby mode (turned off remotely by transmitter) No ❍ Not lit Battery flat / Audio Line In detected No ❍ Not lit Turned off Yes ❍ Not lit Fully charged Yes ● Red - Stable Charging Understanding the Link LED LED Green Not l
Removing the battery before disposal 10 Removing the battery before disposal You can protect the environment by removing and recyling the battery before disposing the headphones. Removing the rechargeable battery will damage the headphones permanently. Make sure the headphones is disconnected from the power adapter before you do the following: 1 Pull off the right ear cushion to remove it. 2 Use a small screwdriver to remove the four screws that hold the speaker plate in place.
Troubleshooting 11 Troubleshooting There is no sound from my headphones. Check the following: • Make sure your transmitter is turned on and its wireless control is enabled. • Make sure the headphones is turned on and is sufficiently charged. • Make sure the Link/Connect LEDs are green, and your units are paired. The Link LEDs do not light up. This indicates that the headphones has lost its connection with the transmitter. Try the following: • Reset the wireless connection.
Troubleshooting 12 My headphones seems to be picking up extra noise, or there are intermittent pauses. The position of your headphones as well as the signals from other wireless routers or Bluetooth equipment may affect the quality of the transmission. Try the following: • In the Wireless Music Control section of your transmitter software, change the RF Channel from Auto to either Ch 1, 2 or 3. • Move your transmitter and headphones closer to each other.
General Specifications 13 General Specifications Connectivity • One 3.5 mm (1/8”) stereo jack for Analog Line In • One mini USB connector for charging Power Adapter • Supply Voltage: 5V +/- 5% • Current: 1 A • Power: 5 W Radio Frequency (RF) • Operating RF range: 2400 - 2483.5 MHz • Number of RF channels: 3 • RF transmitter power output: 16 dBm (typical) NOTE You cannot tune the RF channels.
Safety Information 14 Safety Information Refer to the following information to use your product safely, and to reduce the chance of electric shock, short-circuiting, damage, fire, hearing impairment or other hazards. Improper handling may void the warranty for your product. For more information, read the warranty available with your product. • Read these instructions. • Keep these instructions. • Heed all warnings. • Follow all instructions. • Do not use this apparatus near water.
Safety Information 15 • WARNING: To reduce the risk of fire or electric shock, do not expose your product to water or moisture. If your product is moisture-resistant, take care not to immerse your product in water or expose it to rain. Earphones • When a conductive apparatus, such as earphones, is used in close proximity with a CRT television or CRT monitor, the latter may emit an electrostatic discharge. The electrostatic discharge can be felt as a static shock.
Safety Information 16 WEEE DIRECTIVE 2002/96/EC The use of the WEEE Symbol indicates that this product may not be treated as household waste. By ensuring this product is disposed of correctly, you will help protect the environment. For more detailed information about the recycling of this product, please contact your local authority, your household waste disposal service provider or the shop where you purchased the product.
Declaration of Conformity 17 Declaration of Conformity According to the FCC96 208 and ET95-19 Manufacturer/Importer's Name: Manufacturer/Importer's Address: Creative Labs, Inc. 1901 McCarthy Boulevard Milpitas, CA. 95035 United States Tel: (408) 428-6600 declares under its sole responsibility that the product Trade Name: Creative Labs Model Numbers: SB1220 has been tested according to the FCC / CISPR22/97 requirement for Class B devices and found compliant with the following standards: EMI/EMC: ANSI C63.
Regulatory Information 18 Regulatory Information Notice for the USA 1 2 FCC Part 15: This equipment has been tested and found to comply with the limits for a Class B digital device, pursuant to Part 15 of the FCC Rules. These limits are designed to provide reasonable protection against harmful interference in a residential installation.
Regulatory Information 19 The antenna used for this transmitter must not be co-located in conjunction with any other antenna or transmitter. Federal Communication Commission (FCC) Radiation Exposure Statement This equipment complies with FCC radiation exposure limits set forth for an uncontrolled environment. This transmitter must not be co-located or operating in conjunction with any other antenna or transmitter.
Regulatory Information 20 Creative a choisi d'inclure une mise en garde s'appuyant sur sa connaissance de la présence d'un ou de plusieurs de ces produits chimiques sans essayer d'en évaluer le niveau d'exposition. Pour les produits de Creative, le niveau d'exposition peut être inférieur au niveau critique établi par la Proposition 65 ou même être nul. Néanmoins, par souci extrême de prudence, Creative a choisi de placer l'avertissement de la Proposition 65 sur ses produits.