Live! Drive IR Quick Start Contents Introduction SB0010 Introduction ................................................................................................................. 1 System Requirements .................................................................................................. 2 Your Live! Drive IR ..................................................................................................... 3 Installing Hardware ...........................................................
System Requirements 2 Live! Drive IR Quick Start SB0010 The minimum system requirements for Live! Drive IR are: ❑ An installed Sound Blaster Live! (with an AUD_EXT expansion header) ❑ An available 5¼" PC drive bay ❑ Genuine Intel® Pentium® class processor: 166 MHz for Windows 95/98 or Windows Millennium Edition, 200 MHz for Windows NT 4.0 or Windows 2000 ❑ Intel or 100% compatible motherboard chipset ❑ Windows 95, 98 or Millennium Edition, Windows NT 4.
Your Live! Drive IR The front panel of your Live! Drive IR has these jacks, connectors and controls: RCA Auxiliary In jacks Connects to consumer equipment such as VCR, TV and CD player, via RCA Auxiliary outputs. If a particular INPUT source (for example, Line In 2) is supported by the Live! Drive IR as well as the Digital I/O card, only the input on the Live! Drive IR will be enabled.
Switching Audio Input Sources You need to install the software first before you can switch audio input sources. On your Sound Blaster Live! and Live! Drive IR, two audio input sources may share a connection. In such cases, only one of the input source can be enabled and used at any one time. If your audio card has an I2S connector, you can use only either one of the following inputs at any one time: ❑ I2S ❑ Line In 2 or Line In 2/Mic In 2 To switch the audio input source: 1.
Connecting Headphones To listen to an analog source (e.g. CD Audio) using headphones, make sure that in Surround Mixer, the recording source selected is “What U Hear”. Otherwise, no sound will be heard from the headphones. Connecting Microphone The Jumper JP1 may not be available on certain models of Live! Drive IR. There are two types of headphones which you can connect to the Live! Drive IR: ❑ Home audio or professional audio headphones, which are usually fitted with a ¼" stereo plug.
Adjusting Headphones Volume and Microphone Gain If your headphones and microphone are attached to the Live! Drive IR, the headphones volume and microphone gain can be adjusted in two ways. Using the Live! Drive IR Control Knobs On the front panel of the Live! Drive IR, turn the respective control knob: ❑ Counter-clockwise to decrease the headphones volume or microphone gain. ❑ Clockwise to increase the headphones volume or microphone gain.
Installing Hardware To install your Live! Drive IR, you need to perform the following: ❑ Step 1: Prepare the System for Hardware Installation ❑ Step 2: Insert the Live! Drive IR into the System ❑ Step 3: Connect to the SB Live! Card ❑ Step 4: (Optional) Install the Digital DIN Metal Bracket (To connect to FPS2000, DTT2500 or DTT3500 digital speakers) ❑ Step 5: (Optional) Connect to the Digital I/O Card (Only if you have one) ❑ Step 6: Complete the Installation Step 1: Prepare the System for Hardware Insta
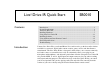
2. Connect the cables to the Live! Drive IR as shown in Figure 4. To system power supply unit Power splitter cable Live! Drive IR Digital DIN metal bracket Orange-colored wire Digital DIN cable J3 Connector for future upgrades JP1 J2 J1 Black circle on the underside of the cable Red-colored wire Red-colored wire Jumper for microphone type selection Light grey flat cable Dark grey flat cable (Optical) Digital I/O card Sound Blaster Live! card Figure 4: Connecting cables to the Live! Drive IR. 3.
Step 3: Connect to the SB Live! Card Do not force the audio card into the slot. If it does not fit properly, gently remove it and try again. Connect the dark grey flat cable to Sound Blaster Live!’s AUD_EXT header. If you have difficulty connecting to the AUD_EXT header: 1. Remove the Sound Blaster Live! card from its PCI slot. 2. Connect the dark grey flat cable to Sound Blaster Live!’s AUD_EXT header. 3. Align the Sound Blaster Live! card with the vacant PCI expansion slot.
Step 4: (Optional) Install the Digital DIN Metal Bracket (To connect to FPS2000, DTT2500 or DTT3500 digital speakers) Step 5: (Optional) Connect to the Digital I/O Card (Only if you have one) Step 6: Complete the Installation 10 Live! Drive IR Quick Start SB0010 1. Remove the metal plate from a vacant ISA or PCI expansion slot. 2. Align the Digital DIN metal bracket with the vacant expansion slot opening. 3. Secure the metal bracket to the system casing with a screw.
Using Your Live! Drive IR The Live! Drive IR will most undoubtedly give you endless hours of listening pleasure. The following information and diagrams on the next two pages show how you can connect to your Live! Drive IR to optimize your enjoyment. Playing Games and Music, and Watching Movies ❑ With FourPointSurround or DeskTop Theater 5.1 Digital Speaker System from Cambridge SoundWorks, you can experience crystal clear gaming sequences or music from the Digital DIN connection.
Playing Games and Music, and Watching Movies with 4.1 or 5.1 Digital Speaker Systems FourPointSurround or DeskTop Theater Digital Speakers Sound Blaster Live! card Digital DIN Digital DIN Metal bracket Recording and Content Authoring with Live! Drive IR SPDIF (RCA) In Out Watching DVD Movies with Creative SoftPC-DVD and DeskTop Theater 5.1 Digital Speaker System Digital device (e.g., DAT) MiniDisc AUX input from an analog source (e.g., CD player or tape deck) Live! Drive IR DeskTop Theater 5.
If you have an Optical Digital I/O card (or Digital I/O card) from an earlier purchase, you can connect it to your Live! Drive IR. The figure below shows an alternative method for audio recording and content authoring using the Optical Digital I/O card. When you cascade your existing Digital I/O card to the Live! Drive IR, please note the following: • On the Digital I/O card, only the SPDIF Outputs are available. The SPDIF Inputs and 2nd Line Input are available on the Live! Drive IR.
Installing Software 1. Insert the installation disc into your CD-ROM drive. The disc supports Windows AutoPlay mode and starts running automatically.If not, see “Troubleshooting” on page 17. 2. Follow the instructions on the screen to complete the installation.
Using the RemoteCenter Remote Control Creative RemoteCenter converts your PC into an entertainment system, which you can control remotely from the comfort of your bed or sofa. With the RemoteCenter remote control in your hand, you can command your PC from a distance to play audio CDs, video CDs, DVDs using the RemoteCenter Player, a simple but powerful multimedia player, which also plays most media file formats.
General Specifications Audio Inputs and Outputs On Front Panel ❑ Two RCA jacks for coaxial SPDIF input and output ❑ One Headphone output with auto detection via ¼" stereo jack with volume control ❑ One shared line-level analog Line/Microphone input via ¼" stereo jack.
Troubleshooting Problems Installing Software Problems with Sound The installation does not start automatically after the CD-ROM is inserted. Cause The AutoPlay feature in your Windows system may not be enabled. Solution To start the installation program through the My Computer shortcut menu: 1. Double-click the My Computer icon on your Windows desktop. 2. In the My Computer window, right-click the CD-ROM drive icon. 3. On the shortcut menu, click AutoPlay and follow the instructions on the screen.
❑ If the above conditions have been met and you still do not get any sound, click the red plus sign above the VOL control and check whether the Digital Output Only check box is selected. If it is, you are in the Digital Output Only mode and so must connect to digital speakers to hear the sound from your audio card. See the section on Digital Output Only in Surround Mixer’s online help for more information. ❑ If your headphones and/or the ¼" to 3.
Creative End-User Software License Agreement Version 2.4, Ju ne 2000 PLEASE READ THIS DOCUMENT CAREFULLY BEFORE INSTALLING THE SOFTWARE. BY INSTALLING AND USING THE SOFTWARE, YOU AGREE TO BE BOUND BY THE TERMS OF THIS AGREEMENT. IF YOU DO NOT AGREE TO THE TERMS OF THE AGREEMENT, DO NOT INSTALL OR USE THE SOFTWARE. PROMPTLY RETURN, WITHIN 15 DAYS, THE SOFTWARE, ALL RELATED DOCUMENTATION AND ACCOMPANYING ITEMS TO THE PLACE OF ACQUISITION FOR A FULL REFUND.
1. determine whether you require such information for a legitimate purpose and, if so, Creative will provide such information to you within a reasonable time and on reasonable conditions. In any event, you will notify Creative of any information derived from reverse engineering or such other activities, and the results thereof will constitute the confidential information of Creative that may be used only in connection with the Software. TERMINATION The license granted to you is effective until terminated.
to obtain such information, and you agree to request such information from Creative at the address listed earlier. Upon receiving such a request, Creative shall determine whether you require such information for a legitimate purpose and, if so, Creative will provide such information to you within a reasonable time and on reasonable conditions.
No part of this publication may be reproduced or transmitted in any form or by any means without the prior written consent of Creative Technology Ltd. Copyright © 2000 Creative Technology Ltd. All rights reserved. Version 1.10 October 2000 Sound Blaster and Blaster are registered trademarks, and the Sound Blaster Live! logo, the Sound Blaster PCI logo, EMU10K1, EAX, Creative Multi Speaker Surround and LAVA! are trademarks of Creative Technology Ltd. in the United States and/or other countries.