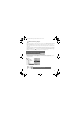
Pager S CLE QS.book Page 1 Friday, October 8, 2004 7:34 AM English Your Player At A Glance 1 6 2 3 5 4 1. Play/Pause button Press and hold to turn the player on and off. Press once to start playing tracks, and press again to pause playback. 2. Microphone A built-in microphone that lets you make digital voice recordings. 3. LCD Displays menu options. 4. Volume Decrease button Press to decrease the volume. 5. Volume Increase button Press to increase the volume. 6.
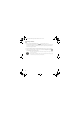
Pager S CLE QS.book Page 2 Friday, October 8, 2004 7:34 AM 7 8 9 7. Headphone jack Connect headphones to this jack. 8. Line In jack Connect external stereo sources, such as cassette players, CD players and MiniDisc players, to this jack. Note that this is not a digital (optical) input jack. This jack is only found on MuVo N200 players. 9. USB port Connect your computer to this port using the supplied USB cable. Using the Scroller You can use the Scroller to select menu options.
Pager S CLE QS.book Page 3 Friday, October 8, 2004 7:34 AM Getting Started 1 Set up computer DO NOT connect your player to your computer before setting up the software. 1. Turn on your computer. 2. If you have Windows XP or Windows 2000, you must log in as an administrator in Windows before you can set up the software. For more information, refer to your operating system’s online Help. 3. Insert the Installation and Applications CD into your CD-ROM/DVD-ROM drive. Your CD should start automatically.
Pager S CLE QS.book Page 4 Friday, October 8, 2004 7:34 AM 2 Insert battery Use one AAA alkaline battery with your player. When you turn on your player for the first time, the menu will be in English. To change the language 1. Press the Scroller. The main menu appears. 2. Scroll Select the Settings option 3. Scroll Select the Language option 4. Scroll Select the language that you want. 4 . .
Pager S CLE QS.book Page 5 Friday, October 8, 2004 7:34 AM 3 Transfer music 1. Flip open the rubber cover of your player’s USB port. 2. Connect your player to your computer’s USB port using the supplied USB cable. Do not press the buttons on your player while connecting it to your computer. Your computer’s USB port may be located on the front, back or side panels. 3. Start Windows Explorer on your computer. You will notice that your player is recognized as a Removable Disk in Windows Explorer.
Pager S CLE QS.book Page 6 Friday, October 8, 2004 7:34 AM 4. Transfer audio files (MP3 or WMA files) to your player using a drag-and-drop operation. You can also transfer data files using Windows Explorer. For more information about using Windows Explorer, refer to its online Help. 5. For more advanced song management tasks, you can use Creative MuVo Media Explorer or Creative MediaSource Player/Organizer.
Pager S CLE QS.book Page 7 Friday, October 8, 2004 7:34 AM 4 Disconnect player Before disconnecting your player from your computer, use the Windows Eject or Safely Remove Hardware icon on the Taskbar to safely disconnect your player. If not, your player may not be able to function normally. Follow these steps below to safely disconnect your player.
Pager S CLE QS.book Page 8 Friday, October 8, 2004 7:34 AM 5 Play music 1. Press and hold the Play/Pause button until your player turns on. The CREATIVE logo appears on the LCD, followed by the MuVo logo. Music stored in your player starts playing automatically. Note that your player comes preloaded with some music to get you started. 2. Press the Volume Increase and Volume Decrease buttons to adjust the volume. 3.
Pager S CLE QS.book Page 9 Friday, October 8, 2004 7:34 AM Some Basic Functions Playing music 1. Press the Scroller. The main menu appears. 2. Scroll Select the Music option 3. Scroll to the audio track that you want to play and press the Play/Pause button . . Listening to FM radio (FM radio is available on MuVo N200 players only.) You can automatically scan for all available radio stations and save up to 32 radio presets. 1. Connect headphones to the Headphone jack. 2. Press the Scroller.
Pager S CLE QS.book Page 10 Friday, October 8, 2004 7:34 AM MP3 encoding (Direct MP3 encoding is available on MuVo N200 players only.) You can directly encode or "rip" music to your player, instead of ripping music on your computer first and then transferring it to your player. 1. Connect the Line In jack on your player to the line output of an external stereo source, such as a CD or MiniDisc player, using the supplied Stereo cable. 2. Press the Scroller. The main menu appears. 3.
Pager S CLE QS.book Page 11 Friday, October 8, 2004 7:34 AM Frequently Asked Questions Can I use my player as a portable data storage device? Yes, you can. You can transfer data files using Creative MuVo Media Explorer or Windows Explorer. Why does my player skip certain tracks? The player will only play valid media formats (MP3 and WMA files). Other types of media formats will be skipped. Why are some files/tracks corrupted when transferred to my player? Transfer may have been interrupted.
Pager S CLE QS.book Page 12 Friday, October 8, 2004 7:34 AM More Information Creative Knowledge Base Resolve and troubleshoot technical queries at Creative's 24-hour self-help Knowledge Base. Go to www.creative.com and select your region. Register your product! Enjoy a host of benefits by registering your product during installation, or at www.creative.com/register. Benefits include: • Service and product support from Creative. • Exclusive updates on promotions and events.
Pager S CLE QS.book Page 13 Friday, October 8, 2004 7:34 AM Safety Advice As with any digital media-based storage device, data should be backed up regularly. We strongly recommend that you observe the usage precautions laid out in this booklet, and also back up the data in your player regularly.
Pager S CLE QS.book Page 14 Friday, October 8, 2004 7:34 AM Français Votre lecteur en un coup d'œil 1 6 2 3 5 4 1. Bouton Lecture/Pause Appuyez sur ce bouton et maintenez-le enfoncé pour allumer et éteindre le lecteur. Appuyez une fois pour lancer la lecture des pistes et appuyez de nouveau pour mettre la lecture sur pause. 2. Microphone Un microphone intégré qui vous permet de réaliser des enregistrements vocaux numériques. 3. Ecran à cristaux liquides Affiche des options de menu. 4.
Pager S CLE QS.book Page 15 Friday, October 8, 2004 7:34 AM 7 8 9 7. Prise des écouteurs Connectez vos écouteurs à cette prise. 8. Prise d’entrée Ligne Connectez à cette prise les sources stéréo externes, comme des lecteurs de cassettes, des lecteurs de CD et des lecteurs MiniDisc. Remarque : il ne s’agit pas d’une prise d’entrée numérique (optique). Cette prise est disponible sur les lecteurs MuVo N200 uniquement. 9. Port USB Connectez votre ordinateur à ce port à l’aide du câble USB fourni.
Pager S CLE QS.book Page 16 Friday, October 8, 2004 7:34 AM Démarrage 1 Définissez un ordinateur NE RACCORDEZ PAS votre lecteur à votre ordinateur avant d’avoir installé le logiciel. 1. Mettez l’ordinateur sous tension. 2. Si vous utilisez Windows XP ou Windows 2000, vous devez vous connecter comme administrateur dans Windows avant de pouvoir installer le logiciel. Pour plus d'informations, consultez l'aide en ligne de votre système d'exploitation. 3.
Pager S CLE QS.book Page 17 Friday, October 8, 2004 7:34 AM 2 Insérez la pile Utilisez une pile alcaline AAA dans votre lecteur. Quand vous allumez votre lecteur pour la première fois, le menu est en anglais. Pour modifier la langue 1. Appuyez sur la molette. Le menu principal apparaît. 2. Sélectionnez par navigation l'option Settings (Paramètres) 3. Sélectionnez par navigation l'option Language (Langue) 4. Sélectionnez par navigation la langue de votre choix. . .
Pager S CLE QS.book Page 18 Friday, October 8, 2004 7:34 AM 3 Transférez la musique 1. Ouvrez la protection en caoutchouc du port USB de votre lecteur. 2. Connectez votre lecteur au port USB de votre ordinateur à l’aide du câble USB fourni. N’appuyez pas sur les boutons de votre lecteur lorsque vous le connectez à votre ordinateur. Il est possible que le port USB de votre ordinateur se situe sur le panneau avant, arrière ou latéral. 3. 18 Lancez l’Explorateur Windows sur votre ordinateur.
Pager S CLE QS.book Page 19 Friday, October 8, 2004 7:34 AM 4. Transférez des fichiers audio (MP3 ou WMA) vers votre lecteur à l’aide d’un glisser-déplacer. Vous pouvez également transférer des fichiers de données en utilisant Windows Explorer. Pour obtenir plus d’informations sur l’utilisation de l’Explorateur Windows, consultez l’aide en ligne. 5. Pour davantage de tâches avancées de gestion des chansons, vous pouvez utiliser Creative MuVo Media Explorer ou Creative MediaSource Player/Organizer.
Pager S CLE QS.book Page 20 Friday, October 8, 2004 7:34 AM 4 Déconnectez le lecteur Avant de déconnecter votre lecteur de l’ordinateur, utilisez l’icône Ejection Windows ou Supprimer le périphérique en toute sécurité située dans la barre des tâches pour déconnecter votre lecteur en toute sécurité. Dans le cas contraire, votre lecteur pourrait ne plus fonctionner normalement. Suivez les étapes ci-dessous pour déconnecter votre lecteur en toute sécurité.
Pager S CLE QS.book Page 21 Friday, October 8, 2004 7:34 AM 5 Lisez de la musique 1. Maintenez le bouton Lecture/Pause enfoncé jusqu'à la mise sous tension du lecteur. Le logo CREATIVE s'affiche sur l'écran LCD, suivi du logo MuVo. La musique enregistrée sur votre lecteur est lue automatiquement. Remarque : de la musique a été préchargée sur votre lecteur pour vous permettre de démarrer. 2. Appuyez sur les boutons Augmentation du volume et Diminution du volume pour régler le volume. 3.
Pager S CLE QS.book Page 22 Friday, October 8, 2004 7:34 AM Quelques fonctions de base Lecture de musique 1. Appuyez sur la molette. Le menu principal apparaît. 2. Sélectionnez par navigation l'option Musique 3. Sélectionnez la piste audio à lire et appuyez sur le bouton Lecture/Pause . . Ecoute d’une radio FM (La radio FM est disponible sur les lecteurs MuVo N200 uniquement.) Vous pouvez automatiquement rechercher des stations radio disponibles et enregistrer jusqu’à 32 présélections radio. 1.
Pager S CLE QS.book Page 23 Friday, October 8, 2004 7:34 AM Encodage MP3 (L’encodage MP3 direct est disponible sur les lecteurs MuVo N200 uniquement.) Vous pouvez coder ou « extraire » de la musique directement sur votre lecteur, plutôt que d’extraire de la musique d’abord sur votre ordinateur puis la transférer sur votre lecteur. 1. Connectez la prise d’entrée Ligne de votre lecteur à la sortie Ligne d’une source stéréo externe, comme un lecteur CD ou MiniDisc, à l’aide du câble stéréo fourni. 2.
Pager S CLE QS.book Page 24 Friday, October 8, 2004 7:34 AM Questions courantes Puis-je utiliser mon lecteur comme dispositif portable de stockage de données ? Oui, c’est possible. Vous pouvez transférer des fichiers de données en utilisant Creative MuVo Media Explorer ou l’Explorateur Windows. Pourquoi mon lecteur ignore-t-il certaines pistes ? Le lecteur ne lit que certains formats multimédia valides (fichiers MP3 et WMA). Les autres types de formats multimédia seront ignorés.
Pager S CLE QS.book Page 25 Friday, October 8, 2004 7:34 AM Pour plus d’informations Base de connaissances Creative Pour résoudre un problème technique, utilisez la Base de connaissances de Creative, disponible 24 heures sur 24. Visitez le site www.creative.com et sélectionnez votre région. Enregistrez votre produit ! Profitez d’une multitude d’avantages en enregistrant votre produit pendant l’installation ou sur le site www.creative.com/register.
Pager S CLE QS.book Page 26 Friday, October 8, 2004 7:34 AM Instructions de sécurité Comme pour tout dispositif de stockage basé sur des supports numériques, les données doivent être sauvegardées régulièrement. Nous vous recommandons vivement de respecter les précautions d’utilisation présentées dans ce livret et de sauvegarder régulièrement les données de votre lecteur.
Pager S CLE QS.book Page 27 Friday, October 8, 2004 7:34 AM IMPORTANT- A LIRE AVEC ATTENTION Ecouter de manière prolongée, à un très haut volume sonore de la musique (au dessus de 80 decibels), au moyen d'un casque ou d'écouteurs, peut entraîner une détérioration irreversible et définitive de vos facultés auditives.
Pager S CLE QS.book Page 28 Friday, October 8, 2004 7:34 AM Deutsch Der Player auf einen Blick 1 6 2 3 5 4 1. Wiedergabe/Pause Halten Sie diese Taste gedrückt, um den Player ein- bzw. auszuschalten. Wenn Sie die Taste einmal kurz drücken, startet die Wiedergabe. Durch erneuten Druck können Sie die Wiedergabe anhalten. 2. Mikrofon Ein integriertes Mikrofon, das Ihnen digitale Sprachaufzeichnungen ermöglicht. 3. LCD-Display Zeigt Menüoptionen an. 4.
Pager S CLE QS.book Page 29 Friday, October 8, 2004 7:34 AM 6. Navigieren Sie durch die Menüoptionen, indem Sie das Auswahlrad drehen, und drücken Sie auf das Auswahlrad, um eine Option auszuwählen. Diese Aktion wird auch als „Drehauswahl“ bezeichnet. Während der Wiedergabe können Sie durch Drehen des Auswahlrades zwischen verschiedenen Titeln wechseln und durch gleichzeitiges Drücken und Drehen innerhalb eines Titels spulen. Auswahlrad 7 8 9 7.
Pager S CLE QS.book Page 30 Friday, October 8, 2004 7:34 AM Verwenden des Auswahlrades Mithilfe des Auswahlrades können Sie Menüoptionen auswählen. Im Rahmen dieser Dokumentation wird mit dem Begriff „Drehauswahl“ ein Vorgang bezeichnet, bei dem Sie mit dem Auswahlrad zunächst zu einer Menüoption navigieren und diese dann durch Drücken des Auswahlrades auswählen. 1. Durch Drehen des Auswahlrades können Sie auf Ihrem LCD-Display zu den gewünschten Menüoptionen navigieren, z. B. Wiedergabemodus ( ). 2.
Pager S CLE QS.book Page 31 Friday, October 8, 2004 7:34 AM Erste Schritte 1 Computer konfigurieren Schließen Sie den Player erst NACH dem Konfigurieren der Software an den Computer an. 1. Schalten Sie den Computer ein. 2. Wenn Sie mit Windows XP oder Windows 2000 arbeiten, müssen Sie sich vor dem Konfigurieren der Software zunächst als Administrator in Windows anmelden. Weitere Informationen finden Sie in der Onlinehilfe zu Ihrem Betriebssystem. 3.
Pager S CLE QS.book Page 32 Friday, October 8, 2004 7:34 AM 2 Batterie einlegen Verwenden Sie eine AAA-Alkalibatterie für den Player. Wenn Sie den Player zum ersten Mal einschalten, wird das Menü zunächst in englischer Sprache angezeigt. So ändern Sie die Sprache 1. Drücken Sie auf das Auswahlrad. Daraufhin wird das Hauptmenü angezeigt. 2. Wählen Sie durch Drehauswahl die Option Settings (Einstellungen) ( ) aus. 3. Wählen Sie durch Drehauswahl die Option Language (Sprache) ( 4.
Pager S CLE QS.book Page 33 Friday, October 8, 2004 7:34 AM 3 Musik übertragen 1. Öffnen Sie die Abdeckung des USB-Anschlusses Ihres Players. 2. Verbinden Sie den Player über das im Lieferumfang enthaltene USB-Kabel mit dem USB-Anschluss Ihres Computers. Betätigen Sie keine der Player-Tasten, während der Player am Computer angeschlossen ist. Der USB-Anschluss Ihres Computers kann sich auf der Vorderseite, der Rückseite oder an den Seitenbereichen befinden. 3.
Pager S CLE QS.book Page 34 Friday, October 8, 2004 7:34 AM 4. Übertragen Sie Audiodateien (MP3 oder WMA) per Drag & Drop auf den Player. Sie können Datendateien auch mithilfe von Windows Explorer übertragen. Weitere Informationen zum Verwenden von Windows-Explorer finden Sie in der dazugehörigen Onlinehilfe. 5. Für das anspruchsvollere Verwalten von Titeln können Sie Creative MuVo Media Explorer oder Creative MediaSource Player/Organizer verwenden.
Pager S CLE QS.book Page 35 Friday, October 8, 2004 7:34 AM 4 Player vom Computer trennen Bevor Sie den Player vom Computer trennen, verwenden Sie das Windows-Auswurf-Symbol oder das Symbol Hardware sicher trennen in der Taskleiste, um den Player sicher zu trennen. Andernfalls kann es zu Funktionsstörungen kommen. Führen Sie die nachfolgenden Schritte aus, um Ihren Player sicher zu trennen.
Pager S CLE QS.book Page 36 Friday, October 8, 2004 7:34 AM 5 Musik wiedergeben 1. Halten Sie die Taste Wiedergabe/Pause ( ) gedrückt, bis der Player eingeschaltet wird. Daraufhin werden nacheinander das CREATIVE-Logo und das MuVo-Logo auf dem Display angezeigt. Bei Musik, die in Ihrem Player gespeichert ist, wird die Wiedergabe automatisch gestartet. Um Ihnen einen schnellen Einstieg zu ermöglichen, ist im Player bereits eine Audioauswahl gespeichert. 2.
Pager S CLE QS.book Page 37 Friday, October 8, 2004 7:34 AM Einige Grundfunktionen Wiedergeben von Musiktiteln 1. Drücken Sie auf das Auswahlrad. Daraufhin wird das Hauptmenü angezeigt. 2. Wählen Sie durch Drehauswahl die Option Titel ( ) aus. 3. Navigieren Sie zu einem Titel, der wiedergegeben werden soll, und drücken Sie dann die Taste Wiedergabe/Pause ( ). UKW-Radioempfang (Das FM-Radio ist nur bei MuVo N200-Playern verfügbar.
Pager S CLE QS.book Page 38 Friday, October 8, 2004 7:34 AM MP3-Encoding (Das direkte MP3-Encoding ist nur bei MuVo N200-Playern möglich.) Anstatt Musiktitel erst auf Ihren Computer auszulesen und dann auf den Player zu übertragen, können Sie sie auch direkt auf Ihrem Player auslesen bzw. codieren. 1. Verbinden Sie die Line In-Buchse Ihres Players über das mitgelieferte Stereokabel mit dem Line Out-Ausgang einer externen Stereoquelle, wie z. B. einem CD- oder MiniDisc-Player. 2.
Pager S CLE QS.book Page 39 Friday, October 8, 2004 7:34 AM 3. Um die Playersperre wieder aufzuheben, drücken Sie eine beliebige Taste, und wählen Sie durch Drehauswahl die Option Tasten freigeben ( ) aus. Weitere Informationen finden Sie im Benutzerhandbuch auf der Installations-CD. Wechseln Sie zu d:\manual\\manual.chm. (Ersetzen Sie d:\ durch den Laufwerksbuchstaben Ihres CD-ROM/DVD-ROM-Laufwerks und durch die Sprache des Dokuments.
Pager S CLE QS.book Page 40 Friday, October 8, 2004 7:34 AM Häufig gestellte Fragen Kann der Player als tragbares Datenspeichergerät verwendet werden? Ja, das ist möglich. Sie können Datendateien mithilfe von Creative MuVo Media Explorer oder Windows Explorer übertragen. Warum werden manche Titel übersprungen? Mit dem Player können nur bestimmte Medienformate (MP3- und WMA-Dateien) wiedergegeben werden. Andere Medienformate werden übersprungen.
Pager S CLE QS.book Page 41 Friday, October 8, 2004 7:34 AM Weitere Informationen Creative Knowledge Base Mit der rund um die Uhr verfügbaren Knowledge Base von Creative lassen sich zahlreiche technische Fragen und Probleme in Selbsthilfe klären. Besuchen Sie unsere Website unter www.creative.com, und wählen Sie Ihre Region. Registrieren Sie Ihr Produkt! Wenn Sie Ihr Produkt bei der Installation oder nachträglich unter www.creative.
Pager S CLE QS.book Page 42 Friday, October 8, 2004 7:34 AM Sicherheitshinweis Wie bei allen Speichermedien auf der Basis digitaler Medien müssen die Daten regelmäßig gesichert werden. Es wird dringend empfohlen, die in der vorliegenden Dokumentation beschriebenen Vorsichtsmaßnahmen zu beachten und darüber hinaus die im Player gespeicherten Daten regelmäßig zu sichern.
Pager S CLE QS.book Page 43 Friday, October 8, 2004 7:34 AM Italiano Aspetto del lettore 1 6 2 3 5 4 1. Pulsante Riproduci/Pausa Tenere premuto questo pulsante per accendere e spegnere il lettore. Premerlo una volta per avviare la riproduzione dei brani, premerlo di nuovo per sospendere la riproduzione. 2. Microfono Microfono incorporato che consente di effettuare registrazioni vocali digitali. 3. Schermo LCD Visualizza le opzioni di menu. 4.
Pager S CLE QS.book Page 44 Friday, October 8, 2004 7:34 AM 6. Ruotare lo scroller per scorrere le opzioni di menu, quindi premerlo per selezionarle. Questa operazione viene anche chiamata "scorrimento e selezione". Durante la riproduzione, ruotare lo scroller per passare da un brano all'altro, oppure ruotare e tenere premuto lo scroller per spostarsi all'interno di un brano. Scroller 7 8 9 7. Jack cuffie Collegare le cuffie al jack. 8.
Pager S CLE QS.book Page 45 Friday, October 8, 2004 7:34 AM Utilizzo dello scroller È possibile utilizzare lo scroller per selezionare le opzioni di menu. L'espressione "Scorrere e selezionare" viene utilizzata per indicare l'uso dello scroller per scorrere a un'opzione di menu e selezionarla tramite la pressione dello scroller. 1. Ruotare lo scroller per scorrere le opzioni di menu sullo schermo LCD fino ad evidenziare l'opzione desiderata, ad esempio Modo esecuz. (Modo esecuzione) 2.
Pager S CLE QS.book Page 46 Friday, October 8, 2004 7:34 AM Preparazione 1 Impostazione del computer NON collegare il lettore al computer prima di aver impostato il software. 1. Accendere il computer. 2. Nei sistemi operativi XP o Windows 2000, è necessario accedere a Windows come amministratore prima di poter impostare il software. Per ulteriori informazioni, consultare la Guida in linea del sistema operativo. 3. Inserire il CD di installazione e delle applicazioni nell'unità CD-ROM/DVD-ROM.
Pager S CLE QS.book Page 47 Friday, October 8, 2004 7:34 AM 2 Inserimento della batteria Utilizzare il lettore con una batteria alcalina di tipo AAA. Quando si accende il lettore per la prima volta, viene visualizzato il menu in inglese. Per modificare la lingua 1. Premere lo scroller. Viene visualizzato il menu principale. 2. Scorrere e selezionare l'opzione Settings (Impostazioni) 3. Scorrere e selezionare l'opzione Language (Lingua) 4. Scorrere e selezionare la lingua desiderata. . .
Pager S CLE QS.book Page 48 Friday, October 8, 2004 7:34 AM 3 Trasferimento di musica 1. Spostare la protezione in gomma della porta USB del lettore per aprirla. 2. Collegare il lettore alla porta USB del computer utilizzando il cavo USB in dotazione. Non premere i pulsanti del lettore durante il collegamento al computer. La porta USB potrebbe trovarsi sul pannello anteriore, posteriore o laterale del computer. 3. 48 Avviare Esplora risorse sul computer.
Pager S CLE QS.book Page 49 Friday, October 8, 2004 7:34 AM 4. Trasferire i file audio (MP3 o WMA) nel lettore mediante l'operazione di trascinamento della selezione. Oppure è possibile traferire i file da Esplora risorse. Per ulteriori informazioni sull'uso di Esplora risorse di Windows, consultare la relativa Guida in linea. 5. Per operazioni più avanzate di gestione delle canzoni, è possibile utilizzare Creative MuVo Media Explorer o Lettore/Organizer Creative MediaSource.
Pager S CLE QS.book Page 50 Friday, October 8, 2004 7:34 AM 4 Scollegamento del lettore Prima di scollegare il lettore dal computer, servirsi dell'icona Rimuovi di Windows o Rimozione sicura dell'hardware che si trova sulla barra delle applicazioni per scollegare in modo sicuro il lettore. In caso contrario, il lettore potrebbe non funzionare normalmente. Per scollegare il lettore correttamente, procedere nel modo seguente.
Pager S CLE QS.book Page 51 Friday, October 8, 2004 7:34 AM 5 Riproduzione di musica 1. Tenere premuto il pulsante Riproduci/Pausa fino all'accensione del lettore. Sulla schermata viene visualizzato il logo CREATIVE seguito dal logo MuVo. La riproduzione della musica archiviata nel lettore inizia automaticamente. Il lettore è dotato di musica precaricata per consentire un immediato utilizzo. 2. Premere i pulsanti Aumento volume e Riduzione volume per regolare il volume. 3.
Pager S CLE QS.book Page 52 Friday, October 8, 2004 7:34 AM Funzioni di base Riproduzione di musica 1. Premere lo scroller. Viene visualizzato il menu principale. 2. Scorrere e selezionare l'opzione Musica 3. Scorrere fino al brano che si desidera riprodurre e premere il pulsante Riproduci/ Pausa . . Ascolto della radio FM (La radio FM è disponibile solo sui lettori MuVo N200.
Pager S CLE QS.book Page 53 Friday, October 8, 2004 7:34 AM Codifica MP3 (La codifica MP3 è disponibile solo sui lettori MuVo N200.) È possibile codificare o estrarre musica direttamente nel lettore anziché estrarre prima la musica nel computer e poi trasferirla nel lettore. 1. Collegare il jack Line In del lettore all'uscita di linea di un'origine audio esterna, ad esempio un lettore CD o MiniDisc, utilizzando il cavo Stereo in dotazione. 2. Premere lo scroller. Viene visualizzato il menu principale.
Pager S CLE QS.book Page 54 Friday, October 8, 2004 7:34 AM Domande frequenti È possibile usare il lettore come periferica portatile di archiviazione dei dati? Sì, è possibile. I file di dati possono essere trasferiti utilizzando Creative MuVo Media Explorer o Esplora risorse. Perché il lettore salta determinati brani? Il lettore è in grado di riprodurre solo formati multimediali validi (file MP3 e WMA). Gli altri tipi di formati multimediali vengono ignorati.
Pager S CLE QS.book Page 55 Friday, October 8, 2004 7:34 AM Ulteriori informazioni Database Informativo Creative Per rispondere a domande e risolvere problemi tecnici, è disponibile il Database Informativo Creative consultabile 24 ore su 24. Accedere al sito www.creative.com e selezionare la propria area geografica. Registra il prodotto! Per poter approfittare di numerosi e interessanti vantaggi, registrare il prodotto in fase di installazione oppure presso il sito www.creative.com/register.
Pager S CLE QS.book Page 56 Friday, October 8, 2004 7:34 AM Note sulla sicurezza Come per tutti dispositivi di memorizzazione basati su supporto digitale, si consiglia di eseguire regolarmente il backup dei dati. Si raccomanda di attenersi scrupolosamente alle precauzioni d'uso riportate in questo documento e di eseguire regolarmente il backup dei dati memorizzati sul lettore.
Pager S CLE QS.book Page 57 Friday, October 8, 2004 7:34 AM Español El reproductor de un vistazo 1 6 2 3 5 4 1. Botón Reproducir/Pausa Manténgalo pulsado para encender y apagar el reproductor. Púlselo una vez para iniciar la reproducción de pistas y púlselo de nuevo para hacer una pausa en la reproducción. 2. Micrófono El micrófono incorporado le permite realizar grabaciones de voz digitales. 3. Pantalla LCD Muestra las opciones de menú. 4.
Pager S CLE QS.book Page 58 Friday, October 8, 2004 7:34 AM 6. Rueda de desplazamiento Gire la rueda de desplazamiento para moverse por las opciones de menú y púlsela para seleccionarlas. Esta acción también se denomina "Seleccionar con rueda de desplazamiento". Durante la reproducción, gire la rueda de desplazamiento para desplazarse entre pistas, o gire y mantenga pulsada la rueda de desplazamiento para desplazarse en una pista concreta. 7 8 9 7. Conector para auriculares 8.
Pager S CLE QS.book Page 59 Friday, October 8, 2004 7:34 AM Uso de la rueda de desplazamiento Puede utilizar la rueda de desplazamiento para seleccionar opciones de menú. En esta Guía, se emplea la frase “Utilice la rueda de desplazamiento para seleccionar” cuando deseamos que utilice la rueda de desplazamiento para desplazarse hasta una opción de menú y luego seleccionarla pulsando la rueda. 1.
Pager S CLE QS.book Page 60 Friday, October 8, 2004 7:34 AM Primeros pasos 1 Configuración del ordenador NO conecte el reproductor al ordenador antes de configurar el software. 1. Encienda el ordenador. 2. Si tiene instalado Windows XP o Windows 2000, deberá iniciar sesión como administrador en Windows antes de poder configurar el software. Para obtener más información, consulte la ayuda en línea de su sistema operativo. 3. Inserte el CD de instalación y aplicaciones en la unidad de CD-ROM/DVD-ROM.
Pager S CLE QS.book Page 61 Friday, October 8, 2004 7:34 AM 2 Introducción de la pila Utilice una pila alcalina AAA con el reproductor. Cuando encienda el reproductor por primera vez, el menú aparecerá en inglés. Para cambiar el idioma 1. Pulse la rueda de desplazamiento. Aparece el menú principal. 2. Utilice la rueda de desplazamiento para seleccionar la opción Settings (Configuración) . 3. Utilice la rueda de desplazamiento para seleccionar la opción Language (Idioma) 4.
Pager S CLE QS.book Page 62 Friday, October 8, 2004 7:34 AM 3 Transferir música 1. Deslice la cubierta de goma del puerto USB del reproductor. 2. Conecte el reproductor al puerto USB del ordenador mediante el cable USB suministrado. No pulse los botones del reproductor mientras lo conecte al ordenador. Es posible que el puerto USB del ordenador se encuentre en los paneles frontal, posterior o laterales. 3. 62 Inicie el Explorador de Windows en el ordenador.
Pager S CLE QS.book Page 63 Friday, October 8, 2004 7:34 AM 4. Transfiera los archivos de audio (MP3 o WMA) al reproductor mediante una operación de “arrastrar y soltar”. Puede también transferir archivos de datos con ayuda del Explorador de Windows. Si desea obtener más información sobre el uso del Explorador de Windows, consulte su ayuda en línea. 5. Si desea utilizar tareas de gestión de canciones más avanzadas, puede utilizar Creative MuVo Media Explorer o Creative MediaSource Player/Organizer.
Pager S CLE QS.book Page 64 Friday, October 8, 2004 7:34 AM 4 Desconecte el reproductor Antes de desconectar el reproductor del ordenador, utilice la función de Expulsión de Windows o el icono Quitar hardware con seguridad de la barra de tareas para desconectar el reproductor de forma segura. Si no lo hace así, es posible que el reproductor no funcione de la manera normal. Siga los pasos que se indican a continuación para desconectar el reproductor con seguridad.
Pager S CLE QS.book Page 65 Friday, October 8, 2004 7:34 AM 5 Reproducción de música 1. Mantenga pulsado el botón Reproducir/Pausa hasta que se encienda el reproductor. Aparece en la pantalla LCD el logotipo de CREATIVE, seguido del logotipo de MuVo. La música almacenada en el reproductor comienza a reproducirse automáticamente. En el reproductor se ha cargado previamente música para que pueda empezar rápidamente. 2. Pulse Subir volumen o Bajar volumen para ajustar el volumen deseado. 3.
Pager S CLE QS.book Page 66 Friday, October 8, 2004 7:34 AM Algunas funciones básicas Reproducción de música 1. Pulse la rueda de desplazamiento. Aparece el menú principal. 2. Utilice la rueda de desplazamiento para seleccionar la opción Música 3. Desplácese hasta la pista de audio que desea reproducir y pulse el botón Reproducir/ Pausa . . Escuchar una estación de radio FM (la radio FM sólo está disponible en los reproductores MuVo N200 ).
Pager S CLE QS.book Page 67 Friday, October 8, 2004 7:34 AM Codificación de MP3 (la codificación directa MP3 sólo está disponible en los reproductores MuVo N200 ). Si lo desea, puede codificar directamente o extraer música al reproductor, en lugar de extraer música en el ordenador primero y luego transferirla al reproductor. 1.
Pager S CLE QS.book Page 68 Friday, October 8, 2004 7:34 AM Preguntas más frecuentes ¿Puedo utilizar el reproductor como dispositivo de almacenamiento de datos portátil? Sí puede. Puede transferir archivos de datos con ayuda de Creative MuVo Media Explorer o Windows Explorer. ¿Por qué salta el reproductor algunas pistas? El reproductor sólo reproducirá formatos multimedia válidos (archivos MP3 y WMA). Los demás tipos de formatos multimedia se saltarán.
Pager S CLE QS.book Page 69 Friday, October 8, 2004 7:34 AM Información adicional Base de conocimientos de Creative Puede solucionar sus problemas o dudas técnicas en la Base de conocimientos de Creative, que ofrece autoayuda las 24 horas del día. Vaya a www.creative.com y seleccione la región donde se encuentra. Registre su producto Disfrute de una amplia variedad de beneficios registrando su producto durante la instalación o en www.creative.com/register.
Pager S CLE QS.book Page 70 Friday, October 8, 2004 7:34 AM Consejo de seguridad Al igual que con cualquier otro dispositivo de almacenamiento basado en medios digitales, deben realizarse habitualmente copias de seguridad de los datos. Creative le recomienda que tenga en cuenta las precauciones de uso incluidas en este folleto y que realice regularmente copias de seguridad de los datos almacenados en el reproductor.
Pager S CLE QS.book Page 71 Friday, October 8, 2004 7:34 AM Nederlands Beknopt overzicht van de speler 1 6 2 3 5 4 1. Knop Afspelen/ Onderbreken Houd deze knop ingedrukt om de speler in of uit te schakelen. Druk één keer op deze knop om tracks af te spelen en druk opnieuw op de knop als u het afspelen wilt onderbreken. 2. Microfoon Een ingebouwde microfoon waarmee u digitale spraakopnamen maakt. 3. LCD-scherm Op dit scherm worden menuopties weergegeven. 4.
Pager S CLE QS.book Page 72 Friday, October 8, 2004 7:34 AM 6. Draai aan de bladerknop om door de menuopties te bladeren en druk op de bladerknop om de gewenste menuoptie te selecteren. Voor deze handeling wordt de term "selecteren met bladerknop" gebruikt. Draai tijdens het afspelen aan de bladerknop om naar vorige of volgende tracks te gaan of draai tijdens het afspelen aan de bladerknop en houd de knop in deze stand om vooruit of achteruit te gaan in een track. Bladerknop 7 8 9 7.
Pager S CLE QS.book Page 73 Friday, October 8, 2004 7:34 AM Werken met de bladerknop Met de bladerknop kunt u opties in menu's selecteren. In deze handleiding wordt de term "selecteren met bladerknop" gebruikt om aan te geven dat u de bladerknop gebruikt om naar een menuoptie te bladeren en deze optie selecteert door op de bladerknop te drukken. 1. Draai aan de bladerknop om door de menuopties op het LCD-scherm te bladeren tot de gewenste optie, bijvoorbeeld Afspeelmodus is gemarkeerd. 2.
Pager S CLE QS.book Page 74 Friday, October 8, 2004 7:34 AM Aan de slag 1 De computer instellen Installeer EERST de software voordat u de speler op uw computer aansluit. 1. Schakel de computer in. 2. Als u in Windows XP of Windows 2000 werkt, moet u zich in Windows als beheerder aanmelden voordat u de software kunt instellen. Raadpleeg de on line Help van het besturingssysteem voor meer informatie. 3. Plaats de installatie- en toepassingen-cd in het cd-rom-/dvd-rom-station.
Pager S CLE QS.book Page 75 Friday, October 8, 2004 7:34 AM 2 Batterij plaatsen Gebruik voor de speler één AAA-alkalinebatterij. Wanneer u de speler voor het eerst aanzet, verschijnt het menu in het Engels. De taal wijzigen 1. Druk op de bladerknop. Het hoofdmenu verschijnt. 2. Selecteer met de bladerknop de optie Settings (Instellingen) 3. Selecteer met de bladerknop de optie Language (Taal) 4. Selecteer met de bladerknop de gewenste taal. . .
Pager S CLE QS.book Page 76 Friday, October 8, 2004 7:34 AM 3 Muziek overbrengen 1. Klap het rubberen klepje van de USB-poort van de speler open. 2. Sluit de speler met behulp van de meegeleverde USB-kabel aan op de USB-poort van de computer. Druk niet op de knoppen van de speler wanneer u deze op uw computer aansluit. Mogelijk bevindt de USB-poort van uw computer zich aan de voorkant, zijkant of zijpanelen. 3. 76 Start Windows Verkenner op de computer.
Pager S CLE QS.book Page 77 Friday, October 8, 2004 7:34 AM 4. Breng audiobestanden (MP3 of WMA) naar uw speler over met behulp van slepen-en-neerzetten. U kunt ook gegevensbestanden overbrengen met behulp van Windows Verkenner. Raadpleeg de on line Help van Windows Verkenner voor meer informatie over het gebruik van dit programma. 5. Voor meer geavanceerde taken voor trackbeheer kunt u Creative MuVo Media Explorer of Creative MediaSource Player/Organizer gebruiken.
Pager S CLE QS.book Page 78 Friday, October 8, 2004 7:34 AM 4 Speler loskoppelen Voordat u de speler van uw computer loskoppelt, klikt u eerst op het Windows-pictogram Uitwerpen of Hardware veilig verwijderen op de Taakbalk om de speler op een veilige manier los te koppelen. Anders kan de speler niet normaal functioneren. Volg de stappen hieronder om de speler op een veilige manier los te koppelen.
Pager S CLE QS.book Page 79 Friday, October 8, 2004 7:34 AM 5 Muziek afspelen 1. Houd de knop Afspelen/Onderbreken ingedrukt tot de speler is ingeschakeld. Het CREATIVE-logo verschijnt op het LCD-scherm, gevolgd door het MuVo-logo. De muziek die in uw speler is opgeslagen, wordt automatisch afgespeeld. De speler bevat standaard al wat muziek, zodat u meteen aan de slag kunt. 2. Druk op de knoppen Volume verhogen en Volume verlagen om het volume aan te passen. 3.
Pager S CLE QS.book Page 80 Friday, October 8, 2004 7:34 AM Bepaalde basisfuncties Muziek afspelen 1. Druk op de bladerknop. Het hoofdmenu verschijnt. 2. Selecteer met de bladerknop het pictogram Muziek 3. Blader naar de audiotrack die u wilt afspelen en druk op de knop Afspelen/ Onderbreken . . Naar FM-radio luisteren (FM-radio is alleen beschikbaar op MuVo N200-spelers.) U kunt automatisch scannen op alle beschikbare radiostations en maar liefst 32 radiopresets opslaan. 1.
Pager S CLE QS.book Page 81 Friday, October 8, 2004 7:34 AM MP3-codering (Directe MP3-codering is alleen beschikbaar op MuVo N200-spelers.) U kunt muziek direct naar de speler coderen of rippen, zodat u de muziek niet eerst op de computer hoeft te rippen en vervolgens naar de speler moet overbrengen. 1. Sluit de lijningang van de speler aan op de lijnuitgang van een externe stereobron, zoals een cd- of MiniDisc-speler, met behulp van de meegeleverde stereokabel. 2. Druk op de bladerknop.
Pager S CLE QS.book Page 82 Friday, October 8, 2004 7:34 AM Veelgestelde vragen Kan ik mijn speler gebruiken als draagbaar opslagapparaat voor gegevens? Ja, dat is mogelijk. U kunt gegevensbestanden overbrengen met behulp van Creative MuVo Media Explorer of Windows Verkenner. Waarom slaat mijn speler bepaalde tracks over? De speler speelt alleen media met een geldige indeling af (MP3- en WMA-bestanden). Bestanden met een andere indeling worden overgeslagen.
Pager S CLE QS.book Page 83 Friday, October 8, 2004 7:34 AM Aanvullende informatie Creative Knowledge Base Voor vragen over en oplossingen voor technische problemen kunt u 24 uur per dag terecht op de Knowledge Base voor zelfhulp van Creative. Ga naar www.creative.com en selecteer uw regio. Registreer uw product! Registreer uw product tijdens de installatie of later op www.creative.com/register en geniet van tal van voordelen, waaronder: • Service en productondersteuning van Creative.
Pager S CLE QS.book Page 84 Friday, October 8, 2004 7:34 AM Veiligheidsadvies Zoals bij alle opslagapparaten die op digitale media zijn gebaseerd, dient u regelmatig een back-up van uw gegevens te maken. Wij bevelen u ten zeerste aan de voorzorgsmaatregelen voor het gebruik die in deze handleiding zijn vermeld, in acht te nemen, en regelmatig een back-up van de gegevens in de speler te maken.
Pager S CLE QS.book Page 85 Friday, October 8, 2004 7:34 AM Português Descrição geral do leitor 1 6 2 3 5 4 1. Botão Play/Pause (Reproduzir/Pausa) Carregue sem soltar para ligar e desligar o leitor. Carregue uma vez para iniciar a reprodução de faixas e carregue novamente para fazer uma pausa na reprodução. 2. Microfone Um microfone incorporado que permite fazer gravações de voz digitais. 3. LCD Mostra as opções de menu. 4.
Pager S CLE QS.book Page 86 Friday, October 8, 2004 7:34 AM 6. Rode o botão de deslocamento para percorrer as opções de menu e carregue no mesmo para as seleccionar. Esta acção também é conhecida como "Vá para e seleccione". Durante a reprodução, rode o botão de deslocamento para percorrer as faixas ou rode-o e carregue continuamente para se mover dentro da faixa. Botão de deslocamento 7 8 9 7. Ficha para auscultadores Ligue os auscultadores a esta ficha. 8.
Pager S CLE QS.book Page 87 Friday, October 8, 2004 7:34 AM Utilizar o botão de deslocamento Pode utilizar o botão de deslocamento para seleccionar opções de menus. A expressão “Vá para e seleccione” é utilizada quando se pretende utilizar o botão de deslocamento para ir até uma opção de menu, seleccionando-a em seguida com o mesmo botão. 1. Rode o botão de deslocamento para percorrer as opções de menu no LCD até a opção pretendida, por exemplo Play Mode (Modo de reprodução), aparecer realçada. 2.
Pager S CLE QS.book Page 88 Friday, October 8, 2004 7:34 AM Guia de iniciação 1 Configuração do computador NÃO ligue o leitor ao computador antes de instalar o software. 1. Ligue o computador. 2. Se tiver o Windows XP ou o Windows 2000 instalado, tem de iniciar sessão como administrador no Windows antes de configurar o software. Para obter mais informações, consulte a ajuda online do sistema operativo. 3. Introduza o CD de instalação de aplicações na unidade de CD-ROM/DVD-ROM.
Pager S CLE QS.book Page 89 Friday, October 8, 2004 7:34 AM 2 Inserir a pilha Utilize uma bateria alcalina AAA no leitor. Quando liga o leitor pela primeira vez, o menu aparece em inglês. Mudar o idioma 1. Carregue no botão de deslocamento. Aparece o menu principal. 2. Vá para e seleccione a opção Settings (Definições) 3. Vá para e seleccione a opção Language (Idioma) 4. Vá para e seleccione o idioma pretendido. . .
Pager S CLE QS.book Page 90 Friday, October 8, 2004 7:34 AM 3 Transferir música 1. Abra a tampa de borracha da porta USB do leitor. 2. Ligue o leitor à porta USB do computador através do cabo USB fornecido. Não carregue nos botões do leitor quando estiver a ligá-lo ao computador. A porta USB do computador pode estar localizada no painel frontal, lateral ou posterior. 3. 90 Inicie o Explorador do Windows no computador. O leitor é reconhecido como um Disco amovível pelo Explorador do Windows.
Pager S CLE QS.book Page 91 Friday, October 8, 2004 7:34 AM 4. Transfira os ficheiros de áudio (ficheiros MP3 ou WMA) para o leitor através da operação de arrastar e largar. Também pode transferir ficheiros de dados através do Explorador do Windows. Para mais informações sobre como utilizar o Explorador do Windows, consulte a ajuda online. 5. Para tarefas de gestão de músicas mais avançadas, utilize o Creative MuVo Media Explorer ou o Creative MediaSource Player/Organizer.
Pager S CLE QS.book Page 92 Friday, October 8, 2004 7:34 AM 4 Desligar o leitor Antes de desligar o leitor do computador, utilize o ícone Windows Eject (Ejectar do Windows) ou Safely Remove Hardware (Remover o hardware com segurança) da barra de tarefas para desligar o leitor com segurança. Se não o fizer, o leitor pode não funcionar correctamente. Siga os passos abaixo para desligar o leitor com segurança.
Pager S CLE QS.book Page 93 Friday, October 8, 2004 7:34 AM 5 Reproduzir música 1. Carregue sem soltar o botão Play/Pause (Reproduzir/Pausa) para ligar o leitor. Aparece o logótipo CREATIVE no LCD, seguido do logótipo MuVo. A música guardada no leitor é reproduzida automaticamente. O leitor inclui algumas músicas de origem que podem ajudá-lo a começar. 2. Carregue nos botões Volume Increase (Aumentar volume) e Volume Decrease (Diminuir volume) para regular o volume. 3.
Pager S CLE QS.book Page 94 Friday, October 8, 2004 7:34 AM Algumas funções básicas Reproduzir música 1. Carregue no botão de deslocamento. Aparece o menu principal. 2. Vá para e seleccione a opção Music (Música) 3. Vá para a faixa de som que quer reproduzir e carregue no botão Play/Pause (Reproduzir/Pausa) . . Escutar rádio em FM (Rádio em FM só está disponível nos leitores MuVo N200.) Pode procurar automaticamente todas as estações de rádio disponíveis e programar até 32 estações. 1.
Pager S CLE QS.book Page 95 Friday, October 8, 2004 7:34 AM Codificação de MP3 (A codificação directa de MP3 só está disponível nos leitores MuVo N200.) Pode codificar directamente ou "sacar" música para o leitor, em vez de "sacar" música no computador e depois transferi-la para o leitor. 1. Ligue a tomada de entrada de linha no leitor à saída de linha de uma fonte de som estéreo externa, tal como um CD ou um leitor MiniDisc, através do cabo estéreo fornecido. 2. Carregue no botão de deslocamento.
Pager S CLE QS.book Page 96 Friday, October 8, 2004 7:34 AM Perguntas mais frequentes (FAQ) Posso utilizar o meu leitor como um dispositivo de armazenamento de dados portátil? Sim, é possível. Pode transferir ficheiros de dados através do Creative MuVo Media Explorer ou do Explorador do Windows. Por que é que o meu leitor ignora determinadas faixas? O leitor só reproduz formatos de multimédia válidos (ficheiros MP3 e WMA). Os outros tipos de formatos de multimédia são ignorados.
Pager S CLE QS.book Page 97 Friday, October 8, 2004 7:34 AM Mais informações Creative Knowledge Base Resolva e repare avarias de ordem técnica com a ajuda da Creative Knowledge Base, disponível 24 horas por dia. Vá para www.creative.com e seleccione a sua região. Registe o produto! Aproveite um conjunto de vantagens, registando o produto durante a instalação ou em www.creative.com/register. As vantagens incluem: • Assistência e suporte do produto pela Creative.
Pager S CLE QS.book Page 98 Friday, October 8, 2004 7:34 AM Conselhos sobre segurança Devem ser efectuadas cópias de segurança regularmente, como com qualquer outro dispositivo de armazenamento de multimédia digital. Recomendamos vivamente que siga as precauções de utilização descritas neste folheto e que faça cópias de segurança dos dados no leitor regularmente.
Pager S CLE QS.book Page 99 Friday, October 8, 2004 7:34 AM Svenska Snabböversikt 1 6 2 3 5 4 1. Uppspelnings-/pausknapp Tryck och håll ned för att sätta på och stänga av spelaren. Tryck ner en gång för att spela upp spår och tryck en gång till för att pausa uppspelningen. 2. Mikrofon En inbyggd mikrofon med vilken du kan göra digitala röstinspelningar. 3. LCD Visar menyalternativ. 4. Volymsänkningsknapp Tryck för att minska volymen. 5. Volymhöjningsknapp Tryck för att öka volymen.
Pager S CLE QS.book Page 100 Friday, October 8, 2004 7:34 AM 6. Vrid på bläddraren om du vill bläddra i menyalternativen och tryck på den när du vill välja ett alternativ. Detta kallas även att "bläddra och välja". Vrid på bläddraren under uppspelning om du vill flytta mellan spåren, eller vrid på och håll kvar bläddraren om du vill gå framåt eller bakåt i ett spår. Bläddrare 7 8 9 7. Uttag för hörlurar Anslut hörlurar till den här utgången. 8. Linjeingång Anslut externa stereokällor, t.ex.
Pager S CLE QS.book Page 101 Friday, October 8, 2004 7:34 AM Använda bläddraren Du kan använda bläddraren för att välja alternativ på menyer. Vi använder begreppet ”bläddringsvälja” för att beskriva det du gör med bläddraren när du först bläddrar till ett alternativ och sedan väljer det genom att trycka på bläddraren. 1. Vrid på bläddraren om du vill bläddra bland menyalternativen på LCD-skärmen tills det alternativ som du söker, t.ex. Spelläge , är markerat. 2.
Pager S CLE QS.book Page 102 Friday, October 8, 2004 7:34 AM Komma igång 1 Ställ in datorn Anslut INTE din spelare till datorn förrän du har konfigurerat programmet. 1. Sätt på datorn. 2. Om du har Windows XP eller Windows 2000, måste du logga in som administratör i Windows för att kunna installera programvaran. Mer information får du genom ditt operativsystems direkthjälp. 3. Sätt in installations-CD:n i CD-/DVD-ROM-enheten. CD:n bör starta automatiskt. Följ annars stegen nedan. i.
Pager S CLE QS.book Page 103 Friday, October 8, 2004 7:34 AM 2 Sätt i batteriet Använd ett alkaliskt AAA-batteri i spelaren. När du sätter på datorn första gången är menyerna på engelska. Så här byter du språk 1. Tryck på bläddraren. Huvudmenyn visas. 2. Bläddra och välj alternativet Settings (Inställningar) 3. Bläddra och välj alternativet Language (Språk) 4. Bläddra och välj det språk du vill ha. . .
Pager S CLE QS.book Page 104 Friday, October 8, 2004 7:34 AM 3 Överföra musik 1. Öppna gummihöljet till spelarens USB-port. 2. Anslut spelaren till datorns USB-port med den medföljande USB-kabeln. Tryck inte på spelarens knappar medan du ansluter den till datorn. Datorns USB-port kan finnas på framsidan, baksidan eller någon av datorns sidor. 3. Starta Utforskaren i Windows på datorn. Din spelare identifieras som en flyttbar disk i Utforskaren i Windows. 4.
Pager S CLE QS.book Page 105 Friday, October 8, 2004 7:34 AM 5. När det gäller mera avancerad hantering av sånger kan du använda Creative MuVo Media Explorer eller Creative MediaSource Player/Organizer. Creative MediaSource Player/Organizer är ditt digitala musikcentrum för att spela, skapa, organisera och överföra digital musik. Du startar Creative MediaSource Player/Organizer genom att dubbelklicka på ikonen Creative MediaSource Player/Organizer på skrivbordet.
Pager S CLE QS.book Page 106 Friday, October 8, 2004 7:34 AM 4 Koppla från spelaren Innan du kopplar bort spelaren från datorn, klickar du på ikonen Mata ut eller Säker borttagning av maskinvara på aktivitetsfältet. I annat fall är det möjligt att spelaren inte kan fungera normalt. Följ anvisningarna nedan om du vill koppla bort spelaren utan problem.
Pager S CLE QS.book Page 107 Friday, October 8, 2004 7:34 AM 5 Spela musik 1. Tryck och håll ned Uppspelnings-/paus-knappen tills spelaren startar. Creative-logotypen visas på LCD-skärmen, och därefter MuVo-logotypen. Den musik som har lagrats på spelaren börjar automatiskt spelas upp. Observera att det finns lite lagrad musik på spelaren från början, så att du ska komma igång lättare. 2. Justera volymen genom att hålla ned knapparna för volymhöjning och volymsänkning. 3.
Pager S CLE QS.book Page 108 Friday, October 8, 2004 7:34 AM Några grundläggande funktioner Spela musik 1. Tryck på bläddraren. Huvudmenyn visas. 2. Bläddra och välj alternativet Musik 3. Bläddra till det ljudspår som du vill lyssna på och tryck på Uppspelnings-/ paus-knappen . . Lyssna på FM-radio (FM-radio är tillgänglig endast på MuVo N200-spelarna.) Du kan söka automatiskt efter alla tillgängliga radiostationer och spara upp till 32 radioförinställningar. 1.
Pager S CLE QS.book Page 109 Friday, October 8, 2004 7:34 AM MP3-kodning (Direkt MP3-kodning är tillgänglig endast på MuVo N200-spelarna.) Du kan koda eller "rippa" musik direkt till din spelare istället för att först rippa musiken på datorn och sedan överföra den till spelaren. 1. Anslut linjeingången på spelaren till linjeutgången på en extern stereokälla, t.ex. en CDeller MiniDisc-spelare, med den medföljande stereokabeln. 2. Tryck på bläddraren. Huvudmenyn visas. 3.
Pager S CLE QS.book Page 110 Friday, October 8, 2004 7:34 AM Vanligt förekommande frågor Kan jag använda spelaren som en bärbar datalagringsenhet? Ja, det kan du. Du kan överföra datafiler med Creative MuVo Media Explorer eller Utforskaren i Windows. Varför hoppar spelaren över vissa spår? Spelaren spelar bara upp upp giltiga mediaformat (MP3- och WMA-filer). Övriga mediaformat hoppas över. Varför förstörs vissa filer/spår när jag överför data till min spelare? Överföringen kan ha avbrutits.
Pager S CLE QS.book Page 111 Friday, October 8, 2004 7:34 AM Mer information Creative Knowledge Base Felsök och hitta lösningen på tekniska frågor dygnet runt i Creative Knowledge Base för självhjälp. Gå till www.creative.com och välj önskad region. Registrera din produkt! Genom att registrera din produkt under installationen få du tillgång till en mängd fördelaktiga erbjudanden. Du kan också välja att registrera produkten i efterhand på www.creative.com/register.
Pager S CLE QS.book Page 112 Friday, October 8, 2004 7:34 AM Säkerhetsföreskrifter Som alltid när det är fråga om digitala mediabaserade lagringsenheter, bör data säkerhetskopieras regelbundet. Vi rekommenderar varmt att du vidtar de försiktighetsåtgärder som anges i den här broschyren och dessutom säkerhetskopierar data i spelaren regelbundet.
Pager S CLE QS.book Page 113 Friday, October 8, 2004 7:34 AM Norsk En rask titt på spilleren 1 6 2 3 5 4 1. Spill av/pause-knapp Trykk på og hold knappen for å slå spilleren på og av. Trykk én gang for å starte avspilling av spor, og trykk igjen for å stanse avspilling. 2. Mikrofon En innebygd mikrofon som du kan bruke til digital innspilling av tale. 3. LCD-skjerm Viser menyalternativer. 4. Lavere lydvolum-knapp Trykk for å redusere lydvolumet. 5.
Pager S CLE QS.book Page 114 Friday, October 8, 2004 7:34 AM 7 8 9 7. Kontakt for hodetelefoner 8. Line In-kontakt Koble eksterne stereokilder, som kassettspillere, CD-spillere og MiniDisc-spillere, til denne kontakten. Legg merke til dette ikke er en digital (optisk) inngang. Denne kontakten finnes bare på MuVo N200-spillere. 9. USB-port Koble datamaskinen til denne porten med den medfølgende USB-kabelen. Koble hodetelefoner til denne kontakten.
Pager S CLE QS.book Page 115 Friday, October 8, 2004 7:34 AM Komme i gang 1 Konfigurere datamaskinen IKKE koble spilleren til datamaskinen før du har installert programvaren. 1. Slå på datamaskinen. 2. Hvis du har Windows XP eller Windows 2000, må du logge deg på som administrator i Windows før du kan installere programvaren. Du finner mer informasjon i den elektroniske hjelpen til operativsystemet. 3. Sett inn installerings- og program-CDen i CD-ROM/DVD-ROM-stasjonen.
Pager S CLE QS.book Page 116 Friday, October 8, 2004 7:34 AM 2 Sette inn batteri Bruk ett alkalisk AAA-batteri til spilleren. Første gang du slår spilleren på, vil menyen være på engelsk. Slik skifter du språk 1. Trykk på rulleknappen. Da vises hovedmenyen. 2. Velg alternativet Settings (Innstillinger) 3. Velg alternativet Language (Språk) 4. Velg det aktuelle språket med rulleknappen. 116 med rulleknappen. med rulleknappen.
Pager S CLE QS.book Page 117 Friday, October 8, 2004 7:34 AM 3 Overføre musikk 1. Åpne gummidekselet på spillerens USB-port. 2. Koble spilleren til datamaskinens USB-port med den medfølgende USB-kabelen. Ikke trykk på knappene på spilleren mens du kobler den til datamaskinen. Datamaskinens USB-port kan være plassert på fronten, på baksiden eller på sidene. 3. Start Windows Utforsker på datamaskinen. Du vil se at spilleren blir gjenkjent som en flyttbar disk i Windows Utforsker. 4.
Pager S CLE QS.book Page 118 Friday, October 8, 2004 7:34 AM 5. Bruk Creative MuVo Media Explorer eller Creative MediaSource Player/Organizer til mer avanserte musikkadministrasjonsoppgaver. Creative MediaSource Player/Organizer er et digitalt musikksenter der du kan spille av, lage, organisere og overføre digital musikk. Når du skal starte Creative MediaSource Player/Organizer, dobbeltklikker du på snarveiikonet for Creative MediaSource Player/Organizer på skrivebordet.
Pager S CLE QS.book Page 119 Friday, October 8, 2004 7:34 AM 4 Koble fra spilleren Før du kobler spilleren fra datamaskinen, velger du ikonet Utløs eller Trygg fjerning av maskinvare på oppgavelinjen i Windows for å koble fra spilleren på en trygg måte. Hvis ikke, vil spilleren kanskje ikke kunne fungere normalt. Følg fremgangsmåten nedenfor for å koble fra spilleren på en trygg måte.
Pager S CLE QS.book Page 120 Friday, October 8, 2004 7:34 AM 5 Spille musikk 1. Trykk på og hold nede Spill av/pause-knappen til spilleren slås på. CREATIVE-logoen vises på LCD-skjermen, etterfulgt av MuVo-logoen. Musikk som er lagret på spilleren, vil automatisk bli avspilt. Vær oppmerksom på at spilleren leveres med noe musikk for at du skal komme i gang. 2. Trykk på knappene Høyere lydvolum og Lavere lydvolum for å stille inn lydvolumet. 3.
Pager S CLE QS.book Page 121 Friday, October 8, 2004 7:34 AM Noen grunnleggende funksjoner Spille musikk 1. Trykk på rulleknappen. Da vises hovedmenyen. 2. Velg alternativet Musikk 3. Bla til lydsporet du vil spille, og trykk på Spill av/pause-knappen med rulleknappen. . Lytte på FM-radio (FM-radio er bare tilgjengelig på MuVo N200-spillere.) Du kan søke automatisk etter alle tilgjengelige radiostasjoner og lagre opptil 32 forhåndsinnstilte kanaler. 1.
Pager S CLE QS.book Page 122 Friday, October 8, 2004 7:34 AM MP3-koding (Direkte MP3-koding er bare tilgjengelig på MuVo N200-spillere.) Du kan kode eller "rippe" musikk direkte til spilleren i stedet for å kopiere musikken til en datamaskin først og deretter overføre den til spilleren. 1. Koble Line In-kontakten på spilleren til linjen ut fra en ekstern stereokilde, for eksempel en CD- eller MiniDisc-spiller, med den medfølgende stereokabelen. 2. Trykk på rulleknappen. Da vises hovedmenyen. 3.
Pager S CLE QS.book Page 123 Friday, October 8, 2004 7:34 AM Vanlige spørsmål Kan jeg bruke spilleren som bærbar datalagringsenhet? Ja, det kan du. Du kan overføre datafiler med Creative MuVo Media Explorer eller Windows Utforsker. Hvorfor hopper spilleren over enkelte spor? Spilleren vil bare spille av gyldige medieformater (MP3- og WMA-filer). Andre typer medieformater vil bli hoppet over. Hvorfor blir enkelte filer/spor ødelagt når de blir overført til spilleren? Overføringen kan være avbrutt.
Pager S CLE QS.book Page 124 Friday, October 8, 2004 7:34 AM Flere opplysninger Creative Knowledge Base Finn løsningen på tekniske spørsmål på Creative døgnåpne Knowledge Base for selvhjelp (Knowledge Base). Gå til www.creative.com og velg din region. Registrer produktet! Få tilgang til flere tjenester ved å registrere produktet under installering eller på www.creative.com/register.
Pager S CLE QS.book Page 125 Friday, October 8, 2004 7:34 AM Råd om sikkerhet Som for alle andre digitale, mediebaserte lagringsenheter, bør data sikkerhetskopieres regelmessig. Vi anbefaler sterkt at du følger forholdsreglene som er beskrevet i dette heftet og dessuten sikkerhetskopierer dataene i spilleren regelmessig.
Pager S CLE QS.book Page 126 Friday, October 8, 2004 7:34 AM Dansk En oversigt over afspilleren 1 6 2 3 5 4 1. Knappen Afspil/Pause Tryk og hold for at tænde/slukke afspilleren. Tryk én gang for at afspille numre, og tryk igen for at sætte afspilningen på pause. 2. Mikrofon En indbygget mikrofon, der giver dig mulighed for at lave digitale stemmeoptagelser. 3. LCD-display Viser menupunkter. 4. Knappen Lydstyrke ned Tryk på den for at skrue ned for volumen. 5.
Pager S CLE QS.book Page 127 Friday, October 8, 2004 7:34 AM 7 8 9 7. Stik til hovedtelefoner Tilslut hovedtelefonerne til dette stik. 8. Indgangsstik Tilslut eksterne stereokilder, f.eks. kassetteafspillere, cd-afspillere og minidiskafspillere, til dette stik. Bemærk, at dette ikke er et digitalt (optisk) indgangsstik. Dette stik findes kun på MuVo N200-afspillere. 9. USB-port Tilslut computeren til denne port ved hjælp af det medfølgende USB-kabel.
Pager S CLE QS.book Page 128 Friday, October 8, 2004 7:34 AM Kom i gang 1 Konfiguration af computeren Du skal IKKE slutte afspilleren til computeren, inden du konfigurerer softwaren. 1. Tænd computeren. 2. Hvis du bruger Windows XP eller Windows 2000, skal du logge på som administrator i Windows, før du kan installere softwaren. Yderligere oplysninger finder du i onlinehjælpen til operativsystemet. 3. Læg installations- og program-cd'en i cd-rom-/dvd-rom-drevet. Cd-rommen skal starte automatisk.
Pager S CLE QS.book Page 129 Friday, October 8, 2004 7:34 AM 2 Isætning af batteri Brug ét AAA alkaline-batteri sammen med afspilleren. Første gang du tænder afspilleren, vises menuen på engelsk. Sådan skifter du sprog 1. Tryk på Scroller. Hovedmenuen vises. 2. Vælg menupunktet Settings ved hjælp af Scroll Select 3. Vælg menupunktet Language ved hjælp af Scroll Select 4. Vælg det ønskede sprog ved hjælp af Scroll Select. . .
Pager S CLE QS.book Page 130 Friday, October 8, 2004 7:34 AM 3 Overførsel af musik 1. Åbn gummidækslet på afspillerens USB-port. 2. Slut afspilleren til computerens USB-port med det medfølgende USB-kabel. Du må ikke trykke på afspillerens knapper, mens den sluttes til computeren. Computerens USB-port findes måske på forsiden, bagsiden eller ét af sidepanelerne. 3. Start Windows Stifinder på computeren. Bemærk, at afspilleren genkendes som en flytbar disk i Windows Stifinder. 4.
Pager S CLE QS.book Page 131 Friday, October 8, 2004 7:34 AM 5. Oplysninger om mere avancerede opgaver i forbindelse med håndtering af sange finder du i Creative MuVo Media Explorer eller Creative MediaSource Player/Organizer. Creative MediaSource Player/Organizer er dit digitale musikcenter til afspilning, oprettelse, organisering og overførsel af digital musik.
Pager S CLE QS.book Page 132 Friday, October 8, 2004 7:34 AM 4 Frakobling af afspilleren Inden du kobler afspilleren fra computeren, skal du bruge Windows-ikonet Skub ud eller ikonet Sikker fjernelse af hardware på proceslinjen til at frakoble afspilleren på sikker vis. Hvis ikke, fungerer afspilleren muligvis ikke normalt. Følg nedenstående trin til at frakoble afspilleren på sikker vis.
Pager S CLE QS.book Page 133 Friday, October 8, 2004 7:34 AM 5 Afspilning af musik 1. Tryk på og hold knappen Afspil/Pause nede , indtil afspilleren tændes. Logoet CREATIVE vises på LCD-displayet efterfulgt at logoet MuVo. Musik, der er gemt på afspilleren, afspilles automatisk. Bemærk, at afspilleren leveres med forudindlæst musik, så du kan komme i gang. 2. Tryk på knapperne Lydstyrke op og Lydstyrke ned for at justere volumen. 3.
Pager S CLE QS.book Page 134 Friday, October 8, 2004 7:34 AM Almindelige funktioner Afspilning af musik 1. Tryk på Scroller. Hovedmenuen vises. 2. Vælg menupunktet Musik ved hjælp af Scroll Select 3. Rul hen til det lydspor, du vil afspille, og tryk på knappen Afspil/Pause . . Lytning til FM-radio FM-radio findes kun på MuVo N200-afspillere. Du kan scanne efter alle tilgængelige radiostationer og gemme op til 32 forvalg. 1. Tilslut hovedtelefonerne til hovedtelefonstikket. 2. Tryk på Scroller.
Pager S CLE QS.book Page 135 Friday, October 8, 2004 7:34 AM MP3-kodning Direct MP3-kodning findes kun på MuVo N200-afspillere. Du kan kode direkte eller "rippe" musik til afspilleren i stedet for at rippe musik på computeren først, og derefter overføre den til afspilleren. 1. Tilslut indgangsstikket på afspilleren til linjeudgangen på en ekstern stereokilde, f.eks. en cd- eller minidiskafspiller, ved hjælp af det medfølgende stereokabel. 2. Tryk på Scroller. Hovedmenuen vises. 3.
Pager S CLE QS.book Page 136 Friday, October 8, 2004 7:34 AM Ofte stillede spørgsmål Kan jeg bruge afspilleren som en bærbar datalagringsenhed? Ja, det kan du. Du kan overføre datafiler ved hjælp af Creative MuVo Media Explorer eller Windows Stifinder. Hvorfor springer afspilleren over bestemte spor? Afspilleren kan kun spille gyldige medieformater (MP3- og WMA-filer). Alle andre medieformater springes over.
Pager S CLE QS.book Page 137 Friday, October 8, 2004 7:34 AM Yderligere oplysninger Creative Knowledge Base Du kan få oplysninger om tekniske spørgsmål og fejlfinding i Creatives Knowledge Base, som er tilgængelig 24 timer i døgnet. Gå til www.creative.com, og vælg dit område. Registrér dit produkt! Du får adgang til massevis af fordele ved at registrere produktet under installationen eller senere på www.creative.com/register. Fordelene omfatter: • Service og produktsupport fra Creative.
Pager S CLE QS.book Page 138 Friday, October 8, 2004 7:34 AM Sikkerhedsoplysninger Som ved enhver lagringsenhed baseret på et digitalt medie skal data jævnligt sikkerhedskopieres. Vi anbefaler, at du træffer forholdsreglerne vedrørende brug, som er angivet i dette hæfte, og også jævnligt sikkerhedskopierer dine data på afspilleren.
Pager S CLE QS.book Page 139 Friday, October 8, 2004 7:34 AM Suomi Soitin yhdellä silmäyksellä 1 6 2 3 5 4 1. Toista/Keskeytä-painike Kytke soittimeen virta ja katkaise virta pitämällä tätä painiketta alas painettuna. Voit aloittaa kappaleiden toiston painamalla painiketta kerran. Voit keskeyttää toiston painamalla painiketta uudelleen. 2. Mikrofoni Sisäänrakennettu mikrofoni digitaalista äänentallennusta varten. 3. Nestekidenäyttö Näyttää valikkokomennot. 4.
Pager S CLE QS.book Page 140 Friday, October 8, 2004 7:34 AM 6. Selaa valikkokomentoja pyörittämällä vierityspainiketta. Valitse haluamasi vaihtoehto painamalla vierityspainiketta. Tätä toimenpidettä kutsutaan myös valitsemiseksi vierityspainikkeen avulla. Voit siirtyä toiston aikana raitojen välillä pyörittämällä vierityspainiketta tai liikkua raidalla pitämällä vierityspainiketta alas painettuna ja pyörittämällä sitä. Vierityspainike 7 8 9 7. Kuulokeliitäntä Kytke kuulokkeet tähän liitäntään. 8.
Pager S CLE QS.book Page 141 Friday, October 8, 2004 7:34 AM Vierityspainikkeen käyttäminen Voit valita valikkokomentoja vierityspainikkeen avulla. Kun ohjeessa pyydetään valitsemaan jotakin vierityspainikkeen avulla, tarkoitetaan sitä, että valikkokomentoja selataan ensin pyörittämällä vierityspainiketta ja haluttu komento valitaan painamalla vierityspainiketta. 1.
Pager S CLE QS.book Page 142 Friday, October 8, 2004 7:34 AM Aloittaminen 1 Tietokoneen asetusten määrittäminen ÄLÄ kytke soitinta tietokoneeseen, ennen kuin ohjelma on asennettu. 1. Käynnistä tietokone. 2. Jos käytössä on Windows XP tai Windows 2000 -käyttöjärjestelmä, ohjelman asentaminen edellyttää käyttäjän kirjautumista tietokoneeseen järjestelmänvalvojana. Lisätietoja on käyttöjärjestelmän käytönaikaisessa ohjeessa. 3. Aseta asennus- ja sovelluslevy CD- tai DVD-asemaan.
Pager S CLE QS.book Page 143 Friday, October 8, 2004 7:34 AM 2 Pariston asentaminen Käytä soittimessa AAA-alkaliparistoa. Kun käynnistät soittimen ensimmäisen kerran, valikko on englanninkielinen. Kielen vaihtaminen 1. Paina vierityspainiketta. Näyttöön tulee päävalikko. 2. Valitse vierityspainikkeen avulla Settings (Asetukset) -vaihtoehto 3. Valitse vierityspainikkeen avulla Language (Kieli) -vaihtoehto 4. Valitse vierityspainikkeen avulla haluamasi kieli. . .
Pager S CLE QS.book Page 144 Friday, October 8, 2004 7:34 AM 3 Musiikin siirtäminen 1. Nosta soittimen USB-portin kuminen suojus. 2. Kytke soitin tietokoneen USB-porttiin soittimen mukana toimitetulla USB-kaapelilla. Kun kytket soittimen tietokoneeseen, älä paina soittimen painikkeita. USB-portti voi olla tietokoneen etu-, taka- tai sivupaneelissa. 3. Käynnistä tietokoneen Resurssienhallinta. Windowsin Resurssienhallinta tunnistaa soittimen siirrettäväksi levyksi. 4.
Pager S CLE QS.book Page 145 Friday, October 8, 2004 7:34 AM 5. Vaativissa kappaleiden hallintatehtävissä voit käyttää Creative MuVo Media Explorer- tai Creative MediaSource Player/Organizer -sovelluksia. Creative MediaSource Player/ Organizer on digitaalinen musiikkikeskus digitaalisessa muodossa olevan musiikin toistamiseen, luomiseen, järjestämiseen ja siirtämiseen.
Pager S CLE QS.book Page 146 Friday, October 8, 2004 7:34 AM 4 Soittimen irrottaminen Napsauta tehtäväpalkin Windows Eject- tai Safely Remove Hardware -kuvaketta, ennen kuin irrotat soittimen tietokoneesta. Jos et tee niin, soitin ei ehkä toimi normaalilla tavalla.
Pager S CLE QS.book Page 147 Friday, October 8, 2004 7:34 AM 5 Musiikin toistaminen 1. Pidä Toista/Keskeytä-painiketta alas painettuna, kunnes soitin käynnistyy. Nestekidenäyttöön tulee ensin näkyviin CREATIVE-logo ja sen jälkeen MuVo-logo. Soittimeen tallennetun musiikin toistaminen käynnistyy automaattisesti. Huomaa, että soittimeen on tallennettu valmiiksi musiikkia, jotta pääset helpommin alkuun. 2.
Pager S CLE QS.book Page 148 Friday, October 8, 2004 7:34 AM Joitakin perustoimintoja Musiikin toistaminen 1. Paina vierityspainiketta. Näyttöön tulee päävalikko. 2. Valitse vierityspainikkeen avulla Musiikki-vaihtoehto 3. Valitse toistettava ääniraita ja paina Toista/Keskeytä-painiketta . . FM-radion kuunteleminen (FM-radio on vain MuVo N200 -soittimissa.) Voit etsiä automaattisesti kaikki käytettävissä olevat radioasemat ja tallentaa enintään 32 radioaseman esiasetusta. 1.
Pager S CLE QS.book Page 149 Friday, October 8, 2004 7:34 AM MP3-koodaus (Suora MP3-koodaus on käytettävissä vain MuVo N200 -soittimissa.) Voit koodata musiikkia soittimeen suoraan. Tällöin musiikkia ei tarvitse ensin kopioida tietokoneessa ja sitten siirtää soittimeen. 1. Kytke soittimen Line In -liitäntä ulkoisen stereoäänilähteen, kuten CD- tai MiniDisc-soittimen, linjalähtöön käyttämällä soittimen mukana toimitettua stereokaapelia. 2. Paina vierityspainiketta. Näyttöön tulee päävalikko. 3.
Pager S CLE QS.book Page 150 Friday, October 8, 2004 7:34 AM Usein kysytyt kysymykset Voiko soitinta käyttää kannettavana tietojen tallennuslaitteena? Kyllä voi. Datatiedostoja voidaan siirtää Creative MuVo Media Explorer -ohjelmassa tai Windowsin Resurssienhallinnassa. Miksi soitin ohittaa tietyt raidat? Soitin toistaa vain kelvollisia tiedostomuotoja (MP3- ja WMA-tiedostoja). Se hyppää muiden tiedostojen yli. Miksi jotkin tiedostot tai raidat vioittuivat siirron yhteydessä? Siirto on voinut keskeytyä.
Pager S CLE QS.book Page 151 Friday, October 8, 2004 7:34 AM Lisätietoja Creativen Knowledge Base -tietokanta Voit ratkaista ja määrittää teknisiä ongelmia Creativen aina käytössä olevan Knowledge Base -tietokannan avulla. Siirry osoitteeseen www.creative.com ja valitse oma asuinalueesi. Rekisteröi tuote Rekisteröimällä tuotteen asennuksen aikana tai osoitteessa www.creative.com/register saat monia etuja.
Pager S CLE QS.book Page 152 Friday, October 8, 2004 7:34 AM Käyttöturvallisuus Kaikentyyppisiin tallennuslaitteisiin tallennetut tiedot on syytä varmuuskopioida säännöllisesti. On suositeltavaa ottaa huomioon tässä oppaassa annetut käyttöön liittyvät ohjeet ja ottaa soittimeen tallennetuista tiedoista säännöllisesti varmuuskopio.
Pager S CLE QS.book Page 153 Friday, October 8, 2004 7:34 AM Česky První seznámení s přehrávačem 1 6 2 3 5 4 1. Tlačítko Přehrát/ Pozastavit Stisknutím a přidržením tohoto tlačítka přehrávač zapnete nebo vypnete. Jedním stisknutím zahájíte přehrávání skladeb, opakovaným stisknutím přehrávání pozastavíte. 2. Mikrofon Integrovaný mikrofon umožňuje pořizovat digitální hlasové nahrávky. 3. Displej LCD Zobrazuje položky nabídek. 4. Tlačítko pro snížení hlasitosti Stisknutím snížíte hlasitost. 5.
Pager S CLE QS.book Page 154 Friday, October 8, 2004 7:34 AM Otáčením kolečka procházejte možnostmi nabídek a jeho stisknutím příslušnou možnost vyberte. Tato akce se též označuje jako výběr pomocí kolečka. Během přehrávání se lze otáčením kolečka přesouvat mezi skladbami, nebo se můžete jeho pootočením a přidržením posouvat v rámci skladby. 6. Kolečko 7 8 9 7. Konektor pro sluchátka K tomuto konektoru připojte sluchátka. 8.
Pager S CLE QS.book Page 155 Friday, October 8, 2004 7:34 AM Použití kolečka Pomocí kolečka můžete vybírat položky z nabídek. Termín „vybrat pomocí kolečka“ znamená, že se máte pomocí kolečka přesunout na požadovanou možnost a pak ji stisknutím kolečka vybrat. 1. Otáčením kolečka se posouvejte na displeji LCD po možnostech nabídek, dokud není zvýrazněna požadovaná možnost, například Play Mode (režim přehrávání). 2. Stisknutím kolečka vybranou položku potvrďte.
Pager S CLE QS.book Page 156 Friday, October 8, 2004 7:34 AM Začínáme 1 Nastavení počítače NEPŘIPOJUJTE přehrávač k počítači před instalací softwaru. 1. Zapněte počítač. 2. Máte-li operační systém Windows XP nebo Windows 2000, musíte se před instalací softwaru přihlásit do systému jako správce. Další informace získáte v online nápovědě k operačnímu systému. 3. Vložte disk CD-ROM Installation and Applications do jednotky CD-ROM/ DVD-ROM. Disk by měl být automaticky spuštěn.
Pager S CLE QS.book Page 157 Friday, October 8, 2004 7:34 AM 2 Vložení baterie Pro přehrávač používejte jednu alkalickou baterii AAA. Při prvním zapnutí přehrávače bude nabídka v angličtině. Změna jazyka 1. Stiskněte kolečko. Zobrazí se hlavní nabídka. 2. Vyberte pomocí kolečka možnost Settings 3. Vyberte pomocí kolečka možnost Language (nastavení). (jazyk). 4. Vyberte pomocí kolečka požadovaný jazyk.
Pager S CLE QS.book Page 158 Friday, October 8, 2004 7:34 AM 3 Přenos hudby 1. Odehněte gumovou krytku portu USB přehrávače. 2. Připojte přehrávač k portu USB počítače pomocí kabelu USB dodaného se zařízením. Při zapojování k počítači netiskněte tlačítka na přehrávači. Port USB naleznete na přední, zadní nebo boční stěně počítače. 3. Spust’te v počítači program Průzkumník Windows. Přehrávač bude v Průzkumníku Windows rozpoznán jako vyměnitelný disk.
Pager S CLE QS.book Page 159 Friday, October 8, 2004 7:34 AM 4. Přetažením pomocí myši přeneste zvukové soubory (MP3 nebo WMA) do přehrávače. V Průzkumníku Windows můžete také přenášet datové soubory. Další informace o používání Průzkumníku Windows naleznete v nápovědě. 5. Pro složitější úkoly související se správou skladeb můžete používat aplikace Creative MuVo Media Explorer nebo Creative MediaSource Player/Organizer.
Pager S CLE QS.book Page 160 Friday, October 8, 2004 7:34 AM 4 Odpojení přehrávače Před odpojením přehrávače od počítače přehrávač bezpečně odpojte pomocí příkazu Vysunout v systému Windows nebo pomocí ikony Bezpečně odebrat hardware na hlavním panelu. V opačném případě se může stát, že přehrávač nebude pracovat obvyklým způsobem. Chcete-li přehrávač bezpečně odpojit, postupujte podle následujících kroků.
Pager S CLE QS.book Page 161 Friday, October 8, 2004 7:34 AM 5 Přehrávání hudby 1. Stiskněte a přidržte tlačítko Přehrát/Pozastavit , dokud se přehrávač nezapne. Na displeji LCD se objeví logo CREATIVE, následuje logo MuVo. Automaticky se spustí přehrávání skladeb uložených v přehrávači. Přehrávač je dodáván s několika již nahranými skladbami, aby pro vás bylo seznámení s přístrojem snazší. 2. Tisknutím tlačítek pro zvýšení a snížení hlasitosti upravíte hlasitost. 3.
Pager S CLE QS.book Page 162 Friday, October 8, 2004 7:34 AM Některé základní funkce Přehrávání hudby 1. Stiskněte kolečko. Zobrazí se hlavní nabídka. 2. Vyberte pomocí kolečka možnost Music (hudba). 3. Posuňte se na skladbu, kterou chcete přehrát, a stiskněte tlačítko Přehrát/ Pozastavit . Poslech rozhlasového vysílání v pásmu VKV (Radiopřijímač VKV je k dispozici jen u přehrávače MuVo N200.) Můžete automaticky prohledat všechny dostupné rádiové stanice a uložit až 32 předvoleb. 1.
Pager S CLE QS.book Page 163 Friday, October 8, 2004 7:34 AM Kódování MP3 (Kódování přímo do formátu MP3 je k dispozici jen u přehrávače MuVo N200.) Hudbu můžete kódovat přímo do přehrávače, není tedy třeba ji nejprve nahrát do počítače a pak přenést do přehrávače. 1. Propojte linkový vstup 1 přehrávače s linkovým výstupem externího stereofonního zdroje, např. přehrávače CD či MiniDisc, pomocí stereofonního kabelu dodaného se zařízením. 2. Stiskněte kolečko. Zobrazí se hlavní nabídka. 3.
Pager S CLE QS.book Page 164 Friday, October 8, 2004 7:34 AM Časté dotazy Mohu přehrávač využívat jako přenosnou pamě″ pro data? Ano, můžete. Data lze přenášet pomocí aplikace Creative MuVo Media Explorer nebo pomocí Průzkumníku Windows. Proč přehrávač určité skladby vynechává? Přehrávač přehrává pouze platné formáty (MP3 nebo WMA). Ostatní typy multimediálních souborů budou přeskočeny. Proč jsou některé soubory nebo skladby po přenesení do přehrávače poškozené? Přenos souborů byl patrně přerušen.
Pager S CLE QS.book Page 165 Friday, October 8, 2004 7:34 AM Další informace Znalostní báze Creative Knowledge Base Při řešení technických dotazů a problémů se obrat’te znalostní bázi Knowledge Base společnosti Creative, která je vám k dispozici 24 hodin denně. Navštivte webovou stránku www.creative.com a vyberte oblast, kde se nacházíte. Registrace produktu Zaregistrováním produktu během instalace nebo na adrese www.creative.com/ register můžete získat velké množství výhod.
Pager S CLE QS.book Page 166 Friday, October 8, 2004 7:34 AM Bezpečnostní pokyny Pro všechna úložná zařízení využívající digitální média platí, že by data měla být pravidelně zálohována. Vřele doporučujeme dodržovat pokyny týkající se použití uvedené v této brožuře a také pravidelně zálohovat data v přehrávači.
Pager S CLE QS.book Page 167 Friday, October 8, 2004 7:34 AM Polski Odtwarzacz w skrócie 1 6 2 3 5 4 1. Przycisk odtwarzania/ wstrzymania Naciśnij i przytrzymaj, aby włączyć i wyłączyć odtwarzacz. Naciśnij raz, aby rozpocząć odtwarzanie ścieżki, naciśnij ponownie, aby zatrzymać odtwarzanie. 2. Mikrofon Wbudowany mikrofon umożliwia nagrywanie dźwięku w formacie cyfrowym. 3. LCD Wyświetla opcje menu. 4. Przycisk zmniejszania głośności Naciśnij, aby zmniejszyć głośność. 5.
Pager S CLE QS.book Page 168 Friday, October 8, 2004 7:34 AM Obróć pokrętłem, aby poruszać się po liście opcji. Wciśnij je, aby wybrać żądaną opcję. W odniesieniu do tej czynności jest stosowane również określenie „przewiń i wybierz”. Obracanie pokrętłem podczas odtwarzania umożliwia wybieranie ścieżek. Obracanie pokrętłem i jednoczesne przytrzymywanie go w pozycji wciśniętej pozwala na przewijanie ścieżek. 6. Pokrętło 7 8 9 7. Gniazdo słuchawek Gniazdo to służy do podłączania słuchawek. 8.
Pager S CLE QS.book Page 169 Friday, October 8, 2004 7:34 AM Korzystanie z pokrętła Opcje menu można wybierać, korzystając z pokrętła. Termin „przewiń i wybierz” oznacza przejście do opcji menu za pomocą przewijania, a następie wybranie danej opcji przez naciśnięcie pokrętła. 1. Korzystając z pokrętła, przewiń menu opcji na wyświetlaczu LCD aż do podświetlenia odpowiedniej opcji, na przykład Play Mode . 2. Naciśnij pokrętło, aby wybrać tę opcję menu.
Pager S CLE QS.book Page 170 Friday, October 8, 2004 7:34 AM Uruchamianie 1 Konfigurowanie komputera NIE NALEŻY podłączać odtwarzacza do komputera przed skonfigurowaniem oprogramowania. 1. Włącz komputer. 2. W przypadku korzystania z systemu operacyjnego Windows XP lub Windows 2000 do skonfigurowania oprogramowania konieczne jest zalogowanie się jako administrator. Więcej informacji zawiera pomoc systemu operacyjnego przygotowana w postaci elektronicznej. 3.
Pager S CLE QS.book Page 171 Friday, October 8, 2004 7:34 AM 2 Wkładanie baterii Do zasilania odtwarzacza należy używać wyłącznie baterii alkalicznych AAA. Przy pierwszym włączeniu odtwarzacza język menu zostanie ustawiony na angielski. Aby zmienić język 1. Naciśnij pokrętło. Zostanie wyświetlone menu główne. 2. Przewiń i wybierz opcję Settings . 3. Przewiń i wybierz opcję Language . 4. Przewiń i wybierz odpowiedni język.
Pager S CLE QS.book Page 172 Friday, October 8, 2004 7:34 AM 3 Przenoszenie muzyki 1. Zdejmij gumową osłonę portu USB w odtwarzaczu. 2. Podłącz odtwarzacz do portu USB komputera za pomocą dostarczonego kabla USB. Podłączając odtwarzacz do komputera, nie naciskaj znajdujących się na nim przycisków. Port USB komputera może znajdować się z przodu, z tyłu lub z boku komputera. 3. W komputerze uruchom program Eksplorator Windows.
Pager S CLE QS.book Page 173 Friday, October 8, 2004 7:34 AM 4. Przenieś pliki audio (MP3 lub WMA) do odtwarzacza techniką „przeciągnij i upuść”. Pliki można przenosić także za pomocą programu Eksplorator Windows. Więcej informacji o korzystaniu z programu Eksplorator Windows znajduje się w pomocy przygotowanej w postaci elektronicznej. 5.
Pager S CLE QS.book Page 174 Friday, October 8, 2004 7:34 AM 4 Odłączanie odtwarzacza Aby odłączenie odtwarzacza od komputera było bezpieczne, przed odłączeniem należy kliknąć ikonę Wysuń lub Bezpieczne usuwanie sprzętu znajdującą się na pasku zadań systemu Windows. W przeciwnym razie odtwarzacz może nie działać prawidłowo. Aby bezpiecznie odłączyć odtwarzacz, wykonaj następujące czynności.
Pager S CLE QS.book Page 175 Friday, October 8, 2004 7:34 AM 5 Odtwarzanie muzyki 1. Naciśnij i przytrzymaj przycisk odtwarzania/wstrzymania aż do włączenia odtwarzacza. Na wyświetlaczu LCD zostanie wyświetlone logo CREATIVE, a następnie logo MuVo. Rozpocznie się automatyczne odtwarzanie muzyki przechowywanej w odtwarzaczu. W odtwarzaczu zostało fabrycznie zapisanych kilka utworów muzycznych, co ułatwia rozpoczęcie korzystania z urządzenia. 2.
Pager S CLE QS.book Page 176 Friday, October 8, 2004 7:34 AM Niektóre podstawowe funkcje Odtwarzanie muzyki 1. Naciśnij pokrętło. Zostanie wyświetlone menu główne. 2. Przewiń i wybierz opcję Music . 3. Przewiń do ścieżki audio, którą chcesz odtworzyć, i naciśnij przycisk odtwarzania/wstrzymania . Słuchanie radia FM Radio FM jest dostępne tylko w przypadku odtwarzaczy MuVo N200. Można automatycznie wyszukiwać wszystkie dostępne stacje radiowe i zapisać do 32 zaprogramowanych stacji radiowych. 1.
Pager S CLE QS.book Page 177 Friday, October 8, 2004 7:34 AM Kodowanie MP3 Bezpośrednie kodowanie MP3 jest dostępne tylko w przypadku odtwarzaczy MuVo N200. Możliwe jest kodowanie lub zgrywanie muzyki bezpośrednio w odtwarzaczu, bez konieczności uprzedniego zgrywania muzyki w komputerze i przesłania jej do odtwarzacza. 1. Za pomocą dostarczonego kabla stereofonicznego podłącz gniazdo wejściowe w odtwarzaczu do wyjścia zewnętrznego źródła stereofonicznego, takiego jak odtwarzacz CD lub MiniDisc. 2.
Pager S CLE QS.book Page 178 Friday, October 8, 2004 7:34 AM 3. Aby odblokować odtwarzacz, naciśnij dowolny przycisk, a następnie przewiń i wybierz opcję Unlock . Więcej informacji można znaleźć w Przewodniku użytkownika dostępnym na instalacyjnym dysku CD. Przejdź do folderu d:\manual\\manual.chm (gdzie d:\ jest literą napędu CD-ROM\DVD-ROM w komputerze, a – językiem, w jakim jest napisany dokument).
Pager S CLE QS.book Page 179 Friday, October 8, 2004 7:34 AM Często zadawane pytania Czy można używać odtwarzacza jako przenośnego urządzenia pamięci masowej? Tak, można. Pliki danych można przenosić za pomocą programu Creative MuVo Media Explorer lub Eksplorator Windows. Dlaczego odtwarzacz pomija niektóre ścieżki? Odtwarzacz odtwarza tylko pliki multimedialne o prawidłowych formatach (MP3 i WMA). Pozostałe formaty plików multimedialnych są pomijane.
Pager S CLE QS.book Page 180 Friday, October 8, 2004 7:34 AM Informacje dodatkowe Baza wiedzy Creative Knowledge Base Dostępna całodobowo baza wiedzy firmy Creative umożliwia samodzielne rozwiązywanie problemów technicznych i uzyskiwanie odpowiedzi na pytania. Przejdź do witryny www.creative.com i wybierz swój region. Zarejestruj swoje urządzenie! Po zarejestrowaniu swojego produktu podczas instalacji lub pod adresem www.creative.com/register można korzystać z wielu udogodnień.
Pager S CLE QS.book Page 181 Friday, October 8, 2004 7:34 AM Zalecenia bezpiecznego użytkowania W przypadku każdego urządzenia pamięci masowej z nośnikami cyfrowymi należy regularnie tworzyć kopie zapasowe danych. Zalecamy zapoznanie się z uwagami na temat bezpiecznego korzystania z tego urządzenia podanymi w niniejszym dokumencie, a także regularne tworzenie kopii zapasowych danych w odtwarzaczu.
Pager S CLE QS.book Page 182 Friday, October 8, 2004 7:34 AM Русский Краткое описание проигрывателя 1 6 2 3 5 4 1. Кнопка воспроизведения/ паузы Нажмите и удерживайте нажатой, чтобы включить или выключить проигрыватель. Нажмите один раз, чтобы начать воспроизведение дорожек, затем нажмите еще раз для приостановки воспроизведения. 2. Микрофон Встроенный микрофон, с помощью которого можно производить цифровую запись голоса. 3. ЖК-дисплей Просмотр пунктов меню. 4.
Pager S CLE QS.book Page 183 Friday, October 8, 2004 7:34 AM Для просмотра пунктов меню поворачивайте колесико прокрутки, а чтобы выбрать тот или иной пункт, нажмите на колесико. Это действие также называется "выбор прокруткой". Во время воспроизведения поверните колесико прокрутки для перехода от одной дорожки к другой, либо нажмите и удерживайте колесико для перемещения в пределах одной дорожки. 6. Колесико прокрутки 7 8 7. Разъем стереонаушников 9 К этому разъему подключаются наушники. 8.
Pager S CLE QS.book Page 184 Friday, October 8, 2004 7:34 AM Использование колесика прокрутки Колесико прокрутки можно использовать для выбора пунктов меню. Термин "выбор прокруткой" используется в тех случаях, когда подразумевается, что просмотр пунктов меню осуществляется прокруткой колесика, а выбор нужного пункта – нажатием на него. 1. Поворачивайте колесико прокрутки до тех пор, пока на ЖК-дисплее не будет выделен нужный пункт, например Play Mode (режим воспроизведения). 2.
Pager S CLE QS.book Page 185 Friday, October 8, 2004 7:34 AM Приступая к работе 1 Настройка компьютера НЕ подключайте проигрыватель к компьютеру до установки программного обеспечения. 1. Включите компьютер. 2. Если у вас установлена операционная система Windows XP или Windows 2000, для настройки программного обеспечения надо войти в систему с полномочиями администратора. Для получения дополнительной информации обратитесь к интерактивной справке применяемой операционной системы. 3.
Pager S CLE QS.book Page 186 Friday, October 8, 2004 7:34 AM 2 Установка батареи В проигрывателе используется одна щелочная батарея AAA. При первом включении проигрывателя появляется меню на английском языке. Изменение языка 1. Нажмите на колесико прокрутки. Появится главное меню. 2. Выберите прокруткой значок Settings (настройка) 3. Выберите прокруткой пункт Language (язык) 4. Выберите прокруткой нужный язык. 186 . .
Pager S CLE QS.book Page 187 Friday, October 8, 2004 7:34 AM 3 Перенос музыки 1. Снимите резиновую заглушку с порта USB проигрывателя. 2. Подключите проигрыватель к порту USB компьютера с помощью прилагаемого кабеля USB. Не нажимайте кнопки проигрывателя, когда тот подключен к компьютеру. Порт USB компьютера может быть расположен на передней, боковой или задней панели. 3. Запустите проводник Windows на компьютере. Вы увидите, что в проводнике проигрыватель будет определен как съемный диск.
Pager S CLE QS.book Page 188 Friday, October 8, 2004 7:34 AM 4. Перенесите звуковые файлы (MP3 или WMA) в проигрыватель, используя операцию перетаскивания. Можно также перенести данные с помощью проводника Windows. Для получения дополнительной информации о проводнике Windows обратитесь к соответствующей интерактивной справке. 5. Для выполнения более сложных операций по управлению звуковыми файлами можно использовать программы Creative MuVo Media Explorer или Creative MediaSource Player/Organizer.
Pager S CLE QS.book Page 189 Friday, October 8, 2004 7:34 AM 4 Отключение проигрывателя Для безопасного отключения проигрывателя от компьютера воспользуйтесь значком извлечения из Windows или Безопасное извлечение устройства на панели задач. В противном случае нормальная работа проигрывателя не гарантируется. Выполните указанные ниже действия для безопасного отключения проигрывателя.
Pager S CLE QS.book Page 190 Friday, October 8, 2004 7:34 AM 5 Воспроизведение музыки 1. Нажмите и удерживайте кнопку воспроизведения/паузы до тех пор, пока проигрыватель не включится. На ЖК дисплее появится логотип CREATIVE, а затем логотип MuVo. Воспроизведение музыки, записанной в проигрывателе, начинается автоматически. Обратите внимание на то, что проигрыватель поставляется с предварительно записанным музыкальным произведением, что позволяет сразу же начать прослушивание. 2.
Pager S CLE QS.book Page 191 Friday, October 8, 2004 7:34 AM Некоторые основные функции Воспроизведение музыки 1. Нажмите на колесико прокрутки. Появится главное меню. 2. Выберите прокруткой пункт Music (музыка) . 3. Прокрутите до звуковой дорожки, которую вы хотите послушать, и нажмите кнопку воспроизведения/паузы .
Pager S CLE QS.book Page 192 Friday, October 8, 2004 7:34 AM MP3-кодирование (Прямое MP3-кодирование предусмотрено только в проигрывателях MuVo N2000.) Можно загружать музыку непосредственно в проигрыватель посредством прямого кодирования, а не извлекать сначала на компьютер, а затем переносить в проигрыватель. 1. Используя входящий в комплект поставки стереокабель, соедините гнездо Line In (линейный вход) проигрывателя с источником внешнего стереосигнала, например с проигрывателем дисков CD или MiniDisc.
Pager S CLE QS.book Page 193 Friday, October 8, 2004 7:34 AM 2. Выберите прокруткой пункт Lock (блокирование) . В верхнем правом углу ЖК-дисплея появится соответствующий значок. 3. Для разблокирования проигрывателя нажмите любую кнопку и выберите прокруткой пункт Unlock (разблокирование) . Дополнительные сведения см. в руководстве пользователя на установочном компакт-диске. Откройте файл d:\manual\<язык>\manual.
Pager S CLE QS.book Page 194 Friday, October 8, 2004 7:34 AM Часто задаваемые вопросы Можно ли использовать проигрыватель как портативное устройство для хранения данных? Да, можно. Вы можете переносить файлы данных с помощью программы Creative MuVo Media Explorer или проводника Windows. Почему мой проигрыватель пропускает некоторые дорожки? Проигрыватель воспроизводит только файлы в формате MP3 и WMA. Файлы другого формата пропускаются.
Pager S CLE QS.book Page 195 Friday, October 8, 2004 7:34 AM Дополнительная информация База знаний Creative Knowledge Base База знаний Creative Knowledge Base доступна круглосуточно и предназначена для самостоятельного решения технических вопросов и устранения неполадок. Перейдите к сайту www.creative.com и выберите свой регион. Зарегистрируйте свой проигрыватель! Настоятельно рекомендуем зарегистрировать проигрыватель в процессе установки или на веб-странице www.creative.com/register.
Pager S CLE QS.book Page 196 Friday, October 8, 2004 7:34 AM © Компания Creative Technology Ltd, 2004. Все права защищены. Логотип Creative, MuVo и Creative MediaSource являются товарными знаками или зарегистрированными товарными знаками Creative Technology Ltd. в США и/или других странах. Microsoft, Windows и логотип Windows являются зарегистрированными товарными знаками корпорации Microsoft.
Pager S CLE QS.book Page 197 Friday, October 8, 2004 7:34 AM Меры предосторожности При использовании проигрывателя, как и любого другого цифрового устройства, служащего для хранения информации, необходимо регулярно создавать резервные копии данных. Пользователю настоятельно рекомендуется соблюдать указанные в данном документе меры предосторожности, а также регулярно создавать резервные копии информации, хранящейся в проигрывателе.
Pager S CLE QS.
Pager S CLE QS.
Pager S CLE QS.