Introduction Congratulations on your purchase of Creative’s latest audio revolution, Sound Blaster® Recon3D PCIe! With cutting edge technology from the leaders in PC audio, Sound Blaster Recon3D PCIe will give you years of reliable entertainment on your PCI Express (PCIe®) enabled personal computer. This User's Guide contains software installation and usage information for your audio card. System Requirements Minimum Requirements ❑ Intel® CoreTM2 Duo or AMD® processor equivalent (CoreTM2 2.
More Help For the latest news and products for Sound Blaster, visit www.soundblaster.com. The site also includes information on making purchases, technical help, and the latest driver updates. Using Creative Software AutoUpdate Locating, downloading, and installing updates for your Creative products is now simpler and faster with the web-based Creative Software AutoUpdate system.
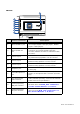
About Your Hardware For instructions on installing your Sound Blaster Recon3D PCIe, and any additional accessories, consult the Quick Start leaflet. To learn more about your product, consult the following sections: ❑ Your Sound Blaster Recon3D PCIe Audio Card ❑ Your Sound Blaster I/O Drive* Notes • *Available for selected models of your audio device in some regions. • Actual products may differ slightly from those shown in this chapter.
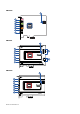
SB1350: 8 7 6 5 4 3 2 1 SB1354 8 7 6 9 5 4 3 10 2 1 SB1356: 8 7 6 5 4 3 2 1 About Your Hardware 4
SB1358: 8 7 6 5 4 3 2 1 Jack or Connector Description 1. Optical S/PDIF In jack Connects to playback devices with optical connectors (for example, Digital Audio Tape players, MiniDisc players or DVD players). 2. Optical S/PDIF Out jack Connects to recording devices with optical connectors (for example, Digital Audio Tape recorders, MiniDisc recorders or external hard disk recorders). 3.
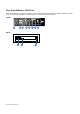
Your Sound Blaster I/O Drive* Your Sound Blaster I/O Drive connects with your Sound Blaster Recon3D Fatal1ty Champion audio card, and provides additional connectivity for a number of other devices.
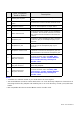
Jack, Connector, Knob or Button Description 1. Auxiliary Line In jacks Connects to playback devices using an RCA cable. 2. THX Trustudio Pro LED button Indicates the current mode THX Trustudio mode. 3. Headphones button Turns on the headphone as output device. 4. Speakers button Turns on the speakers as output device. 5. Master Volume knob Controls the volume output on your headphone or headset. Turn the knob clockwise to increase the volume and anti-clockwise to decrease the volume. 6.
Installing and Uninstalling Software To take full advantage of your Sound Blaster Recon3D PCIe audio card, you need to install device drivers and applications. At times, you may also need to uninstall some or all of the device drivers and applications to correct problems, change configurations, or to upgrade outdated drivers or applications.
Connecting Speakers and Headphones The connectors and associated components shown here may be different from that of your speaker system. Consult the documentation of your speaker system to identify similar input connectors. You can upmix your stereo sources (for example, CD Audio, MP3, WMA, MIDI, and Wave) to enjoy multichannel sound on your speakers or headphones.
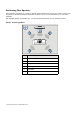
Positioning Your Speakers Good speaker placement is crucial to getting optimal performance from your audio system and achieving an enhanced listening experience. Below are our recommendation for 5.1 channel speakers. For detailed speaker placement tips, consult the documentation of your speaker system. For 5.1 channel speakers: 1 3 2 4 6 5 Speaker component 1. Subwoofer 2. Front Left 3. Front Center 4. Front Right 5. Rear Right 6.
Connecting Analog Speaker Systems Your audio card supports analog speaker systems of up to 5.1 channels. To learn more about connecting different channel speaker systems, consult the following sections: ❑ 2.1 channel analog speakers ❑ 5.1 channel analog speakers 2.1 channel analog speakers 2 1 3 audio inputs audio inputs speakers Jack, Connector or Cable 1. Line Out 1 jack 2. 2 channel audio cable (available separately) 3.
5.1 channel analog speakers 4 3 2 1 7 6 5 audio inputs front rear center/ subwoofer front speakers audio inputs center speaker front rear center/ subwoofer rear speakers Jack, Connector or Cable 1. Line Out 3 jack 2. Line Out 2 jack 3. Line Out 1 jack 4. 5.1 channel audio cable (available separately) 5. Center/Subwoofer (Audio Input) jack 6. Front (Audio Input) jack 7.
Connecting Digital Speaker Systems Your Sound Blaster Recon3D PCIe comes with an Optical S/PDIF Out jack which allows you to connect your digital speaker system. Most digital speakers systems connect the audio card to the subwoofer or an external unit. For more information on your digital speaker connections, consult the documentation of your digital speaker system.
Connecting Home Theater Systems Your Sound Blaster Recon3D PCIe comes with an Optical S/PDIF Out jack which allows you to connect your home theater system. Most home theater systems connect the audio card to an A/V receiver. For more information on your A/V receiver’s speaker connections, consult the documentation of your A/V receiver.
Connecting your A/V Receiver using Line level inputs If your A/V receiver supports multichannel line-level inputs, you can connect them directly to your audio card’s Line Out jacks instead of the Optical S/PDIF Out jack as shown below. 2 3 1 Jack, Connector or Cable 4 Description 1. Line Out 1 jack Connects to the Front Left and Front Right jacks on your A/V receiver, using a 3.50 mm (1/8-inch) stereo-to-RCA cable (available separately) 2. 3.
2 3 1 Jack, Connector or Cable 4 Description 1. Line Out 2 jack Connects to the Rear Left and Rear Right jacks on your A/V receiver, using a 3.50 mm (1/8inch) stereo-to-RCA cable (available separately) 2. 3.50 mm (1/8-inch) surround-to-RCA cable (available separately) Connects your audio card and A/V receiver. 3. Rear Left jack Connects to the Line Out 2 jack on your audio card, using a 3.50 mm (1/8-inch) stereo-toRCA cable (available separately). 4.
2 3 1 Jack, Connector or Cable 4 Description 1. Line Out 3 jack Connects to the Center and Subwoofer jacks on your A/V receiver, using a 3.50 mm (1/8inch) stereo-to-RCA cable (available separately) 2. 3.50 mm (1/8-inch) surround-to-RCA cable (available separately) Connects your audio card and A/V receiver. 3. Center jack Connects to the Line Out 3 jack on your audio card, using a 3.50 mm (1/8-inch) stereo-toRCA cable (available separately). 4.
Connecting Headphones and Headsets Alternatively, you can also connect your headphones and headsets to the Sound Blaster I/O Drive*. Do not listen to audio on your headphones or headsets at high volumes for prolonged periods of time as hearing loss may result. Connecting your headphones and headsets to the Sound Blaster Recon3D PCIe For headphones: 1 Jack or Connector 1. Headphone jack Description Connects to stereo headphones with a 3.50 mm (1/8-inch) plug.
Connecting your headphones and headsets to the Sound Blaster I/O Drive* For headphones: 1 Jack or Connector 1. Headphone jack Description Connects to stereo headphones with a 3.50 mm (1/8-inch) plug. For headsets: 1 Jack or Connector 2 Description 1. Headphone jack Connects to the 3.50 mm (1/8-inch) headphone plug of your headset. 2. Microphone In jack Connects to the 3.50mm (1/8-inch) microphone plug of your headset.
Using Your Sound Blaster Recon3D PCIe Your Sound Blaster Recon3D PCIe works seamlessly with many external devices to perform different tasks. To learn more about these tasks and how to connect additional devices, consult the following sections: ❑ Playing Games ❑ Watching DVDs ❑ Playing/Recording Music ❑ Creating Music ❑ Chatting / Gaming Notes • Actual products may differ slightly from those shown in this chapter.
Watching DVDs Your DVDs are encoded with Dolby Digital audio technologies, which have to be decoded to enjoy multichannel audio on your 5.1 speaker systems. Decoding with a software DVD player You can use a software DVD player to decode Dolby Digital encoded signals from your DVDs, and output multichannel audio through your audio card to your speakers. To do so, you need to install a software DVD player such as PowerDVD or WinDVD (latest version recommended).
Playing/Recording Music You can play music from, and/or record music to external devices (for example, Digital Audio Tape player/recorder) by connecting them to your Sound Blaster Recon3D PCIe. Connecting your external device to the Sound Blaster Recon3D PCIe 3 2 1 Jack, Connector or Cable Description 1. Optical S/PDIF In jack Connects to playback devices with optical connectors (for example, DAT players, MiniDisc players or DVD players). 2.
Creating Music You can set up a home music studio using your Sound Blaster Recon3D PCIe. Put together your own productions consisting of multiple music tracks from a MIDI synthesizer or an electric guitar. Alternatively, connect your electric guitar using a pre-amp box to the Line In/ Microphone In jack. Use a convertor if your Pre-amp box comes with a larger (for example, a 6.35 mm (1/4-inch)) connector. You can also connect a microphone to your Sound Blaster Recon3D PCIe. 1 Jack, Connector or Cable 1.
Chatting / Gaming Your Sound Blaster Recon3D PCIe can also be connected to hands-free microphones or the Sound Blaster Beamforming Microphone, making over-the-Net chatting a hassle-free affair. Now you can enjoy clear voice chat for gaming and other online chatting purposes. 1 Jack, Connector or Cable 1. Line In/Microphone In jack Description Connects to microphones or the Sound Blaster Beamforming Microphone with a 3.50 mm (1/8-inch) plug.
Creative Software Suite The following software is designed for you to access the basic as well as the advanced features of your audio card. We recommend that you familiarize yourself with their functions in order to make full use of the rich features of your audio card. To learn more about each application, consult its online Help. Depending on the application, you can do this by clicking on the toolbar of the application, or selecting Help Topics from the Help menu.
Sound Blaster Recon3D PCIe Control Panel Managing your Profiles Click the button to display the Profiles pane. Activate a profile by clicking and selecting it from the list. Click to save all settings to the current profile or create a new profile. Click to delete the active profile. Sharing Profiles You can export your custom settings and share them with others, or import other gamers’ custom settings.
Configuring your general settings You can change the language settings or restore settings to their default values. You can also check for software updates. Click and select the option from the list. THX TruStudio Pro Settings 3 1 2 1. THX TruStudio Pro enhancements Select to turn on or turn off each enhancement. 2. Enhancement Level sliders Adjust the amount of enhancement to apply. 3. Audio Test controls Play/Pause or Stop the demo video.
CrystalVoice Settings 1 1. CrystalVoice enhancements Select to turn on or turn off each enhancement. Having fun with CrystalVoice Select a voice preset to use, then click voice sounds with the preset applied. and speak into your microphone to hear how your Scout Mode 1 1. Scout mode Select to turn on or off Scout mode. Click to configure hotkeys for turning on and turning off Scout mode.
Speakers/Headphones Settings 1 1. Device selection Select the number of speakers or headphones that you are using. Switch between Speakers or Headphones mode. Testing your audio playback Select the appropriate configuration based on your setup, then click clip being played back through your setup. to hear a sample audio Cinematic Settings 1 1. Encoder settings Select the option to turn on/off the Dolby Digital Live encoder.
Mixer Settings 1 1. Volume sliders Adjust the playback and recording volume for your various inputs and outputs. Adjusting your Mixer settings Slide the volume level sliders right to increase and left to decrease. Click the icon to mute/ unmute the input/ouput. You can click the icon to adjust the settings for your input/output. Equalizer Settings 1 2 1. EQ presets Select an equalizer preset to apply to your audio. 2. EQ sliders Adjust the equalizer settings.
Customizing your EQ settings Select the EQ checkbox to enable this feature, then click the EQ drop-down arrow and select a preset from the list. Selecting a preset will move the EQ sliders to the appropriate values. You can adjust the equalizer setting by dragging the sliders up or down to the desired level. You can save your custom settings as new presets or delete existing ones. Note • The list of default EQ presets cannot be deleted. Advanced Features Settings 1 1.
THX TruStudio Pro Dialog Plus enhances the voices in movies for clearer dialog, allowing the listener to hear the dialog over the rest of the soundtrack and over ambient noise in the listening environment. Scout Mode transforms your hearing and enables you to hear your opponents from further away, giving you a distinct tactical advantage in combat.
General Specifications This section details the specifications of your Sound Blaster Recon3D PCIe audio card. PCI Bus Mastering ❑ PCI Express Specification Version 1.
Connectivity This section details the connectivity of your Sound Blaster Recon3D PCIe audio card and Sound Blaster I/O Drive*. Sound Blaster Recon3D PCIe audio card Audio Inputs ❑ One 3.50 mm (1/8-inch) Line In jack for Analog Line In or Microphone In ❑ One Optical S/PDIF jack for Digital In Audio Outputs ❑ Four 3.
Front Panel Header Audio Connector Connection compatiblity ❑ Intel HD Front Panel Audio standard only. Not compatible with AC97 or Intel-compatible HD Front Panel Audio Pin configuration Pin Signal Name Description 1 PORT 1L Analog Port 1 - left channel (Microphone) 2 GND Ground 3 PORT 1R Analog Port 1 - right channel (Microphone) 4 PRESENCE# Active low signal that signals BIOS that an Intel HD Audio dongle is connected to the analog header.
Troubleshooting This section provides solutions to problems you may encounter during installation or normal use. This includes: ❑ Problems with Digital Audio Devices ❑ Problems with Dolby Digital Live ❑ Problems with Multiple Audio Devices ❑ Problems with Older Sound Blaster Audio Devices ❑ Problems with Sound If you have a technical problem with this product, you can consult our selfhelp tool "Knowledge Base" for online troubleshooting and solutions. Go to www.soundblaster.com and select your region.
Alternatively, during the installation of your audio card, do the following: ❑ If your computer detects an installed Sound Blaster Audigy series, Sound Blaster Live! series or Sound Blaster PCI512 audio card, a message box recommending that you completely uninstall and remove the older audio device will appear. Click the Yes button and follow the instructions on the screen to complete the removal of the old audio device. Remove the old audio card from your computer.
License and Copyright Information in this document is subject to change without notice and does not represent a commitment on the part of Creative Technology Ltd. No part of this manual may be reproduced or transmitted in any form or by any means, electronic or mechanical, including photocopying and recording, for any purpose without the written permission of Creative Technology Ltd. Copyright © 2011 Creative Technology Ltd. All rights reserved.