CF50E Installation & User Instructions You must read these instructions prior to using the appliance and retain them for future reference.
For more information on our exciting product range ring Creda Answer Centre 08701 54 64 74 OR Visit us on the NET at http://www.creda.co.uk Our site invites you to make use of our interactive cookbook and product selector. Feel free to browse our product range to see what’s bubbling away at the moment or to ask for help on our products and services General Domestic Appliances Ltd. Morley Way Peterborough PE2 9JB Creda Answer Centre 08701 54 64 74 Web http://www.creda.co.
Contents Introduction 4 Installation 5 For your Safety – Always 7 For your Safety – Never 8 Features 9 Control Panel 10 Ceramic Hob 11 Ceramic Hob - General Information 12 Temperature Conversion Scale 17 Speedgrill 18 Guide to Grilling 20 Oven Temperature Chart – Meat 21 Oven Temperature Chart – Baking 22 Oven Cookery Notes 23 Using the Oven for other Functions 25 Care and Cleaning 26 Cooking Results Not Satisfactory 28 Something Wrong with your Cooker 29 Key Contacts Ba
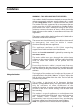
Introduction Your new appliance is guaranteed* and will give lasting service. This guarantee is only applicable if the appliance has been installed in accordance with the installation instructions detailed in this booklet. To help make best use of your cooking equipment, please read this booklet carefully. The cooker is designed specifically for domestic use and responsibility will not be accepted for use in any other installation.
Installation WARNING – THIS APPLIANCE MUST BE EARTHED. Your cooker should have been checked to ensure that the voltage corresponds with your supply voltage, this is stated on the rating plate, which is situated on the rear panel.
Installation Moving the Cooker Before moving your cooker check that it is cool, and switch off at the cooker control unit. Movement of your cooker is most easily achieved by lifting the front as follows: Open the grill door sufficiently to allow a comfortable grip on the underside front edge of the oven roof, avoiding any grill elements. Note: Take care in moving the cooker as it is heavy. Take care to ensure that any floor covering is not damaged.
Safety Information When used properly your appliance is completely safe but as with any electrical product there are certain precautions that must be observed. PLEASE READ THE PRECAUTIONS BELOW BEFORE USING YOUR APPLIANCE. Always ● Remove all packing from the appliance before switching on for the first time. ● Understand the controls prior to using the appliance. ● Keep children away from the appliance when cooking as the surfaces will get extremely hot during and after use.
Safety Information Never ● Never leave children unsupervised where a cooking appliance is installed as all surfaces will be hot during and after its use. ● Never allow anyone to sit or stand on any part of the appliance. ● Never store items above the appliance that children may attempt to reach. ● Never leave anything on the hob surface when unattended and not in use. ● Never remove the oven shelves whilst the oven is hot.
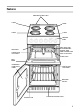
Features HOB VENTILATION SLOTS 1200W 1800W 1200W 1800W CONTROL PANEL GRILL/MEAT PAN WITH REMOVABLE HANDLE, WIRE FOOD SUPPORT AND ANTI-SPLASH TRAY SPEEDGRILL CREDACLEAN SIDE PANELS ROD SHELF GRILL DOOR REMOVABLE INNER GLASS DOOR CREDACLEAN SIDE PANELS OVEN ROD SHELVES RATING PLATE PLINTH VENTILATION SLOTS 9
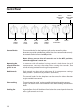
Control Panel GRILL INDICATOR LIGHT LEFT FRONT PLATE Control Knobs LEFT REAR PLATE RIGHT REAR PLATE RIGHT FRONT PLATE TWIN SPEEDGRILL OVEN INDICATOR LIGHT OVEN The control knobs for the hotplates/grill can be rotated in either direction to provide variable heat control, the Oven control knob can only be rotated clockwise from the Off position. Note: Always ensure that all controls are in the OFF position, when the appliance is not in use.
Ceramic Hob CAUTION: IF ANY CRACK IN THE SURFACE BECOMES VISIBLE, TURN OFF THE MAINS COOKER SWITCH. Under no circumstances should the hob be used with aluminium foil in contact with the hob surface. The following boiling plates are located beneath the circular cooking areas:Front 6 Heat 1200W Right Rear Left 6 Heat 1200W Rear 6 Heat 1800W Right Front 6 Heat 1800W Left The cooking areas change colour when heated (become red) indicating which heating element is turned on.
General Information Notes - Ceramic Hobs PANS SHOULD Not be concave (bowed in) Not be convex (bowed out) Not be rimmed Not be deeply ridged But essentially Flat Always ✓ ● Use good quality flatbased cookware on all electric heat sources. ● Always ensure pans have clean, dry bases before use. ● Ensure pans match size of heating area. ● Remember good quality pans retain heat well, so generally only a low or medium heat is necessary. ● Ensure pan handles are positioned safely and away from heat sources.
General Information Notes (Ceramic Hobs) Do Not Do not cook directly on the hob surface without a cooking utensil, as this will result in damage to the surface of the hob. Do not use the hob as a worktop surface as damage may occur to the smooth surface of the hob. Do not drag or slide utensils on the hob surface, as this will cause scratches in the surface of the hob. Do not allow a cooking utensil to come into contact with the hob surround.
General Information Notes (Ceramic Hobs) Safety requirements for deep fat frying IMPORTANT – As with any cooking appliance there could be some fire risk attached to the heating of oil, particularly for deep fat frying, cooking utensils containing oil must not be left unattended (e.g. to answer the telephone) on or in close proximity to the patterned cooking areas. 1. Use a deep pan, large enough to completely cover the appropriate heating area. 2. Never fill the pan more than one-third full of fat or oil.
Choosing Your Utensils Choosing your utensils Below are some guidelines to help you make the right choice of utensils. To obtain a satisfactory performance from a ceramic hob and to avoid unnecessary damage, we recommend the use of good quality utensils with smooth flat bases. Remember 1. Purchasing a new pan will not necessarily mean it will have a flat base, always check before buying. See diagram below. 2.
Choosing Your Utensils Do not use utensils with rough bases. Do not use lightweight utensils with thin, distorted or uneven bases. Do not use lightweight enamelled steel utensils. Do not use cast iron utensils. Do not use utensils with recessed, scrolled or ridged bases. Do not use a utensil which has a base concavity greater than l mm as this will reduce the performance of the hob. Do not use a utensil with a convex base. Do not use glass ceramic utensils.
Temperature Conversion Chart oF Main Convection Oven Top Convection Oven Main Fan Oven /2 250 120 110 100 1 275 140 130 120 2 300 150 140 130 3 325 160 150 140 4 350 180 170 160 5 375 190 180 170 6 400 200 190 180 7 425 220 210 200 8 450 – 220 210 9 475 – – 220 Gas Mark 1 17
Speedgrill CAUTION - ACCESSIBLE PARTS MAY BECOME HOT WHEN THE GRILL IS IN USE. CHILDREN SHOULD BE KEPT AWAY. Your cooker is not fitted with a conventional type of grill. Creda have developed a high speed grill, which is designed to reduce your grilling times. It is quicker because it takes less time to warm up from cold. Conventional grills require 5 minutes preheat before food is placed beneath them, but for normal grilling the Speedgrill can be used directly from cold, without any preheat.
Grilling GRILLING MUST BE DONE WITH THE GRILL DOOR OPEN. Plates and dishes placed on the floor of the grill compartment will be heated when the oven is in use. Using the Grill Compartment as a ‘Hotcupboard’ Do not operate the grill control when using the compartment as a hotcupboard. Do take care when removing plates, dishes and utensils from the grill compartment when the oven is in use, as they become quite hot. Warning: Take care as the grill will be hot – always wear oven gloves.
Guide To Grilling Guide to grilling successfully Food Preheat Shelf Position from base of oven. Grill Setting Approximate Cooking time Toasting of Bread products 1 min 2 or 1 4 3 - 5 mins Grill pan and grid. Small cuts of meat, sausages, bacon, etc. None 2 or 1 4 for 4 mins. reduce to lower setting. 10 - 15 mins Grill pan and grid. Chops etc. Gammon steaks Chicken pieces None 1 4 for 6-8 mins. reduce to lower setting. 25 - 30 mins Grill pan and grid.
Oven Temperature Charts – Meat Fan Oven Cooking Meat Preheat Temperature o C Time (approx.) Beef No 160/180 20-25 mins per 450g (1 lb) + 20 mins extra Lamb No 160/180 25 mins per 450g (1 lb) + 25 mins extra Pork No 160/180 25 mins per 450g (1 lb) + 25 mins extra Veal No 160/170 25-30 mins per 450g (1 lb) + 25 mins extra Chicken/Turkey up to 4kg (8 lb) No 160/180 18-20 mins per 450g (1 lb) + 20 mins extra 150/160 150 13-15 mins per 450g (1 lb) e.g.
Oven Temperature Charts – Baking Fan Oven Cooking Baking Food Preheat Temperature o C Time in mins. Scones Yes 210/220 9-12 Small Cakes 170/180 15-20 Victoria Sandwich 160/170 20-25 Sponge Sandwich Yes 170/190 15-20 Swiss Roll Yes 180/200 12-15 Semi-rich Fruit cakes 140/150 75-90 Rich Fruit Cakes 130/140 Time dependent on recipe. Shortcrust Pastry 190/200 45-50 Puff Pastry 190/200 Time dependent on recipe.
Oven Cookery Notes The oven is fitted with ‘Credaclean’ liners and two rod shelves. To heat the oven, turn the controlo knob clockwise, selecting the o o o required temperature between 80 C (175 F) and 230 C (450 F) as recommended in the temperature chart. The indicator light will immediately come on and remain on until the oven reaches the required temperature. This light will then automatically go off and on during cooking as the oven thermostat maintains the correct temperature.
Oven Cookery Notes To prepare meat and poultry for roasting in your fan oven. (a) Wipe the meat or poultry, dry well and weigh it. Meat which has been stored in a refrigerator should be allowed to come to room temperature before cooking, and frozen meat or poultry must be completely defrosted before placing in the oven. (b) The weight of any stuffing used should be added before calculating the cooking time. (c) Place meat/poultry in the meat pan supplied with your cooker. Small joints weighing less than 1.
Using the Oven for Other Functions 90 “SLOW” Setting This is used for slow cooking, keeping food warm and warming plates for short periods. Extra care should be taken when warming bone china, as it may be damaged in a hot oven. DO NOT place food or plates directly on the oven floor as this could damage both the oven lining and the plates which are being warmed. Advantages of “SLOW” cooking are: The oven stays cleaner because there is less splashing.
Care and Cleaning TURN OFF THE MAIN COOKER WALL SWITCH BEFORE CLEANING. BEFORE SWITCHING ON AGAIN, ENSURE THAT ALL CONTROLS ARE IN THE OFF POSITION. NEVER USE BIOLOGICAL WASHING POWDER, HARSH ABRASIVES, SCOURING PADS, AEROSOL CLEANERS OR OVEN CHEMICAL CLEANERS OF ANY KIND UNLESS SPECIFIED BELOW. Cleaning materials to avoid 1. Plastic or nylon pads / scourers, these may scratch the surface. 2. Household abrasive powders. 3. Oven chemical cleaners, aerosols and oven pads.
Care and Cleaning Decorative Trims It is advisable to clean the decorative trims regularly to prevent any build up of soiling. The recommended method of cleaning is to wipe over the trims with a soft cloth wrung out in warm water or mild non-abrasive cleaner. (If in doubt try the cleaner on a small area of trim which is not noticeable in normal use). Then, after wiping with a cloth wrung out in clear water, dry with a soft clean cloth.
Cooking Results Not Satisfactory? Problem Check Grilling Uneven cooking front to back Ensure that the grill pan is positioned centrally below the grill element. Fat splattering Oven Baking Uneven rising of cakes Sinking of cakes Over/Under cooking Fast/Slow cooking 28 Ensure that the grill is not set to too high a temperature. Use the anti-splash tray supplied under the food support.
Something Wrong with your Cooker? Before contacting your Creda Service Centre/Installer, check the problem guide below; there may be nothing wrong. Problem Check Slight odour or small amount of smoke when using the cooker for the first time. This is normal and should cease after a short period. Nothing works. Is the main cooker wall switch turned on? Check other appliances, there may be a power cut. Grill does not work. Oven works. Grill with the door open. Grill keeps turning on and off.
Key Contacts Service Creda has the largest appliance manufacturer’s service team in Europe, trained specialists directly employed by us to ensure your complete confidence. Repair Service UK: 08709 066 066 Republic of Ireland: 1850 302 200 You will be asked for the following information:Name, address and postcode.