Instructions for Installation and Use Aspire To the Installer Before installation fill in the product details on the back cover of this booklet. The information can be found on the rating plate. To the User You must read the instructions prior to using the appliance and then retain them for future reference.
For more information on our exciting product range ring Creda Answer Centre 08701 54 64 74 OR Visit us on the NET at http://www.creda.co.uk Our site invites you to make use of our interactive cookbook and product selector. Feel free to browse our product range to see what’s bubbling away at the moment or to ask for help on our products and services General Domestic Appliances Ltd. Morley Way Peterborough PE2 9JB Creda Answer Centre 08701 54 64 74 Web http://www.creda.co.
CONTENTS Introduction Installation For Your Safety Know Your Cooker Automatic Cooking Know Your Timer - Oven Timer Operation Using The Ceramic Hob - Important Advice Temperature Conversion Chart Solarplus Grill Conventional Grill Multifunction Cooking Top Oven Cookery Notes Main Oven Care And Cleaning Cooking Results Not Satisfactory Something Wrong ? Service 4 5-7 8-9 10-11 12 13-18 19-21 22 23-24 25 26 26-27 27-32 33-35 36 37-38 Back Cover 3
INTRODUCTION Your new cooker is guaranteed* and will give lasting service. This guarantee is only applicable if the appliance has been installed in accordance with the installation instructions detailed in this booklet. To help make best use of your cooking equipment, please read this booklet carefully. The cooker is designed specifically for domestic use and responsibility will not be accepted for use in any other installation.
INSTALLATION UNPACKING After unpacking your cooker, make sure that you remove all the packing from the oven and grill, and any stickers from the oven door and the hob. Examine your cooker for any damage, particularly the hob glass. Make sure there are no chips or cracks. If there is any damage to your cooker or anything is missing, please contact your supplier for advice. If the hob is cracked the cooker must not be connected to the supply, and no part of it may be used.
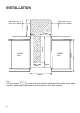
INSTALLATION Side Wall to be no closer than 150mm 650mm Side Wall to be no closer than 150mm 225mm CABINET (front) CABINET (front) 250mm 900mm 650mm 75 250mm 550mm Fig. 1 The area marked must be clear of obstructions including the wall switch, mains cable and main cable socket outlet because of the position of oven vents and hob.
INSTALLATION CONNECTING THE COOKER For your own safety, we recommend that your cooker is installed by a qualified person – for example one who is registered (or similar) by NICEIC (National Inspection Council for Electrical Installation Contracting) registered contractor.
FOR YOUR SAFETY When used properly, your appliance is completely safe but as with any electrical product there are certain precautions that must be observed. PLEASE READ THE PRECAUTIONS BELOW BEFORE USING YOUR APPLIANCE. ALWAYS ● ● ● ● ● ● ● ● ● ● ● ● ● ● ● ● ● ● Always make sure you remove all packaging and literature from inside the oven and grill compartments before switching on for the first time. Always make sure you understand the controls prior to using the appliance.
FOR YOUR SAFETY NEVER ● ● ● ● ● ● ● ● ● ● ● ● ● ● ● ● ● ● ● ● ● ● ● Never stare at Halogen heating units. Never leave children unsupervised where a cooking appliance is installed as all cooking surfaces will be hot during and after use. Never allow anyone to sit or stand on any part of the appliance. Never store items above the appliance that children may attempt to reach. Never leave anything on the hob surface when unattended and not in use. Never remove the oven shelves whilst the oven is hot.
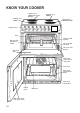
KNOW YOUR COOKER Cooking area 1500W twin circuit Solarglo Cooking area 1200W Cooking area 1200W Cooking area 1800W Solarglo Control Panel Grill Grill pan food support Grill pan with detachable handle Top oven/grill rod shelf Top oven side panels Top Oven Door Main oven Creda Clean roof panel Oven Fan Main oven Creda Clean Sides Main oven rod shelves Rating plate Main oven door with glass panel 10 Meat pan
KNOW YOUR COOKER FRONT BACK LEFT LEFT BACK FRONT TOP RIGHT RIGHT GRILL OVEN MAIN FAN OVEN TOP OVEN PILOT LIGHT TIMER MAIN OVEN PILOT LIGHT CONTROL KNOBS The knobs for the grill and hotplates can be rotated in either direction to provide variable heat control, the oven knobs can only be rotated clockwise from the OFF position.
AUTOMATIC COOKING AUTOMATIC COOKING The Top Oven and Main Oven can be controlled by the electronic clock. When the clock has been set for one oven it is possible to use the other oven only on the same automatic cooking programme. The grill will not function when the Top Oven is set to cook automatically. HINTS ON AUTOMATIC COOKING 1. 2. 3. 4. 5. 6. 7. 8. 9. 10. 11. 12. 12 Select foods which will take the same time to cook and require approximately the same temperature.
KNOW YOUR TIMER CLOCKFACE The timer incorporates a 24 hour clock. Ensure the correct time of day is always set, before using your cooker. Minute Cook End Minder Period Time SYMBOLS Will light up when you select a Minute Minder Period and will remain lit for the period set. Minute Cook End Minder Period Time This “Cookpot” symbol will light up either:– _ When the cooker is in "Manual Mode" – When you press the Cook Period Button and set a length of time for an Auto Cooking Programme.
OVEN TIMER OPERATION SETTING THE TIME OF DAY A U T O A MinuteMinute Cook Cook End End Minder Period Period Time Manual Minder Time Step 1 Make sure all oven controls are turned Off. Step 2 Check the electricity supply to the cooker is turned on. When switched on the display will show 0.00 and "A" symbol, both will be flashing intermittently. Step 3 Press & hold in both the "Cook Period & End Time" buttons together.
OVEN TIMER OPERATION There are two Auto Cooking programmes that can be selected using your timer:a) To set the timer to switch the oven(s) On and Off automatically. b) To set the timer to switch On immediately and OFF automatically after a set cook period. a) TO SET TIMER TO SWITCH THE OVEN(S) ON AND OFF AUTOMATICALLY. Step 1 Check that the correct time of day is set, if not follow instructions for setting the time of day.
OVEN TIMER OPERATION 16 . 20 A 16 . 20 A Minute Cook Minute Cook End End Manual Minder Minder PeriodPeriod Time Time At the end of the Automatic Cook Period the Auto Symbol "A" will flash and an intermittent bleeping sound will be heard. The symbol will go out. The bleeping sound will continue for several minutes unless cancelled. (see step 8) The "A" symbol will continue to flash until the timer is returned to Manual operation (see below).
OVEN TIMER OPERATION b) TO SET TIMER TO SWITCH ON IMMEDIATELY AND OFF AUTOMATICALLY AFTER A SET COOK PERIOD Step 1 Check that the correct time of day is set, if not follow instructions for setting the time of day. Step 2 Place food onto the correct shelf position in the oven and close the oven door(s). Step 3 Turn the oven control(s) to the required temperature, and if necessary select the appropriate oven function. Cookpot Symbol Step 4 Press & hold in the "Cook Period" button, the display will read 0.
OVEN TIMER OPERATION OTHER NOTES ON TIMER OPERATION 1. To cancel the Auto Cooking programme before or after auto cooking starts, press the "Cook Period" and "End Time" buttons together, this will return the cooker to the manual operation. 2. When cooking Automatically the "Cook Period" can be checked at any time by simply pressing the "Cook Period" button. 3. When cooking Automatically the "End Time" can be checked at any time by simply pressing the "End Time" button 4.
USING THE CERAMIC HOB HOB SETTING CONTROLS (A) TIMER CAUTION: IF ANY CRACK IN SURFACE BECOMES VISIBLE, DISCONNECT THE APPLIANCE IMMEDIATELY FROM THE SUPPLY. Under no circumstances should the hob be used with aluminium foil in contact with the hob surface. The boiling plates are located beneath the circular cooking areas. DO NOT allow young children near to the appliance when the hob is in use as the surfaces get extremely hot.
HOB - IMPORTANT ADVICE CHOICE OF UTENSILS Every electric hob deserves the right choice of utensils. We recommend for optimum performance the use of good quality utensils. Remember: 1. Purchasing a new pan will not necessarily mean it will have a flat base, always check before buying. 2. Using the correct saucepans will result in maximum contact with the hob and maximum efficiency.
HOB - IMPORTANT ADVICE This table is a general guide to the types of pan suitable for electric hobs. Remember pans should be good quality, with smooth flat bases. For any further information refer to manufacturer’s instructions.
TEMPERATURE CONVERSION CHART 22 Gas Mark oF Main Convection Oven oC Top Convection Oven oC Main Fan Oven oC 1 /2 250 120 110 100 1 275 140 130 120 2 300 150 140 130 3 325 160 150 140 4 350 180 170 160 5 375 190 180 170 6 400 200 190 180 7 425 220 210 200 8 450 – 220 210 9 475 – – 220
SOLARPLUS GRILL - 48905 / 6 / 7 CAUTION: ACCESSIBLE PARTS MAY BECOME HOT WHEN GRILL IS IN USE. CHILDREN SHOULD BE KEPT AWAY. Your cooker is not fitted with a conventional type of grill. Creda have developed a Solarplus high speed grill which is designed to reduce your grilling times. It is quicker because it takes less time to warm up from cold.
SOLAR PLUS GRILL - 48905 / 6 / 7 GUIDE TO GRILLING SUCCESSFULLY Food Preheat Shelf Position from base of oven Setting Approx. Cooking Time Toasting of Bread Products 1 min. 2 or 1 Maximum 3-5 mins. Grill pan and grid. Small cuts of meat None – Sausages, Bacon 2 or 1 Maximum for 4 mins. reduce to 3 10-15 mins. Grill pan and grid. Chops, etc. Gammon Steaks, Chicken pieces None 1 Maximum for 6-8 mins. reduce to 3/21/ 25-30 mins. Grill pan and grid. Fish.
CONVENTIONAL GRILL - 48904 / 8 / 9 CAUTION - ACCESSIBLE PARTS MAY BECOME HOT WHEN THE GRILL IS IN USE. CHILDREN SHOULD BE KEPT AWAY. GRILLING SHOULD NEVER BE UNDERTAKEN WITH THE GRILL/TOP OVEN DOOR CLOSED. The grill control is designed to provide variable heat control of either the twin grill elements on together or the single left hand grill element only, depending upon which direction the control knob is rotated.
MULTIFUNCTION COOKING Your new Creda cooker offers multifunction cooking with a conventional top oven (with top elements inside cavity and element below the oven cavity) and a Circulaire fan main oven. This gives you the benefits of multifunction cooking with the flexibility and added capacity of a double oven cooker.
TOP OVEN COOKERY NOTES TOP OVEN AS A WARMING COMPARTMENT FOR PLATES AND DISHES Larger joints of meat and poultry weighing more than 3.6kg (8lbs) should be roasted in the main oven. Do not use the main oven meat pan or the grill pan as a meat pan in the top oven as air circulation will be seriously restricted. Place the plates and dishes on the shelf that has been positioned on the floor of the oven and turn on the top oven control to 100oC for 10-15 minutes. Do not use the grill control.
MAIN OVEN COOKERY NOTES Since a Circulaire fan oven heats up more quickly, and generally cooks food at a lower temperature than a conventional oven, pre-heating the oven is often unnecessary. However, foods such as bread, scones, Yorkshire pudding, should be placed in a pre-heated oven. The charts on pages 30 and 31 are a guide only, giving approximate cooking temperatures and times. To suit personal taste and requirements, it may be necessary to increase or decrease temperatures by 10˚C.
MAIN OVEN COOKERY NOTES c) Place meat/poultry in the main oven meat pan supplied with your cooker. Small joints weighing less than 1.75kg (31/2 lbs) should be roasted in a smaller meat pan/tin – or they may be ‘pot roasted’ – a small joint in a large meat pan causes unnecessary oven splashing and evaporation of meat juices. d) Additional fat should not be added, except for veal, very lean meat or poultry which can either be 'larded' with fat bacon or brushed very sparingly with cooking oil or melted fat.
30 Yes Yes Yes Yes Yes Yes Yes Yes Yes Meat Beef/ Lamb (slow roasting) Beef/ Lamb (foil covered) Pork (slow roasting) Pork (foil covered) Veal (slow roasting) Veal (foil covered) Poultry/Game (slow roasting) Poultry/Game (foil covered) Casserole Cooking 2-2 /2 hrs 1 25-30 mins per 450g (1lb) 25-30 mins per 450g (1lb) + 25 mins over 40-45 mins per 450g (1lb) 40-45 mins per 450g (1lb) + 40 mins over 40 mins per 450g (1lb) 40 mins per 450g (1lb) + 40 mins over 35-40 mins per 450g
Note: If soft tub margarine is used for cake making, we would recommend using the all in one method and to reduce the temperature by 10oC. Temperatures recommended in this chart refer to cakes made with block margarine or butter only.
USING THE MAIN OVEN FOR OTHER FUNCTIONS "SLOW" SETTING This is used for slow cooking, keeping food warm and warming plates for short periods. Extra care should be taken when warming bone china, as it may be damaged in a hot oven. DO NOT place food or plates directly on the oven floor as this could damage both the oven lining and the plates which are being warmed. ADVANTAGES OF SLOW COOKING ARE: The oven stays cleaner because there is less splashing.
CARE AND CLEANING TURN OFF THE MAIN SWITCH BEFORE CLEANING. Before switching on again, ensure that all controls are in the off position. THE CERAMIC HOB To reduce the amount of cleaning always ensure that the hob and cooking utensils are clean and dry before use. Regular use of cleaner conditioner is recommended for proper care and protection of the hob surface. Apply conditioner before using the hob for the first time.
CARE AND CLEANING HOW 'CREDACLEAN' WORKS The surfaces of the 'Credaclean' oven liners are treated with a special vitreous enamel which absorbs cooking soils. At temperatures of 220˚C (425˚F) or above, the special surface enables these soils to be slowly destroyed. The higher the temperature, the more effective it is. In most cases normal cooking operations at this temperature will permit this cleaning operation to proceed during cooking.
CARE AND CLEANING GRILL/TOP OVEN Refer to the instructions on page 33 for cleaning the 'Credaclean' side panels. Remove the grill pan and the wire grid food support, it is best to wash these items immediately after use to prevent stains from being burnt on when used again. Wipe out the Grill/Top oven compartment, use a fine steel wool soap pad to remove stubborn stains from the rod shelf, grill deflector plate and the floor of the compartment.
COOKING RESULTS NOT SATISFACTORY? Problem Check Grilling Uneven cooking front to back Ensure that the grill pan is positioned centrally below the grill element. Fat splattering Fan Oven Baking Uneven rising of cakes Ensure that the grill is not set to too high a setting. Ensure that the oven shelves are level by using a spirit level on the rod shelf and adjusting the wheels/feet. The oven should be checked both left to right and front to back.
SOMETHING WRONG? Before contacting your Creda Service Centre/Installer, check the problem guide below; there may be nothing wrong with your cooker. Problem Check Slight odour or small amount of smoke when grill / oven used first time Nothing Works This is normal and should cease after a short period. Draught from beneath control panel A gentle flow of air will be blown from beneath the control panel when the appliance is used.
Problem Check Difficulty hearing Bleeper tone The Bleeper tone of the timer fitted to this product can be adjusted to give 3 distinct pitches. Try setting the minute minder, when the alarm sounds, press the minus button to adjust / obtain a different pitch (if unsure refer to timer instructions). Timer buzzer / bleeper operates continually The bleeper will stop automatically after several minutes. To cancel, press the minute minder button to silence.
Key Contacts Service Creda has the largest appliance manufacturer’s service team in Europe, trained specialists directly employed by us to ensure your complete confidence. Repair Service UK: 08709 066 066 Republic of Ireland: 1850 302 200 You will be asked for the following information:Name, address and postcode.