COOKER HOOD USER HANDBOOK FOR INSTALLATION AND OPERATION MODELS CRC95
Your new Cooker Hood Using your new Cooker Hood is very simple. Nevertheless, to get the best results it is important that you read this handbook thoroughly before installing and using your appliance for the first time. Electrical Requirements Any permanent electrical installation must comply with the latest I.E.E. Regulations and local electricity company regulations. For your own safety, this should be undertaken by a qualified electrician eg.
Contents Page Electrical Requirements Get to know your Cooker Hood Installing your Cooker Hood Operating your Cooker Hood The Controls Do’s and Don’ts Caring for your Cooker Hood Filters and their Replacement Cleaning How to Replace the Light Troubleshooting Key Contacts 2 4 5-8 9 10 11 Back Cover Appliance manufactured in EU. Retention of the Instruction Book This Instruction Book must be kept handy for reference as it contains important details on the safe and proper use of the appliance.
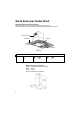
Get to know your Cooker Hood. Unpacking - This is a two person operation. Before installation, ensure that you have removed all packing pieces. Ensure the fixing kit, ducting spigots and literature pack are retained with the hood. Chimney Section Controls Glass Visor Worktop Lighting Filter Grille Performance Table No.
Installing your Cooker Hood SAFETY WARNINGS: THIS COOKER HOOD IS DESIGNED FOR DOMESTIC USE ONLY. When installed above a cooking appliance, the distance between the surface of the hob elements and the lower grille of the chimney hood must be as follows: Minimum 650mm - over an electric hob. Minimum 750mm - over a gas or mixed fuel hob. This chimney hood is not suitable for installation above a cooking appliance with a high level grill.
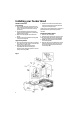
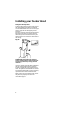
Installing your Cooker Hood Wall Mounted Model Lower Fixings 1. Draw a vertical line on the wall, from the centre of the cooking appliance, up to the ceiling. Check the line is vertical using a spirit level. 2. Put the template provided on the wall paying particular attention to positioning distances (see page 5). 3. Drill two holes (Fig.6 2) and insert wall plugs. 3. Fit two hooks in the drilled holes (Fig.6 4) using screws (Fig.6 5). Upper Fixing Bracket 1.
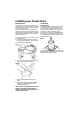
Installing your Cooker Hood RECIRCULATION: The chimney hood is supplied specified for installation in the extraction mode. To convert to recirculation it will be necessary to obtain the optional carbon filter. In the recirculation mode, contaminated air enters the chimney hood and passes through the grease filter and carbon filter and then out into the kitchen through two grilles, at either side of the chimney. To convert the chimney hood to recirculation proceed as follows: 1.
Installing your Cooker Hood Fitting the Chimney Stack: To fit the upper chimney section, first expand the chimney slightly to allow it to be fitted over the wall brackets. Then secure the upper section using the two self tapping screws provided. The lower chimney section should be located following instructions on page 6, ensuring that the lugs in the base of the chimney are seated into the two recesses on either side of the canopy. Fig.
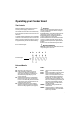
Operating your Cooker Hood The Controls Make sure that the Cooker Hood is wired in and the power supply is switched on. Fan Speed Your Cooker Hood has three speeds to give you the correct extraction level to suit your cooking conditions. Button d Position 1 should be selected when simmering or when using only one pan. Button e Position 2 should be selected for normal cooking up to four pans. Button f Position 3 should be selected when frying or cooking food with strong odours.
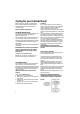
Caring for your Cooker Hood Before doing any cleaning or replacing the filters or light bulb, always ensure that the electricity supply to the Cooker Hood is switched ‘OFF’. Filters and their replacement: THE METAL GREASE FILTER The grease filter is fitted to absorb grease and dust during cooking to help keep the appliance clean inside. The metal filter must be cleaned frequently, at least once every thirty days of normal use. The filter should be handwashed in hot soapy water.
Troubleshooting. First, don’t panic! There may be nothing wrong at all. Look for your problem below, then check the things we suggest. More often than not, this will give you the answer to your problem, and you’ll be able to carry on without having to telephone your Service Office. It is not working! Are you using a plug and socket? - Check that the plug is firmly pushed in. - Check the power supply, by plugging in another appliance.
Key Contacts Service Creda has the largest appliance manufacturer’s service team in Europe, trained specialists directly employed by us to ensure your complete confidence. Repair Service UK: 08709 066 066 Republic of Ireland: 1850 302 200 You will be asked for the following information:Name, address and postcode.