COOKER HOOD USER HANDBOOK FOR INSTALLATION AND OPERATION MODEL CRV10
Your new Cooker Hood Using your new Cooker Hood is very simple. Nevertheless, to get the best results it is important that you read this handbook thoroughly before installing and using your appliance for the first time. Electrical Requirements Any permanent electrical installation must comply with the latest I.E.E. Regulations and local electricity company regulations. For your own safety, this should be undertaken by a qualified electrician eg.
Contents Page Electrical Requirements Get to know your Cooker Hood Installing your Cooker Hood Installation for Recirculation Installation for Extraction Mounting Height Fixing to the Cabinet Fixing to the Wall Operating your Cooker Hood The Controls Do’s and Don’ts Caring for your Cooker Hood Filters and their Replacement Cleaning How to Replace the Light Troubleshooting Key Contacts 2 4 5-7 8 9-10 11 Back Cover Appliance manufactured in EU.
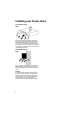
Get to know your Cooker Hood. Unpacking Before installation, ensure that you have removed all packing pieces. Controls Visor Light Grease Filter Wire Clips Dimensions Height Width Depth Including visor.
Installing your Cooker Hood Your new Cooker Hood can be installed either for recirculation or extraction through an outside wall. Installation: These distances, between hobs and grease filter must be observed. Minimum 65cm over an electric hob. Minimum 75cm over a gas hob. Minimum 40-45cm over a high level grill/ top oven. See page 7. NOTE: The hood is more efficient in the exhaust mode, therefore this position should be selected during the warmer months of the year when no heating is being used.
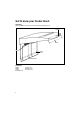
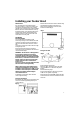
Installing your Cooker Hood Top Extraction (Fig.4) Fig.4 If the exhaust air is being drawn upwards, a pipe with a diameter of 100mm is necessary and the blanking plate must be fitted in the rear outlet. To check that the hood is set up for extraction, open the grille panel and make sure that the conversion lever on the unit is in the exhausting position. Rear Extraction (Fig.5) Fig.
Installing your Cooker Hood Wall Vent Kit: For connecting the hood either directly through a wall or in conjunction with a ducting pipe, we recommend the use of a Wall Vent Kit. A 3m extension pipe is also available. Both of these are 100mm diameter and may be obtained from your nearest retailer or the Genuine Parts and Accessories Mail Order Hotline (see back cover) and must be used where there is a cavity wall.
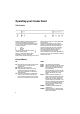
Operating your Cooker Hood The Controls Make sure that the Cooker hood is wired in and the power supply is switched on. Your Cooker hood has three speeds, to give you the correct extraction level to suit your cooking conditions. 1 Low 2 Normal 3 Boost The control marked with the symbol controls the fan speed. Position 1, should be selected when simmering or using only one pan. Position 2 for normal cooking, up to four pans. Position 3 when frying or cooking foods with strong odours.
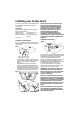
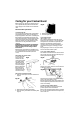
Caring for your Cooker Hood Before doing any cleaning or replacing the filters or light bulb, always ensure that the electricity supply to the Cooker Hood is switched ‘OFF’. Fig.11 Filters and their replacement: THE GREASE FILTER Your Cooker Hood is fitted with a grease filter which absorbs grease, dust etc. and helps to keep the appliance clean inside. Gradually the filter will become saturated with grease and when this happens the visual indicator stripes will start to be seen through the filter grille.
Caring for your Cooker Hood Cleaning: The exterior of the Cooker Hood should be cleaned regularly to keep it looking like new. Wipe over with a soft cloth, wrung out in warm water and dry with a clean soft cloth. Wear protective gloves. You can use mild non-abrasive cleaners but always read the manufacturer’s instructions first. Always test their suitability on a small area of the Cooker Hood not noticeable in normal use. NOTE: DO NOT use scouring pads or abrasive cleaners as they may scratch the surface.
Troubleshooting. First, don’t panic! There may be nothing wrong at all. Look for your problem below, then check the things we suggest. More often than not, this will give you the answer to your problem, and you’ll be able to carry on without having to telephone your Service Office. It is not working! Are you using a plug and socket? - Check that the plug is firmly pushed in. - Check the power supply, by plugging in another appliance.
Key Contacts Service Creda has the largest appliance manufacturer’s service team in Europe, trained specialists directly employed by us to ensure your complete confidence. Repair Service UK: 08709 066 066 Republic of Ireland: 1850 302 200 You will be asked for the following information:Name, address and postcode.