Instructions for Installation and Use Electric Multifunction Oven Model S077EE
CONTENTS Introduction For Your Safety Know your Oven The Controls Cooking Advice Cooking Chart Programming the cooking mode Do not worry if Care and Cleaning Installation Electrical Connection Key Contacts 4 5 6 7-8 9 9 10-11 12 13 14 15 Back Cover Retention of this Instruction Book This Instruction Book must be kept handy for reference as it contains important details on the safe and proper use of the appliance.
Introduction Your new electric oven is guaranteed* and will give lasting service. This guarantee is only applicable if the appliance has been installed in accordance with the installation instructions detailed in this booklet. To help make best use of your cooking equipment, please read this booklet carefully. The oven is designed specifically for domestic use and responsibility will not be accepted for use in any other installation.
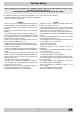
For Your Safety When used properly your appliance is completely safe but as with any electrical product there are certain precautions that must be observed. PLEASE READ THE BELOW PRECAUTIONS BEFORE USING YOUR APPLIANCE. To maintain the efficiency and safety of this appliance, we recommend you do the following: - only call the Service Centres authorised by the manufacturer. - always use genuine spare parts.
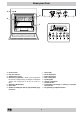
Know your Oven A H D B G C 8 F 7 1 A. B. C. D. Control Panel Function selector Temperature control Electronic programmer - Allows you to programme the desired cooking mode by selecting the cooking time and the end cooking time. It can also be used as a timer. F. Grill Pan or Baking Tray G. Oven Shelf H. Guides for sliding the shelf or grill pan/baking tray in and out 1. 2. 3. 4. 5. 6. 7. 8.
The Controls The 7 Cuochi oven combines the advantages of traditional convection ovens with those of the more modern fan assisted models in a single appliance. It is an extremely versatile appliance that allows you to choose easily and safely between 7 different cooking modes. The various features offered by the oven are selected by means of selector knob “B” situated on the control panel. you can modify it simply by turning knob C.
The Controls This cooking mode is particularly recommended for dishes requiring a gratin finish or for those requiring considerably prolonged cooking times, such as for example: lasagne, pasta bakes, roast chicken and potatoes, etc… Moreover, the excellent heat distribution makes it possible to use lower temperatures when cooking roasts. This results in less loss of juices, meat which is more tender and a decrease in the loss of weight for the roast.
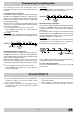
Programming the cooking mode The cooking time and/or end cooking time can be programmed after the desired cooking mode has been selected. For example It is 9:00 a.m. and the end cooking time is set at 10:15 a.m.. Cooking will last 1 hour and 15 minutes. Programming the cooking time Press button 5 and then adjust the cooking time by turning knob C. Press the OK button to store the setting.
Cooking Advice Using the “Fast Cooking” Mode Functional, fast and practical for those of you who use frozen or pre-cooked food along with other food items. You will find useful suggestions in the “Cooking Chart” . The oven offers a wide range of alternatives which allows you to cook any type of food in the best possible way. With time you will learn to make the best use of this versatile cooking appliance and the following are only a guide, which may be varied according to your own personal taste.
Cooking Advice Cooking Fish and Meat When cooking white meat, fowl and fish, use temperature settings from 180 °C to 200 °C. For red meat that should be well done on the outside while tender and juicy in the inside, it is a good idea to start with a high temperature setting (200°C-220°C) for a short time, then turn the oven down afterwards. In general, the larger the roast, the lower the temperature setting.
Cooking Chart Setting made Type of food Weight (in kg) Position of the rack from the oven bottom Preheating time (min.) Therm ostat setting Cooking time (min.) 1 1 1 1 3 3 3 3 3 15 15 15 15 15 200 200 200 180 180 65-75 70-75 70-80 15-20 30-35 1 1 1 1+1 1 1 0.5 0.5 0.5 1.0 1.5 2-4 3 2 2-4 2 2 2-4 2-4 2 2-4 3 15 10 10 15 10 10 10 10 10 10 15 230 180 180 200 180 170 190 180 170 170 200 15-20 30-35 40-45 60-70 30-35 40-50 20-25 10-15 15-20 20-25 25-30 0.7 0.6 0.6 0.8 0.4 0.8 0.6 0.6 1 n.
Care and Cleaning Befor carrying out any cleaning and maintenance to your appliance you must disconnect it from the power supply. Disassembling the oven door The oven door can easily be removed to clean the space between the bottom of the door and the front of the oven.
Installation The appliance must be installed only by a qualified person in compliance with the instructions provided. The manufacturer declines all responsibility for improper installation which may harm persons and animals and damage property. Important: The power supply to the appliance must be cut off before any adjustments or maintenance work is done on it. The panels of the adjacent cabinets must be made of heatresistant material.
Electrical Connection Electrical connection The electrical connection to the mains must be made on the appliance. The power voltage and frequency are as indicated on the rating plate. WARNING: THIS APPLIANCE MUST BE EARTHED.
Key Contacts After Sales Service Over 1200 trained specialists, directly employed by us, ensure that you can have complete confidence in both the appliances and services we offer. Repair Service and Information Desk UK: 08709 066 066 (Open 8 to 8 Mon - Fri, 8 to 6 Sat, 10 to 4 Sun & Bank Holidays) www.theservicecentre.co.