S220E Installation & User Instructions You must read these instructions prior to using the appliance and retain them for future reference.
For more information on our exciting product range ring Creda Answer Centre 08701 54 64 74 OR Visit us on the NET at http://www.creda.co.uk Our site invites you to make use of our interactive cookbook and product selector. Feel free to browse our product range to see what’s bubbling away at the moment or to ask for help on our products and services General Domestic Appliances Ltd. Morley Way Peterborough PE2 9JB Creda Answer Centre 0541 54 64 74 Web http://www.creda.co.
Contents Introduction 4 Safety Information 5 Features 7 Controls 8 Clock / Minute Minder Operation 9 Grill Pan and Handle 11 Using the Grill 12 Guide to Grilling 13 Using the Oven for Fan Cooking 14 Using the Oven for Other Functions 15 Temperature Conversion Chart 17 Oven Temperature Charts 18 Cooking Results Not Satisfactory? 20 Care and Cleaning 21 Installation 25 Something Wrong? 29 Key Contacts Back Cover 3
Introduction Your new appliance is guaranteed* and will give lasting service. This guarantee is only applicable if the appliance has been installed in accordance with the installation instructions detailed in this booklet. To help make best use of your cooking equipment, please read this booklet carefully. The cooker is designed specifically for domestic use and responsibility will not be accepted for use in any other installation.
Safety Information When used properly your appliance is completely safe but as with any electrical product there are certain precautions that must be observed. PLEASE READ THE PRECAUTIONS BELOW BEFORE USING YOUR APPLIANCE. Always ● Always make sure you remove all packaging and literature from inside the oven and grill compartments before switching on for the first time. ● Always make sure you understand the controls prior to using the appliance.
Safety Information Never ● Never leave children unsupervised where a cooking appliance is installed as all cooking surfaces will be hot during and after use. ● Never allow anyone to sit or stand on any part of the appliance. ● Never store items above the appliance that children may attempt to reach. ● Never remove the oven shelves whilst the oven is hot. ● Never heat up unopened food containers as pressure can build up causing the container to burst.
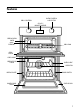
Features GRILL CONTROL OVEN CONTROL & SELECTOR CLOCK / MINUTE MINDER ❍ ❍ CREDACLEAN LINER GRILL ELEMENT GRILL PAN GRILL DOOR OVEN LIGHT CREDACLEAN LINER OVEN SHELF OVEN FAN RATING PLATE DOOR SWITCH INNER DOOR GLASS OVEN DOOR 7
Controls B OVEN CONTROL & SELECTOR A GRILL CONTROL CLOCK / MINUTE MINDER ❍ ❍ Control Markings Control Knob A Description Grill Setting Control Function Selects the heat at which the grill will cook the food. TWIN GRILL - Turn control clockwise SINGLE GRILL - Turn control anti-clockwise 1 – 4 Grill Settings Control: 1 = Low, 4 = High B Oven Temperature & Function Control Fan Only Fan Only Setting - This is used to decrease the amount of time required to defrost food items.
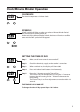
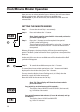
Clock/Minute Minder Operation CLOCKFACE 0.00 The timer incorporates a 24 hour clock. + - SYMBOLS 0.00 A ‘Bell’ symbol will light up when you select a Minute Minder Period and will remain lit for the period set. At the end of the Minute Minder Period, the timer will emit an audible tone and the ‘Bell’ symbol will disappear. Minute Minder SETTING THE TIME OF DAY 0.00 0.00 Step 1 Make sure all oven controls are turned off. Step 2 Check the electricity supply to the cooker is turned on.
Clock/Minute Minder Operation Here you can set a time period of up to 10 hours, that will count down. When it reaches zero, the timer will emit an audible tone. For Example: If you set 20 minutes, the audible tone will occur 20 minutes later. SETTING THE MINUTE MINDER Step 1 Ensure the time of day is set correctly. Step 2 Press and release the ‘+’ button. 0.00 Note: Step 3 must be started within 10 seconds, otherwise you must repeat Step 2. Step 3 Press the ‘+’ button to set the required time period.
Grill Pan and Handle SHELF POSITIONING FOR GRILLING The shelf can be inserted in two different ways for grilling. The grilling chart will indicate the correct orientation. Orientation A Orientation B The grill pan handle is detachable from the pan, to facilitate cleaning and storage. The grill pan handle can be fixed as follows: (d) (a) (c) (b) Step 1 Step 2 Step 3 Step 4 Step 1 Remove screw & washers from the grill pan bracket (a). Step 2 Tilt the handle over the recess (b).
Operation when using the Grill SHELF POSITIONING FOR GRILLING Do not place food / utensils directly on the oven floor. 3 2 1 3 2 1 NOTE: There should be at least 25mm (1 inch) between the top of the food and the grill element. Preheat the grill at setting 6 on the grill control for approximately 5 minutes. The grill pan must be placed on the correct shelf and positioned centrally under the grill element. Leave the control at 6 for toast, and for fast cooking of foods.
Setting 6 Setting 6 Setting 6 Setting 6 Setting 6 Small cuts of meat, Sausage, Bacon Chops etc. Gammon steaks Fish Whole Fillets Fingers Pre-cooked Potato products Pizzas Setting 6 Setting 6 Toasting of Bread Products Browning of food eg. Cauliflower Cheese Preheat for five minutes Food 1A 2B 2B 2B 2A 2A 2B Shelf Position from base of oven and orientation.
Using the Oven for Fan Cooking Since a circulaire fan oven heats up more quickly and generally cooks food at a lower temperature than a conventional oven, pre-heating is often unnecessary. For guides on “pre-heating”, “cooking temperatures” and “cooking times” see “Oven Temperature Charts” later in book. Note: Charts are a guide only, to suit personal taste and requirements, it may be necessary to increase or decrease temperatures by 10oC. It may also be necessary to increase or decrease cooking times.
Using the Oven for other Functions Fan Only Fan Only Setting Defrosting frozen meat and poultry Joints of meat and whole birds should be defrosted slowly, preferably in a refrigerator (allowing 5-6 hours per lb.) or at room temperature (allowing 2-3 hours per lb.). Frozen meat or poultry must be completely defrosted before cooking in the oven. However, to decrease the amount of time required to defrost food items, a nonheating fan only setting may be selected for the main oven only.
Using the Oven for other Functions ‘S’ “SLOW” Setting This is used for slow cooking, keeping food warm and warming plates for short periods. Extra care should be taken when warming bone china, as it may be damaged in a hot oven. DO NOT place food or plates directly on the oven floor as this could damage both the oven lining and the plates which are being warmed. Advantages of “SLOW” cooking are: The oven stays cleaner because there is less splashing.
Temperature Conversion Chart Gas Mark ˚F Main Conventional Oven Top Convection Oven Main Fan Oven /2 250 120 110 100 1 275 140 130 120 2 300 150 140 130 3 325 160 150 140 4 350 180 170 160 5 375 190 180 170 6 400 200 190 180 7 425 220 210 200 8 450 – 220 210 9 475 – – 220 1 17
Oven Temperature Chart - Meat Main Fan Oven Cooking Food Note: Up to two shelves may be used in this oven. The position of these is not important providing they are evenly spaced. Meat Preheat Temperature ˚C Time (approx.
Oven Temperature Chart – Baking Main Fan Oven Cooking Baking Note: Up to two shelves may be used in this oven. The position of these is not important providing they are evenly spaced.
Cooking Result Not Satisfactory? GRILL Uneven cooking front to back Ensure that the grill pan is positioned centrally below the grill element. Fat splattering Ensure that the grill pan is not lined with foil. Ensure that the grill setting control (A) is not set too high. BAKING Uneven rising of cakes Ensure that the oven shelves are level. Sinking of cakes The following may cause cakes to sink: 1. Pre-heating of fan ovens – not always necessary. 2.
Care and Cleaning Warning: Before cleaning, please ensure that the electricity supply to the appliance is switched off and the appliance is fully cold. 1. “CREDACLEAN” OVEN LINERS (Main Oven) (a) How "Credaclean" works. The surfaces of the "Credaclean" oven liners are treated with a special vitreous enamel which absorbs cooking soils. At temperatures of 220˚C (425˚F) or above, the special surface enables these soils to be slowly destroyed. The higher the temperature the more effective it is. (b) Cleaning.
Care and Cleaning 2. CLEANING GRILL AND MAIN OVEN (a) Base & Rear of Grill and Base of Main Oven. Wipe out the oven with a damp soapy cloth. For more stubborn stains on the base of the oven use a well soaped fine steel wool soap pad. (b) Grill Pan & Oven Shelves. GRILL PAN BASE & REAR OVEN SHELVES MAIN OVEN BASE To prevent stains from being burnt on to the grill pan, food support and rod shelf, always wash immediately after use in warm soapy water.
Care and Cleaning 4. REPLACEMENT OF THE OVEN LAMP Warning: To avoid electric shock - please ensure that the electricity supply to the appliance is switched off and the appliance is fully cold, before removing lamp lens. Open the oven door and remove the oven shelves. Using a thick cloth, grip the lamp lens, unscrew anticlockwise and remove the lens. Carefully unscrew the bulb anti-clockwise. Fit replacement bulb (15W 300°C SES). Fit replacement bulb and refit lens. OVEN LAMP 5.
Care and Cleaning TO CLEAN THE INSIDE OF OUTER AND INNER GLASS PANELS Warning: Always switch your appliance OFF at the mains supply and allow to cool before cleaning. Fig. 1 1. Position top or main oven door as shown in fig. 1. Note: The door can be wedged open using a towel between the door and the side trim thus leaving your hands free. Fig. 2 TWO SCREWS/ WASHERS DOOR FIXING TAG Fig. 3 RUBBER GROMMETS DOOR INNER PANEL DOOR OUTER GLASS & HANDLE 2.
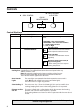
Installation Electrical Requirements For your own safety, we recommend that your cooker is installed by a competent person such as one who is registered with NICEIC (National Inspection Council for Electrical Installation Contracting). The cooker should be installed in accordance with the latest edition of the IEE Regulations. Warning: This appliance must be earthed. Electrical Connections The installer must check that the voltage shown at the rating plate corresponds with the house electricity supply.
Installation 1. General The appliance is designed to be mounted on a floor between two adjacent cabinets. The cabinets must be securely fixed to the wall and the cooker securely fixed to the cabinets. This cooker must not be used free standing. NOTE: This appliance must NOT be fitted on a platform. 2. Final Installation a. Ensure that the adjacent cabinets and the gap between them have dimensions in accordance with the diagram. b. Assemble the plastic plugs provided into the fixing brackets. See diagram.
Installation 890mm Max 870mm Min 597mm min 720mm min 565mm n mi 570 565mm to top of plinth 150mm Min 170mm Max A minimum distance of 25mm should be maintained between the front face of the cabinet side and the front face of the plinth.
Installation Wall Fixing Bracket Cooker 1mm min Cabinet Doors Top View Double pole control switch Hob Cable 2.
Something Wrong? Before calling a Service Engineer, please check through the following lists. THERE MAY BE NOTHING WRONG. Problem Check Slight odour or small amount of smoke when grill / oven is used for the first time, This is normal and should cease after a short period. Nothing works. (a) Check If you find :Display is blank. Then it is likely that there is no electricity supply to your oven. Check: (i) That the main cooker wall switch is turned on.
Key Contacts Service Creda has the largest appliance manufacturer’s service team in Europe, trained specialists directly employed by us to ensure your complete confidence. Repair Service UK: 08709 066 066 Republic of Ireland: 1850 302 200 You will be asked for the following information:Name, address and postcode.