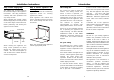
Users Instruction & Installation Book for : SO11GW SO11GB 60cm Gas Oven / Grill Merloni Elettrodomestici UK Ltd, Morley Way, Peterborough. PE2 9JB. 08 25377 00 © 10.
Customer Care If you smell gas: Do not try to light any appliance. Do not touch any electrical switch. Call the Gas Emergency Helpline at TRANSCO on: 0800 111999 In the Republic of Ireland, call the Bord Gaìs emergency line on 1850 205050 or contact your local gas supplier.
Technical Data Data badge Lower part of front frame and rear of appliance. Pressure setting Cat I2H (GB/IE) Grill Nominal Rate Qn Injector Spark gap G20 @ 20mbar Contents User Section . . . . . . . . . . . . . . . . . . . . . . . . . . . . . . . . . . . . . . 2 - 17 2.4kW 1.12mm 3 - 4mm Oven Bray type burner, sheet steel body, stainless steel flame strip Gas category I2H Nominal Rate Qn Injector Spark gap Thermostat bypass Appliance class Class 3 2.5kW 1.
Introduction We hope that the following information will help you to familiarise yourself with the features of the appliance, and to use it successfully and safely. Gas & Electrical connection Please refer to installation instructions for the Gas & Electrical Safety Regulations and the Ventilation Requirements.
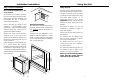
Installation Instructions Step 4: Check edging strip Step 5: Secure appliance into housing unit The edging strip is factory fitted to the front side edges of the appliance front frame. This strip provides the cabinetry with extra protection from any escape of heat. There are 4 black no 8 x 25mm long chipboard screws for securing appliance to cabinet. Insert appliance into cabinet and secure - open the oven door and screw the 4 screws through the holes in the front frame.
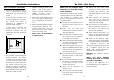
Introduction Glass door panels To replace a light bulb (if fitted) To meet the relevant Standards of Domestic cooking appliances, all the glass panels on this appliance are toughened to meet the fragmentation requirements of BS3193. This ensures that, in the unlikely event that a panel breaks, it does so into small fragments to minimise the risk of injury. Caution: Switch off the electricity supply to the appliance, to avoid the possibility of electric shock.
Installation Instructions Step 2: Connect to gas supply 4. Flexible connections should be to BS669. Parts of the appliance likely to come into contact with a flexible connector have a temperature rise less than 70°C. 1. The inlet to the appliance is ISO 7 - Rp 1⁄2” internal thread situated towards the top right hand rear corner. 5. Parts of the cooker likely to come into contact with the flexible hose have a temperature rise less than 70˚C. 2.
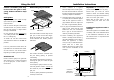
Using the Grill Caution: Accessible parts may be hot when the grill is used, young children should be kept away. Installation Instructions Detachable grill pan handle trivet i) When installed in a typical 600mm deep built in housing unit, the false back should be removed from the housing unit to provide the necessary depth for installation. Important: Do not modify the outer panels of this appliance in any way.
Installation Instructions Step 1: Prepare installation 90 Do not lift the appliance by the door handle. Using the Grill Using the grill mm (mi n imu m) Whilst every care is taken to eliminate burrs and raw edges from this product, please take care when handling - we recommend the use of protective gloves during installation. Please note that the weight of this appliance is approximately 31kg (unpacked). Take care when lifting it into the housing unit - always use an appropriate method of lifting.
Using the Oven When you are cooking, keep children away from the vicinity of the oven. In the event of the burner flames being accidentally extinguished, turn off the burner control and do not attempt to re-ignite the burner for at least one minute. If it is found over a period of time that the oven becomes hotter when used at a particular gas mark, the thermostat may need to be replaced. Oven ignition Push in and turn the oven control knob anticlockwise to gas mark 9.
Cleaning Using the Oven Stainless Steel surfaces (stainless steel finish models only) Oven furniture FACIA PANEL, HANDLES, DOOR CLADDING Oven shelves Only use a clean cloth wrung out in hot soapy water, and dry with a soft cloth. The oven shelf must be positioned with the upstand facing upwards. Stubborn marks can be removed using “Luneta”. We recommend that you clean the whole of the stainless steel area to maintain a uniform finish. Supplies can be purchased from the Customer Care Centre.
Using the Oven Cleaning ● Please ensure that foods are piping hot before consumption. ● Always use the temperature setting stated on food packaging when cooking convenience food. ● Never overload the tray - eg; oven chips should be placed onto the baking tray in one even layer for satisfactory cooking. DOOR PANELS ● Do not slow cook joints of meat or poultry weighing more than 21⁄4 kg / 41⁄2lb. Use a mild cream cleaner - eg; “Cif”. Rinse thoroughly and dry with a soft cloth.
Cleaning Using the Oven Vitreous enamel parts Caution: Any cleaning agent used incorrectly may damage the appliance. GRILL Always let the appliance cool before cleaning. Use a mild cream cleaner - eg; “Cif”. PAN, GRILL COMPARTMENT, OVEN COMPARTMENT Stubborn marks may be removed with a moistened “Brillo” pad. Some cooking operations generate a considerable amount of grease. This, combined with spillage, can become a hazard if allowed to accumulate on the appliance through lack of cleaning.
Using the Oven Programmer / Clock Baking guide The oven will automatically switch off at 18.00 hours (6.00 pm) and the alarm will sound (9). 9. Auto symbol will flash. To switch off the alarm press the minute minder button (10). 10. 11. Auto symbol goes out.
Using the Oven Programmer / Clock 5. Auto symbol appears. Fully automatic cooking (example) For use when a delayed start time is required. A U T O You want to set the length of cooking time, and the time for the oven to switch off. The programmer will automatically calculate the cooking start time.
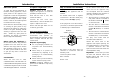
Programmer / Clock The programmer buttons minute minder cook time end time manual minus plus Manual operation To set the time of day To set the programmer to manual operation at any time (cancelling any automatic setting), press the manual button. The programmer must be set to manual before the appliance can be used manually. Setting the minute minder Programmer / Clock Semi-automatic cooking (example) 1. Auto symbol appears.