Condensing Tumble Dryer Instruction Book You must read these instructions prior to using the appliance and retain them for future reference.
Contents Getting to know your Dryer Important Safety Points Installation of your Dryer Caring for your Wash Sorting your laundry Items requiring special attention How to operate your Dryer Electrical Requirements Caring for your Dryer Something Wrong? Service – Creda Tumble Dryers 3 4 5 6 7 8 9 13 14 Inside Back Cover Back Cover EEC Standards This appliance conforms to the following EEC Directives: Low Voltage Equipment 73/23/EEC 93/68/EEC Electromagnetic Compatibility 89/336/EEC 92/31/EEC 93/68/EEC Rete
Features - Getting to Know Your Dryer CONTROL PANEL PUSH HERE TO OPEN DOOR AIR INTAKE GRILLE PLINTH (NOT ON ALL MODELS) SERIAL/MODEL No. (RECORD DETAILS ON SERVICE PAGE AT REAR.) FLUFF FILTER REVERSIBLE DOOR CATCH CONDENSER DOOR CATCH WATER CONTAINER Using your Dryer is easy. Nevertheless, for your own safety and to achieve the best results, it is important to read through this handbook before using the appliance.
Important Safety Points Note: This Dryer is only suitable for Domestic use. Never ... ✘ Never allow children to play with the Dryer. ✘ Never use liquid conditioner in the Dryer. ✘ Never switch the machine off leaving a hot load in the drum. ✘ Do not dry articles that have not been washed, rinsed and spun. ✘ Never tumble dry without the filter, condenser and water container in position. ✘ Never attempt to stand on top of your Dryer. ✘ Never exceed maximum recommended load capacity.
Installation of your Dryer Location There is no internal packing to be removed before use, but make sure the drum is empty. Wipe the inside of the Drum before use to remove any transit dust. Your Dryer does not blow moist air into the room, avoiding the requirement of a vent hose. Position the Dryer where air can freely circulate around it, a 15mm gap each side is recommended.
Caring for your Wash The following wash-care labels should be observed. Item can be used in Dryer. Dry at high heat setting. Do not use in Dryer. Dry on low heat setting. The majority of fabrics today can be dried in a Dryer. There are however certain fabric finishes which need to be dried away from direct heat. Items not suitable for your Dryer ... Items containing Rubber or Plastic film, e.g. pillows, cushions, PVC rainwear. Items which have been dry cleaned. Woollen articles.
Sorting your laundry The same care should be taken for Drying fabrics as when Washing, e.g. split fabric groups, close all zips and hooks, belts and strings should be tied in loose bow. It is important to extract as much water as possible from each item before drying. This reduces the drying time, energy consumption and the running cost. Maximum Dry Load Size Cotton fabrics max. 6 Kg (13.2 lb) Synthetics, eg Polyester, polycotton max. 3 Kg (6.6 lb) Acrylics max. 2 Kg (4.
Items requiring special attention Blankets and Bedspreads Drying requirements of blankets and bedspreads vary according to size, weight and fabric. If you have difficulty getting them into the Dryer, the machine will have difficulty drying them properly as they expand when drying and prevent air flow through the Dryer. This can cause the appliance to overheat. Blankets (e.g. Acrilan, Courtelle, Dralon and Orlon) must never be over dried. Such acrylic fabrics should be dried with care on low heat.
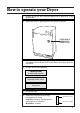
How to operate your Dryer 1. Ensure hands are dry. Plug the appliance in. Switch on at the wall socket. 2. Open the Door by pressing the Front panel as shown. PUSH HERE & RELEASE TO OPEN DOOR 3. Place the selected fabrics into the Dryer. Ensure the fabrics are pushed towards the back of the Drum and away from the Door seal. 4. Always check the following: FLUFF FILTER is clean and in place WATER CONTAINER is empty and in place CONDENSER is in place 5. Close the Door. 6. Select the required heat setting.
How to operate your Dryer 7. Rotate the Timer control to select the appropriate required drying time. All of our Dryers have an energy saving feature which reduces the heat input when the temperature in the drum reaches a predetermined level. Timed Dryers: TIMER CONTROL l0 20 0 12 10 coo Select the required Drying time by rotating the Timer control clockwise (up to 120 minutes) just past the required time, then anti-clockwise to the desired time. Refer to the Drying guide.
How To Operate Your Dryer Drying Times & Heat Settings The drying time will depend on the size of the load, the type of fabric and the wetness of the load. It is therefore not possible to give exact drying times but experience will quickly enable you to set the appropriate time for fully drying or damp drying to your requirements. As an approximate guide, the following table may assist you. The times shown include the cool tumble period, in minutes. The Kg weights specified are fabric dry weights.
How To Operate Your Dryer EMPTY WATER CONTAINER LIGHT WATER CONTAINER WATER CONTAINER SINK 13. Remove plinth moulding (where fitted) by slightly lifting and sliding to the left. Remove the water container and empty after EVERY programme. Failure to do this will result in the water container becoming full and the load will not dry. PLINTH MOULDING WHEN FITTED NOTE: The light on the control panel only comes on when the water container is full.
Electrical Requirements This appliance should be connected to the mains supply via a suitable switched socket, which is in a position accessible after installation. Refer to rating plate for the supply voltage. Supply Warning: This appliance must be earthed. Changing the Plug The flexible mains lead is supplied connected to a BS1363 fused plug with a 13 amp capacity.
Caring for your Dryer To maintain the performance of the Dryer, follow the simple steps below: When not in use: Switch off the electricity and remove the plug, ensuring hands are dry. After each load: Turn the Drum by hand to ensure all items have been removed. Clean the Filter by rinsing under the tap or using a vacuum cleaner. Empty the Water Container. Every week: Wipe the drum, the front of the condenser and the door seal with a damp cloth.
Something Wrong? Before calling a Service Engineer, please check through the following list. THERE MAY BE NOTHING WRONG DRYER WILL NOT START LOAD IS NOT DRY OR TAKES LONGER THAN NORMAL TO DRY CHECK THE POWER SUPPLY CHECK THE FOLLOWING Has the fuse blown in the plug or the main fuse box? (Try plugging in another appliance to check) Does the fluff filter need cleaning? (It should be cleaned after every load) If the fuse has blown in the plug top, refer to Electrical Requirements.
Service Please carry out the checks detailed on the Something Wrong page. If there is a problem with your appliance then contact your Service Centre by using the table below to identify the appropriate phone number. Please have the following information available when you call : 1. (a) Your name. (b) Your address and postcode. (c) Your telephone number. 2. The date and the name of the shop/retailer where the appliance was purchased. Shop / Retailer : Date : 3.