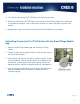
What You Will Need: 1. Connected Cree® LED bulb 2. Connected Cree® LED Bulb Compatible Hub Wink Hub SmartThings® Hub WeMo Link Other ZigBee® certified hub 3. Mobile device using the compatible Android®, iOS®, or Windows Phone® App 4. The latest version of the compatible App downloaded on your mobile device (Wink App, SmartThings App, WeMo App or compatible App for your ZigBee® certified hub).
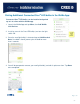
Wink Installation Instructions: Installing the Wink Hub: Note: Wink Hub Installation requires a Wi-Fi network connected with a router using WPA-PSK, WPA2-PSK or open security 1. Plug the Wink Hub into an outlet. The Hub will turn on and when it is ready to connect, the light on the Hub will begin flashing purple. 2. On your mobile device, open the Wink App and tap Add a Product. 3. Select Wink Hub from the product list. 4.
Pairing the Connected Cree® LED bulb in the Wink App: Connected Cree® LED bulbs are installed and paired one at a time with Wink. 1. Install a single Connected Cree® LED bulb in a lamp or light fixture. The switch to the lamp or fixture should remain OFF at this time. 2. Open the Wink App in your mobile device and tap Add a Product or the Plus sign. 3. Select Lights from Product list. 4. On the Lights list, select Cree Light Bulb. 5.
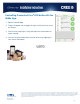
Controlling Connected Cree® LED bulbs with the Wink App 1. Open the Wink App and tap the Lights Icon. 2. Tap On to turn light on. Tap Off to turn light off. Adjust slider around light icon to dim and brighten. 3. Tap Groups to create groups of lights to control together with one tap. 4. Tap the 3 dots in the top right corner to customize the settings for your lights and set Schedules. You can also access Help from this menu and view Activity. 5.
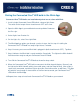
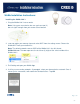
SmartThings Installation Instructions: Installing the SmartThings® Hub: 1. Plug the SmartThings® Hub into the power adapter and an Ethernet cable connected to your internet router. A solid green light on the back indicates that it’s connected. 2. On your mobile device, download and install the SmartThings Mobile app. 3. Fill in information related to your location, including providing a name and selecting a location image. 4.
. Turn ON the Connected Cree® LED bulb at the wall or lamp switch. 7. When the Connected Cree® LED bulb is connected, the SmartThings App will list the device as available to configure. Click on the device to name it as well as configure Top Alerts and Actions. 8. Repeat these steps to install each Connected Cree® LED bulb on your network. Controlling Connected Cree® LED bulbs with the SmartThings Mobile App: 1. Open the SmartThings Mobile App and click on the Things section. 2.
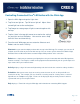
WeMo Installation Instructions: Installing the WeMo Link: 1. Plug the WeMo Link into an outlet. Note: Using your smart device, be sure you have two (2) bars of signal strength from your router at that location. 2. Find and tap on your Settings icon and select Wi-Fi from the settings menu. Choose the WeMo Wi-Fi from your network list. Note: The default network name or SSID of the WeMo Link has this format, WeMo.Link.xxx. The xxx represents the last three (3) digits of the serial number of the WeMo Link.
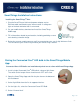
Pairing Additional Connected Cree® LED bulbs in the WeMo App: Connected Cree® LED bulbs can be installed and paired up to 8 at a time with the WeMo app. 1. Launch the WeMo App and tap More, then Add WeMo Link Devices 2. Install or screw in the Cree LED bulb(s) and turn the light switch ON. 3. Once the new light bulb(s) is detected tap on Add Checked. Note: If no bulb is found, power cycle the bulb for more than 2 seconds. 4.
Controlling Connected Cree® LED bulbs with the WeMo App: 1. Open the WeMo App. 2. Tap on the power icon to toggle the light or click the tile to reveal the dimmer. 3. You can also group lights. Drag and drop a tile onto another to create a group. 4. You can schedule automations for your devices by tapping the rules icon at the bottom. www.creebulb.com 866.924.3645 www.cree.com © 2015 Cree, Inc. All rights reserved. For informational purposes only. Not a warranty or specification. See http://creebulb.