
User's Manual


2 of 3 LPN00212X0002A7
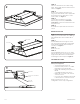
STEP 3:
Place the CR troffer into the T-Bar Ceiling
panel. Ensure T-Bar clips are attached to the
T-Bar. See Figure 2.
STEP 4:
Remove access plate from junction box.
Using screw driver blade, remove appropriate
knockout from access plate door to route
input conduit. See Figure 3.
STEP 5:
Connect input conduit to access plate.
Make wiring connections per Electrical
Connections section. Push all wires back into
the junction box.
STEP 6:
Re-install access plate that was removed in
Step 4.
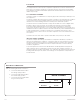
RESET RF MODULE
NOTE: The Blue LED is located behind the
CREE logo on the RF Module. The CREE logo
with illuminate blue when the Blue LED is
active.
STEP 1:
Actuate RESET button through the access
hole. Push and hold until LED on RF module
begins blinking rapidly (approximately 6-7
seconds). See Figure 4.
STEP 2:
Release for 1 sec.
STEP 3:
Press/Hold RESET button for 0.5 sec. Light
will turn off for a few seconds then go to full
bright and the Blue LED on the RF Module
should begin a 2 blink sequence. Figure 4.
TROUBLESHOOTING:
Out of the box, if the light does not turn on
when power is applied:
• Check Wiring with power off
• If wired correctly, check to see if Blue
LED blinking on the RF Module.
• If Blue LED is blinking, then perform a
RESET
(See RESET RF MODULE section).
• If Blue LED is on solid or off, call Cree
Customer Service.
• If you have done a RESET, and the light
is still off, call Cree Customer Service.
If light is unresponsive, use Cree
Configuration Tool to verify configuration.
3
4
Access Plate
RF Module
RF Module
Access Hole, Reset Button
Inside
Blue LED
Placement
2