FL 2242 Feb.
TABLE OF CONTENTS BLAST CHILLER INTRODUCTION Page 1 SECTION 1 DESCRIPTION Chill Processing CCBC-4-35 Features and Specifications CCBC-12-75 Features and Specifications CCBC-12-UA-100 Features and Specifications Control Panel Layout SECTION 2 INSTALLATION Unpacking and Installation Instructions Page 2 SECTION 3 OPERATION Start-Up Information How to Operate Blast Chill Cycle/Modes Loading of Product Defrosting Blast Chill Printer Page 13 " " Page 14 Page 15 " Page 17 SECTION 4 MAINTENANCE How to clean t
INTRODUCTION [ Page 1 ] BLAST CHILLER INTRODUCTION THE BLAST CHILLER is the easiest and simplest way to chill foods safely without additional labor. All food service operators prepare foods in advance or chill foods at the end of a workday. More often than not the foods are chilled in standard refrigeration, often creating an unsafe time and temperature environment.
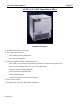
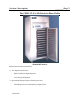
[ Section 1-Description ] [ Page 2 ] Chill Processing Under-Counter and Reach-In Refrigerator/Storage Cabinet CCBC-4-35 The CCBC-4-35 is ideal for food service operations, which require a small volume blast chiller. This model is capable of chilling 35 lbs. of food product to 38°F in approximately 90 minutes. Daily capacity is over 140 lbs. Of processed product.
[ Section 1-Description ] [ Page 3 ] CCBC-4-35 Chill Temp Blast Chiller Standard Features: Stainless Steel Exterior and Interior Two Operational Features: - Blast Chill Processing Refrigerator - 38°F Storage Refrigerator Operational Indicator Panel with Microprocessor: - Blast Chill Cycle Controlled Automatically by Either a Food Probe or Digital Timer - Four (4) Preset Chilling Times: 30, 60, 90, and 240 minutes - Cabinet Temperature Digital Display - Food Temperature Digital Display - Defr
[ Section 1-Description ] [ Page 4 ] Flush Mounted Doors, Anti-Condensation Heaters and Removable Magnetic Door Gaskets Four (4) Pairs of Adjustable Panslides for 12" x 20" x 2 1/2" Pans Heavy Duty Casters Hot Gas Condensate Vaporization Large Surface Area Evaporator and High Velocity Fan CFC Free R-134A Refrigerant SPECIFICATIONS Capacity (lbs/90 mins) Width Depth Open Door Depth Height Clear Door Width Clear Door Height Number Of Tray Slides REFRIGERATION DATA R134a refrigerant Compressor HP BTU/HR 100
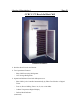
[ Section 1-Description ] [ Page 5 ] CCBC-12-75 Reach-In Blast Chill Standard Features: Stainless Steel Exterior and Interior Two Operational Features: - Blast Chill Processing Refrigerator - 38°F Storage Refrigerator Operational Indicator Panel with Microprocessor: - Blast Chill Cycle Controlled Automatically by Either Food Probes or Digital Timer - Four (4) Preset Chilling Times: 30, 60, 90, or 240 Mins.
[ Section 1-Description ] [ Page 6 ] - Power Failure Alarm - Three (3) Food Probes with Digital Temperature indicator Seven (7) Day Temperature Recorder with Printout Demand Stainless Steel Front, Sides, Door and Interior Flush Mounted Doors, Anti-Condensation Heaters and Removable Magnetic Door Gaskets Twelve (12) Pairs of Adjustable Panslides on 3 1/2" Centers for 18" x 26" Sheet Pans Six (6) Wire Racks.
[ Section 1-Description ] ________[ Page 7 ] The CBBC-12-UA-100 Reach-In Blast Chiller Standard Features Stainless Steel Exterior and Interior Two Operational Features: - Blast Chill Processing Refrigerator - 38°F Storage Refrigerator Operational Indicator Panel with Microprocessor: - Full Microprocessor Controlled by a Digital Timer (continued)
[ Section 1-Description_] ___ - On/Off Switch with Blast Cycle and Cancel Button - Digital Temperature Display and Defrost Indicator - Power Failure Alarm - Food Probe with Digital Temperature Indicator ____[ Page 8 ] Galvanized Stee1 Top Stainless Steel Top, Front, Sides, Door and Liner Flush Mounted Doors, Anti-Condensation Heaters and Removable Magnetic; Gaskets Twelve (12) Adjustable Universal Angles Heavy Duty Swivel Casters with Locking Brakes on the Front Automatic Defrost Condensation Dis
[Page 9] Control Panel For CCBC-4-35 1. Select Chill Mode 2. Select Hard or Soft Blast 3. Select Timer for probe or time of process 4. When satisfied with selections, press Check to Start Cycle 5. Press if you want to erase and start programming over Probe Temperature Displayed Cabinet Temperature or "DEF" when in Defrost cycle Control Panel For CCBC-12-75 & CCBC-12-UA-100 1. Select Chill Mode 2. Select Hard or Soft Blast 3. Select Timer for probe or time of process 4.
[ Section 2-Installation ] [ Page 10 ] UNPACKING INSTRUCTIONS IMPORTANT: It is highly recommended that your refrigerator or freezer be installed by an authorized CresCor Service Agency (List enclosed) A. Receiving Shipment Upon arrival, examine the exterior of the shipment packaging for any signs of rough handling. If the cabinet is damaged, it should be noted on the delivery slip or bill of lading and signed to that effect.
[ Section 2-Installation ] [ Page 11 ] C. Removing Plastic Film Stainless steel surfaces are protected with plastic film when shipped. The film is easily removed by grasping an edge corner of the film and pulling it off. D. Locating Your new Blast Chill Unit The cabinet should not be placed in the immediate vicinity of ranges, ovens and other heat radiating equipment. This will help to increase efficiency as well as lower operating costs. Selfcontained refrigeration is standard on reach-in chillers.
[ Section 2-Installation ] [ Page 12 ] 3. Make sure cabinet is sitting level with all four (4) casters (or legs) in contact with the floor. 4. Also make sure the door stays open when opened past 90 degrees. 5. Inspect magnetic door gasket to be sure it is making contact on all four (4) sides. Also make sure it is not cut, torn, twisted or otherwise deformed. 6. Check installation of shelves or pan slides . 7. Check electrical power source for correct voltage, phase and ampacity.
[ Section 3-Operation ] [ Page 13] GENERAL OPERATION OF BLAST CHILLER All CRESCOR BLAST CHILLERS have 3 basic modes: 1. Normal refrigeration storage 1°C/34°F to 3°C/38°F 2. Blast chill hard –10°C/14°F 3. Blast chill soft 1°C/34° Normal Cycle 1°/34°F to 3°C/38°F This is the storage temperature at which the food can be held. Blast Chill Cycle (hard or soft) During the blast chill hard cycle the air temperature inside the cabinet should go down to approximately -10°C/14°F.
[ Section 3-Operation ] [ Page 14 ] 6) By pressing button ‘3’, select the Timer for the desired duration or probed blast. Default to probe blast unless it is known how long a product will chill. 7) If a variety of products are used make sure one probe is strategically placed near the top shelf, 1 in the center and 1 at a lower shelf. If a variety of products are used make sure one probe is in the largest item to be chilled.
[ Section 3-Operation ] [ Page 15] To activate a blast chill cycle you must: 1. Choose the required store mode with button 1 2. Choose the require blast type with button 2 (select hard blast unless all items chilling are delicate) 3. Choose the blast duration or probe with button 3 (select probe unless you know how long it takes the product to chill) As each selection is made the indicator LED will illuminate to show what is chosen. Press the “D”to accept, or “x” to cancel.
[ Section 3-Operation ] [ Page 16] If a blast cycle is cancelled and the defrost thermostat is measuring 1°C/32°F or less, the BLAST CHILLER automatically goes into a defrost cycle. When the BLAST CHILLER is in the defrost mode the “Cabinet Temp” window of the control panel will display “DEF” During the defrost cycle some fans will stop running. This is normal. When the defrost cycle is finished the compressor will run for approximately 90 seconds before the fans operate.
[ Section 3-Operation ] [ Page 17] PRINTER If equipped, the printer is activated after each blast cycle. The printer provides hard copy historical data of cabinet performance or warning tickets to archive or act upon. The following formats are available: Midnight Ticket At midnight, a ticket is automatically printed for archiving in the morning.
[ Section 4- Maintenance ] [ Page 18 ] CAUTION ! HINTS: 1. Turn Off Blast Chiller 2. Allow Cabinet to warm slightly. 3. Do not hose Blast Chiller. 1. Use the mildest cleaning product that will do the job 2. Always rub in the direction of polish lines to Avoid scratching the surface. Wipe up spills as soon as possible. 3. Use only a soft cloth, sponge, fibrous brushes, Clean regularly to avoid heavy dirt buildup. Plastic pads for cleaning and scouring. 4.
[ Section 5- Troubleshooting ] [ Page 19 ] SERVICE & TROUBLESHOOTING Setting or Resetting Time and Date SWITCH I/O 1 2 3 X SET UP PROCEDURE FUNCTION IN SPECIAL SWITCH MODE ON/OFF SWITCH When held in, displays the code for current parameter Step back to previous parameter, and while held in displays the parameter code. When released, displays the value of the parameter. Advance to the next parameter. (same as above) Increase the value of the current parameter.
[ Section 5- Troubleshooting ] [ Page 19a ] ALARM CODES 7-Segment Display The left hand window shows the cabinet wall temperature. The right hand displays show the probe temperatures during a blast cycle, and are normally blank during store. If a probe fails it will indicate pf (probe failure) during a blast. Cab temp window also acts as a count up timer in probe blast.
[ Section 5- Troubleshooting ] [ Page 20 ] Cabinet has no power to controller-display not lit: 1. Make sure the power is connected to the cabinet that the cord is plugged in on the models with power cord and plug. 2. Check main circuit breaker at power supply panel; make sure it is on. 3. Model CCBC-12-UA-100 only, has an "isolator" (disconnect) switch on the control box, make sure it is on. 4. Check circuit breakers inside cabinet control box; make sure all are on.
[ Section 5- Troubleshooting ] [ Page 21 ] 3. Compressor runs continuously. (1) Check compressor for "pumping" efficiency. (2) Door not closed tight or gasket leaking. (3) If no DPC, or if DPC set too low to open, check refrigerant charge and/or thermostatic expansion valve for adequate feeding. Cabinet has power, display shows "Sto", but load of hot food takes extremely long to chill: 1. "Sto" is the storage mode and cannot chill food properly.
[Section 5-Troubleshooting ] [ Page 22 ] 2. Door not shut tight 3. Gaskets leaking 4. Check defrost heater operator (if used): (a) Defective heater (b) Blown fuse (if used) (c) Defective "klixon" if used 5. Check defrost settings: (a) Check defrost thermostat ("St 5") setting (b) Check defrost differential ("dt 5") setting (c) Check Defrost Period Switch on main PCB inside control box (d) Check Defrost Length Switch on main PCB control box. 6.
[ Section 5-Troubleshooting ] [ Page 23 ] (c) Check make sure ribbon cartridge is properly installed - both sides snapped in place 4. Printer is printing backwards and all characters reversed (a) Paper tape is feeding incorrectly over top of printer ribbon. This can readily occur when inserting a ribbon cartridge with paper tape still protruding from the printer. The ribbon must be on top of the paper in order to print correctly. 5.
[ Section 6 – Parts and Drawings ]______________________ __ [ Page 24 ] Parts List and Breakdown Drawing of Blast Chillers
[ Page 25 ]
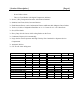
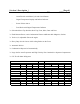
[ Page 26 ] PARTS LIST CCBC-4-35 BLAST CHILLER 208V 60HZ SINGLE PHASE Drawing Number Description Part Number 1 COMPRESSOR CAJ 4492Y R134A WCOMP 345 1a CONDENSER 3X11X21 WCOND 250 1b DRIER 1/4 X 3/16 SWEAT T R134A WDRIER 110 1c SIGHT GLASS 1/4" SWEAT WSIGHT 020 2 RECEIVER 2.2 L WRECEIVER 060 3 EXPANSION VALVE BODY TEN 2 R134A WVALVE 196 3 1/4" SOLDER ADAPTOR WVALVE 198 3 ORIFICE NO.
[ Page 27 ]
[ Page 28 ] PARTS LIST CCBC-12-75 BLAST CHILLER 208V 60HZ SINGLE PHASE Drawing Number Description Part Number 1 COMPRESSOR FH4518Y 208/220V 60HZ WCOMP 365 1 CONDENSER 4X17X17.5 WCOND208 3 EVAPORATOR FAN MOTOR 4X200MM AXIAL FAN ZIEHL WFAN 115 3 FLAT GUARD WGUARD 080 3 1.
[ Page 29 ]
[ Page 30 ] PARTS LIST CCBC-12-UA-100 BLAST CHILLER 208V 60HZ 3 PHASE Drawing Number Description Part Number 1 COMPRESSOR TFH 4524Z 208/230V 60HZ WCOMP 833 2 CONDENSER 4X17X17.5 WCOND208 3 EVAPORATOR FAN MOTOR 4X200MM AXIAL FAN ZIEHL WFAN 115 3 FLAT GUARD WGUARD 080 3 1.
General Rules of Thumb [ Page 31 ] Pre-Chill the cabinet for thirty (30) minutes before you do first load. (to remove interior residual heat) Doubling the food thickness triples the pull-down time. Don't stack food or containers on top of or alongside of each other. (this increases the "thickness) Covering the food increases pull-down time by 10%-30%. Pull-down rate initially is about 2°F per minute and approaching final temperature is about 2 minutes per degree F.
Contact Information [ Page 32 ] Please Send Serial registration information to : Fax: (800) 378 – 8333 E-mail to: parts&service@crescor.com Or Mail To: CresCor 5925 Heisley Road Mentor, OH 44060 Toll Free: 877-273-7267 Fax: 440-350-7267 See us online at: http://www.crescor.com Questions? Call and Speak To One Of Our Friendly Service Counselors: Ellery @ Ext. 319 Pat @ Ext.
[ Page 33 ] Notes __________________________________________________________ __________________________________________________________ __________________________________________________________ __________________________________________________________ __________________________________________________________ __________________________________________________________ __________________________________________________________ __________________________________________________________ ______________________
[Page 34] MEATS* Roasted Meats Roasted meats should be prepared according to the recipe using roast guidelines for each product. Roast Beef (top round) - Follow recipe and roast guidelines. Recommended doneness for rethermalization is about 140° F. (60° C.). Top round should be quartered and placed in the blast chiller. If roast beef is used for cold sandwiches, the end cooking temperature may be higher. If medium doneness is desired, roast to 150° F. (65° C.). Do not overcook.
[Page 35] Seafood Fish - Prepare all fish fillets according to recipe for breaded, baked, broiled, steamed, etc. Be careful not to overcook. Blast chill immediately. Shrimp/Scallops/Shellfish - Prepare according to recipe and blast chill immediately. Be careful not to overcook. If prepared with a sauce (creole, etc.), cook the sauce separate and mix together prior to retherm. Casseroles and Stews Stew and casseroles are very successful in cook/chill and rethermalization.
[Page 36] SOUPS Conventional Soup Prepare conventionally. For creamed soups, substitute a modified starch for a portion of the thickening agent by 30 to 50%. Canned Soup No cooking is necessary for broth based soups. Cream soups should be diluted with milk or water, mixed completely, and blast chilled. Frozen Soup Follow instructions on the soup container for preparing soup, blend thoroughly, and blast chill. VEGETABLES Add seasonings to vegetables prior to panning.
[Page 37] Prepare green beans and carrots in Broccoli/Cauliflower/Green Beans/Carrots bite size and broccoli and cauliflower in flowerets. Steam to desired doneness, then blast chill. Stuffed Vegetables (eggplant, zucchini) Prepare stuffing and blast chill. Steam shell and blast chill or place in ice bath. Stuff vegetable shell and blast chill to bring temperature down from time of assembly. Grilled Vegetables Grill according to recipe. Place in 2-1/2" pan and blast chill.
[Page 38] RICE Prepare according to standardized recipe, then blast chill. If rethermalized product is dry, liquid may be added. PASTA AND NOODLES Cook to al dente, rinse well with cold water, then chill. Chill in 2-1/2" pans with water with ice added. Drain partially before retherming. The best way to heat pasta is to run it under hot water or dunk it into boiling water for 30 seconds. FRIED FOODS It is difficult to achieve a crispy, chewy fried product with an advanced preparation food process.
[Page 39] • Add a 2" perforated insert to pan. • Break eggs (25-30) in separate bowl and slip onto the 1/2 pan insert. • Steam a maximum of 3 minutes (time should be tested at each facility as equipment performance will vary at each location). • Lift perforated insert out of pan and plunge into ice water to retard cooking. The whites will still have a wet, glossy look, but should hold shape. • Lift eggs out with slotted spoon and drain well before plating on trayline. Chill and store until trayline.
[Page 40] BREAKFAST BURRITOS/CREPES Burrito and crepe filling is prepared conventionally and chilled. When filling is chilled, then fill crepes and burritos. Blast chill filled products. BREAKFAST SANDWICHES Prepare sandwich filling separately and chill. Assemble sandwiches, wrap, and blast chill for additional 15-20 minutes. HASH BROWNS/OVEN FRIES For both convenience and freshness, prepare to the point of complete doneness, then blast chill. Product should not be too dry.