CDVS-7000 Series Remote Software Users Guide Crest Electronics, Inc. Version 12.
Remote Surveillance Program The remote surveillance program enables users of the Crest 7000 series DVRs to connect remotely with their digital recorders. This is accomplished by modem or high speed network connection.
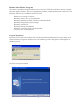
Click next to begin copying files. When the Windows Media Player Codec setup screen appears, click yes to install the software. The Windows Media Player Codec is an AVI codec format which is needed to replay video backed up in AVI format.
Once the installation is finished, the program update files will begin installation. After files are installed, the remote surveillance icon is placed on the desktop. Remote Surveillance Program Operation Before the remote program can be set up, user must log-in with default user ID and password. The default user ID is system, and the password is manager. Click the log-in icon located in the main screen system manager Before the first user is setup, you must log-in to the system.
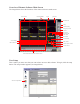
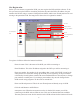
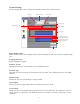
Overview of Remote Software Main Screen The image below shows the functions of the remote software’s main screen. review screen connected DVRs log-in group list minimize/exit setup remote backup emergency record connect disconnect disconnect all audio mute alarm mute current DVR screen display PTZ control camera selection remote system control search control alarm notification/search date and time screen User Setup This is where you enter users that you want to have access to this software.
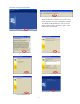
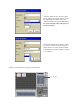
The user setup window appears. Enter the user name, followed by the user ID, and the password. Confirm the password and click the add button. enter user name enter user enter password confirm password place any comments here Click the add button to add Important Note: After entering the first user the default user ID and password will no longer work. Please make a note of the user id and password. To delete a user, highlight user and click the delete button.
Site Registration Before you can connect to a particular DVR, you must register the DVR with this software. To do this you must set up the DVR for networking and know the particular DVR’s IP address, the port numbers the DVR is using to connect if changed from default, and the user ID and password for connecting to the particular DVR. The image below shows the site registration window.
Group Registration Group registration allows the user to effectively manage multiple DVR sites. By utilizing groups, the user is able to view specific cameras from multiple DVRs with a click of a mouse. If the DVR is using DDNS, the DDNS server can be listed as domain. The image below shows the group registration window. To setup Group registration, click the Add button. Enter name for the group you want to setup. You should use a name that will be representative of the cameras in the group.
Click the down arrow in the Site Name box to display the registered sites. Select the registered site of the camera you wish to include in the group. Sites must be registered before they will appear in the site name box. Click on the down arrow button to select the specific camera from the listed site name chosen. Click the camera number to add camera to group. Repeat to add up to 16 cameras. Below is an example of using the group function.
System Settings System settings allows user to change the default settings of the remote software. language software version network type modem setup single display mode event popup event sound recording data path backup data path (VDB) backup data path (AVI) backup log data path save close Single Display Mode When chosen, single camera display tells the system to display in full screen mode or original image size. Language Selection Select language for display.
Recording Data Path Sets the local data path where the system will save data when the user chooses to use emergency record. Backup Data Path (VDB) Sets the local data path to which the system will save data backed up using the remote backup function while saving data in the DVR’s native file format. Backup Data Path (AVI) Sets the local data path to which the system will save data backed up using the remote backup function while saving data in AVI file format.
Single Site Connection To connect to a single site, select a site from the list of sites and click on its icon. Next, click the connect icon. To connect to another site, click that site’s icon and click the connect icon. When in single site connection mode, the system displays cameras from the selected site only. It is possible to change image functions and cameras by using the review screen pop-up screen. To view preset cameras from multiple DVR sites, use the group mode.
Remote Surveillance Screen The remote surveillance screen is the main screen for viewing live and recorded video. The image below shows the details of the remote surveillance screen.
Remote Surveillance Image The image below shows the various elements of the surveillance image in live mode. live image site name camera name record resolution Site Name - This is the name of the DVR site that the image is from. Camera Name - This is the camera name that was set up in the DVR software. Image Type - Shows if the image is in Live video mode. Resolution - Shows the record resolution set up on DVR site for image.
Split Screen The split screen allows the user to display the images in different views. The available screens are shown in the image below. 1 camera 6 camera 4 camera 9 camera 8 camera 12 camera 10 camera full screen auto sequencing 16 camera next snapshot In addition to the predefined split screens, Crest’s Remote Surveillance software provides channel swapping. One channel position can be swapped with another by clicking and dragging one channel to another.
Auto Screen Rotation Click this button for auto screen sequencing for the selected screen split. Snapshot Button Click this button to take a snapshot on the screen. See section on Snapshot for details on how to use snapshot function. Main Screen Pop-up Menu The main screen pop-up menu has several functions that aid the user in viewing images remotely. The following is a list of the available functions. Connect Channel - This function allows the user to change the connected camera.
Disconnect Channel To disconnect a single channel, click inside the image to select it (will be highlighted in red). Right click to bring up the pop-up menu and click disconnect channel. Recording Start This function allows the user to save live video to a local hard drive. To begin recording, right click to bring up the pop-up menu and click start recording. The data will be saved in the directory the user set up when doing system setup. To stop recording, click stop recording from the pop-up menu.
Event Notification Window The event notification window displays event alarms from the registered DVRs. The alarms must be set up in the DVR before they will display in the event window. The event alarms available are sensor, motion, and camera loss. The image below shows the event notification window. Emergency Record Button Emergency record button when clicked will start recording to the local drive all cameras on screen, even cameras in playback mode.
Control Window The control window has three functions: PTZ Control, which allows users connected to a PTZ camera to control it, System Control, which allows users to control relays and make system changes to the remote DVR, and Search Control, which allows users to search and playback video recorded on remote DVRs. This section will look at each of these functions. PTZ Control Allows the user to control PTZ cameras connected to the remote DVR. Image below shows the functions available with PTZ control.
Remote Search Function To begin the remote search function, click the search screen tab and the program changes to search mode. Search Screen The image below details the functions of the search screen. remote search screen split screen plus functions playback control buttons zoom date selection playback speed control hour/minute selection Search Screen - Search screen allows the user to search and playback recorded video from the remote DVR.
Split Screen Plus Functions The split screen allows the user to display playback in the different screen modes. The functions available are full screen and snapshot. The image below shows the split screen and its functions. For information on the snapshot function, please refer to the section labeled “Snapshot” later in this manual.
Playback Control Buttons Playback control buttons allow the user to control the direction and pausing of playback. With this function, user is able to play video forward, backward, pause, or advance/reverse playback one frame at a time. play backward play forward pause advance one frame back one frame Playback Speed Control This function controls the playback speed. slower faster Zoom Zoom control works when viewing one camera.
Remote System Settings Remote system settings screen has three functions: 1) Shows sensor alarms graphically and gives the user the ability to trip relays manually. 2) Allows the remote user to set DVR system settings. 3) Allows for two way audio communication. The image below is the remote system settings window.
Two Way Audio Communication This function establishes two way communication between the remote user and the DVR. When two way audio communication is established, the icon will turn yellow and play an alarm at the DVR indicating that a remote user requests two way audio. Click again to turn off two way audio communication. Two way audio requires computer microphone and speakers at both the remote station and the DVR.
Remote Backup Function The remote backup function allows the user to backup recorded data from the selected DVR to a remote storage site. The backup function allows for manual, daily, weekly, monthly or a specified backup schedule. User can choose all cameras or select individual cameras for backup as well as the method of recording. The Backup Function allows the user to backup in the DVR’s original file format (VDB) or AVI (MPEG4). To begin Remote Backup, click the Remote backup icon.
Add a Backup Task To schedule a backup task, or do a manual backup, click the Add Task button. The task registration window appears as shown below. registered DVR sites task name selected site backup mode camera selection save mode selection backup start/end time backup file format data path save cancel Registered DVR Sites The registered DVR sites is a listing of all DVR sites registered with the remote software. These are the sites that can be backed-up.
Backup Mode Select the type of backup to perform. Manual : Start backup manually. Daily : Perform automatic daily backup at a set time. Weekly : Perform weekly backup automatically on set day and time. Monthly : Perform monthly backup automatically on a set date and time. Specific Date : Backup based on a specific date and time. Camera Selection Select which cameras to be backed up Save Mode Selection Save mode selection allows for the backup of cameras that are using a particular recording mode.
Data Path Allows the user to choose where to save the backup. Default file backup data paths: C:\Rs\AVIbackup - AVI backup C:\Rs\Backup - VDB file backup C:\Rs\Backuplog - Backup log file C:\Rs\Rec - Remote site live video backup Snapshot The snapshot function allows the user to capture a screen shot in a JPG file format. The function allows for previewing, saving or reviewing the image.
Image Enhancement Tools The following tools are available to enhance the image before saving or printing. Miror Image Mirror function will flip image as if it were being viewed in a mirror. See pictures below. before mirror after mirror Flip Image The flip function will flip the image horizontally from bottom to top, as the pictures below demonstrate.
Brightness Control With the brightness control, the snapshot can be lightened or darkened. The arrow to the right increases brightness, while the arrow to the left darkens the picture decreases brightness increases brightness Contrast Control The contrast function controls the amount of contrast in the image. To increase contrast, click the arrow on the right. To decrease contrast, click the arrow on the left.