
Installation Instructions


3
1"
CUT &
FOLD
DOWN
1"
6"
NOTE: If your structure has housewrap see the
illustrations on Page 5 for installation
techniques to preserve design pressure
test ratings. Also perform steps in
Straighten & Level Subfloor
on Page 2.
IMPORTANT: You must complete
Steps 1 and 2 below for both nailing fin or
brickmould units whether they are installed as
DPR or non-DPR.
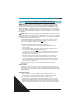
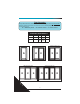
1. Cut a piece of weather barrier self-adhering
tape 4" wide and as long as the opening width
plus 8" (FIGURE 1). Apply to face of exterior wall
so 1" extends above the opening and 4" extends
beyond each side of the opening. Cut along the
corners of rough opening and fold down onto the
sill (FIGURE 1A).
2. Apply a second continuous piece of weather
barrier self-adhering tape on the top surface of the
rough opening sill. Use a rubber roller to apply
barrier to surface (FIGURE 2).
Cut barrier tape the thickness of the wall plus 1"
and 12" longer than the width of the opening. Align
flush with interior of the wall and extend edge of the
tape 1" past the exterior wall surface (FIGURE 2).
Start the piece (approximately 6") up the side of
the rough opening and run it to the bottom of the
opening, to the other side of the opening, and 6"
up the other side (FIGURE 2A).
Improper use of hand and power tools could
result in personal injury and/or product damage.
Follow equipment manufacturers’ instructions for
safe operation. Always wear safety glasses.
Sill Preparation
FIGURE 1
FIGURE 2
1A
2A
4-Wide
All
Wd Bk Mld
Cld Nail Fin
Gen - All