
Installation Instructions


v
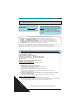
Design Pressure Performance – Fastening Method
Nailing Fin and Brick Mould Configurations
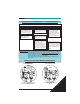
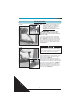
ALUMINUM CLAD
WOOD SLIDING PATIO DOOR
HEAD
PRE-PUNCHED
FASTENER HOLE
IN NAILING FIN
SIDE VIEW -- OX OPERATING CODE
WITH NAILING FIN -- NO BRICK MOULD
FIGURE 1
OX
Screen
Active
Insert
Inactive
Insert
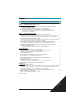
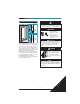
WOOD SLIDING PATIO DOOR
HEAD
SIDE VIEW -- OX OPERATING CODE
WITH BRICK MOULD
FIGURE 2
O
X
Screen
Active
Insert
Inactive
Insert
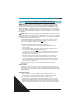
Aluminum Clad Wood Patio Door With Pre-Punched Fastener Holes Or
Wood Door With Wood Brick Mould
Unit Description Fastener How to Fasten
Apply screws through each
pilot hole and tighten firmly.
Screws must be no more than
12" on center from each other.
Do not over-tighten. Seal all
fastener heads with silicone
sealant.
Start a screw 4" in from
corner and apply through
nailing fin into framing
member. Space additional
screws every 4" on center,
around entire perimeter,
staying 4" from each corner.
Nailing Fin with Pre-Punched
Fastener Holes / No Brick
Mould See FIGURE 1 below.
See Important Note below.
#8 Steel screws long enough
to penetrate framing material
by at least 1-1/2".
Wood Brick Mould – See
FIGURE 2 below. See
Important Note below.
#8 Steel screws long enough
to penetrate framing material
by at least 1-1/2"
Drill a 3/32" pilot hole in brick
mould. Start 4" from corner
and space holes 12" on
center around entire perime-
ter, staying at least 4" from
each corner. For a neater
appearance, countersink pilot
holes, sized to screw heads.
IMPORTANT NOTE: To achieve DP50 ratings in clad nailing fin units, the #6 x 1-1/2" flat head
screws holding the inside head stop must be replaced by #8 x 3" long
flat head stainless steel screws (installer must supply these screws)
. The
longer screws must be driven up through the head inside stop, the head
jamb, and fastened securely into the framing.
This screw change is not required for DP35 ratings on either clad or
primed units.
4-Wide
All
Wd Bk Mld
Cld Nail Fin
Gen - All