
Installation Instructions
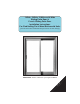


JAMB WIDTH
ROUGH OPENING WIDTH
UNIT WIDTH
1
GENERAL – ALL INSTALLATIONS
SAFETY INSTRUCTIONS
Read installation instructions completely
before beginning procedure.
Wear gloves, safety glasses, goggles or
eye shields appropriate to procedure.
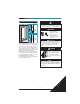
Check Rough Opening Size
Before you begin, check the following:
IMPORTANT: High-quality, exterior,
neutral-cure, clear, silicone sealant (compatible
with aluminum extrusion and exterior face of
the wall) is to be used for all procedures in the
following instructions which call for caulking or
sealant.
IMPORTANT: Check to make sure you
have the correct door type and the correct
size door (Width and Height) for your rough
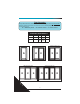
opening (FIGURES 1 – 5).
1. Measure the rough opening to ensure that it is
not more than 1/2" taller in overall Height or 3/4"
wider in overall Width (FIGURE 1) than Jamb
Height or Width (FIGURES 2, 3, 4, & 5).
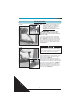
IMPORTANT: If unit is to meet design
pressure ratings, a maximum 1/4" shim space
is required around perimeter. A shim space
greater than 1/4" could result in lower product
performance and may be considered non-com-
pliant with certain building codes. If necessary,
adjust rough opening so shim space is not
greater than 1/4" on each side and the top.
NOTE: Doors do not require 1/4" shim space at
the sill.
H
W
JAMB HEIGHT
ROUGH OPENING
HEIGHT
UNIT HEIGHT
ROUGH OPENING
JAMB HEIGHT
JAMB WIDTH
ROUGH OPENING WIDTH
FIGURE 1
FIGURE 2
FIGURE 3
FIGURE 4
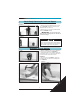
IMPORTANT:
When accessories have been ordered, apply according to the directions
BEFORE you install the unit OR prep the rough opening.
4-Wide
All
Wd Bk Mld
Cld Nail Fin
Gen - All
FIGURE 5