
Installation Instructions


2
FIGURE 2
FIGURE 1
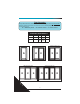
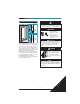
1. Measure the opening diagonally from corner-to-
corner (FIGURES 1 & 1A). The measurements
should not differ more than 1/4".
2. Using a long level check side and sill for plumb
and level (FIGURES 2 & 2A).
IMPORTANT: To ensure that the door
panels operate smoothly, make sure that the sill
is level and straight.
Check Rough Opening for Level and Square
2A
1A
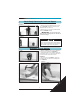
1. Masonry installation requires a 2 x 6 sill plate to
be present. Check sill for level (FIGURE 1).
2. To straighten and level the subfloor, identify the
areas that are above level and countersink nails in
the floor area that will be under the door
(FIGURE 2).
3. Check for level as in (FIGURE 1). Plane area
that will be under the door until it is straight and
level (FIGURE 3).
Improper use of hand and power tools could
result in personal injury and/or product damage.
Follow equipment manufacturers’ instructions for
safe operation. Always wear safety glasses.
Straighten & Level Subfloor
FIGURE 1
FIGURE 2
FIGURE 3
4-Wide
All
Wd Bk Mld
Cld Nail Fin
Gen - All