COPYRIGHT NOTICE Copyright 2007 Imerge Ltd. All rights reserved. The AudioServer XiVA™ software and this documentation are copyright materials. No part of the AudioServer software or this documentation may be reproduced, transmitted, transcribed, stored in a retrieval system, or translated into any language, or computer language, in any form or by any means without prior written permission of Imerge. XiVA™ is a registered trademark of Imerge Ltd. Adagio™ is a trademark of Crestron Electronics, Inc.
contents Safety Instructions.................................................................................................................................................................................1 • General Precautions......................................................................................................................................................................1 • Important Safety Instructions..................................................................................
precautions DTS Encoded Discs CAUTION - when playing DTS encoded CDs excessive noise will be heard on the analog outputs jacks of the SoundServer. To avoid possible damage to the audio system you should ensure that the correct connections are made to your amplification system for replaying this type of disc. general precautions When installing the equipment ensure that: • the ventilation holes are not covered. • air is allowed to circulate freely around the equipment.
IMPORTANT SAFETY INSTRUCTIONS READ INSTRUCTIONS - All the safety and operating instructions should be read before the product is operated. KEEP INSTRUCTIONS - The safety and operating instructions should be kept for future reference. HEED WARNINGS - All warnings on the product and in the operating instructions should be followed. FOLLOW INSTRUCTIONS - All operating and use instructions should be followed. CLEANING - Unplug this product from the wall outlet before cleaning.
Important Safety notices european model Note: This product has been designed and type-tested to comply with the limits set out in EN55013, EN55020, EN60950, EN55022: 1998 CLASS B4, EN55024: 1998, FCC RULES PART 15 SUBPART B CLASS B. AS/NZS 3548:1995 CLASS B The serial number for this equipment is located on the rear panel. Please write this serial number on your enclosed product registration form and keep it in a secure area. This is for your security. U.S.
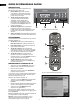
quick start guide front panel The following controls are available on the front panel of your Audio Server. 1. MENU button: Press this button to display the main front panel functions screen on the LCD display of your Audio Server. 2. Front panel action buttons: These four buttons have assignable functions as indicated by the labels at the bottom of the LCD display. For example, in the display opposite, the Setup action button will display the Set Up options. 3.
playing music • To enter text using the alphanumeric keypad Display the Audio Library by pressing the àBrowse key on the remote control. The Audio Library menu allows you to choose how you want to browse your music collection. You can browse by track, album, artist, genre, year, era or playlist. • • Use the S and T keys to move the cursor to the required position. • Use the keys on the alphanumeric keypad to enter a letter.
GUIDE DE DÉMARRAGE RAPIDE PANNEAU AVANT Une sélection de contrôles est disponible sur le panneau avant du serveur audio. 1. Bouton MENU: appuyez sur ce bouton pour afficher les principales fonctions de l’écran du panneau avant sur l’affichage LCD de votre serveur audio. 2. Touches d’action du panneau avant: ces quatre touches ont des fonctions assignables, comme indiqué par les inscriptions au bas de l’affichage LCD.
LECTURE DE MUSIQUE Siasie de texte à l’aide du pavé alphanumérique • Affichez la médiathèque en appuyant sur la touche de àdéfilement de la télécommande. • Utilisez les touches S et T pour placer le curseur à l’endroit voulu. Le menu de la médiathèque vous permet de parcourir votre collection musicale en utilisant différents critères. Vous pouvez la parcourir par titre, album, artiste, genre, année, époque ou liste. • Utilisez les touches du pavé alphanumérique pour saisir une lettre.
SCHNELLSTARTHANDBUCH GERÄTEVORDERSEITE Auf der Gerätevorderseite des Audio-Servers sind eine Reihe von Bedienelementen vorhanden. 1. MENU -Taste: Drücken Sie diese Taste, um die LCD-Hauptfunktionsanzeige auf der Vorderseite des Audio-Servers anzuzeigen. 2. Aktionstasten auf der Gerätevorderseite: Diesen vier Tasten können Funktionen zugewiesen werden, die im unteren Bereich der LCD-Anzeige angegeben sind.
So geben Sie Text über die alphanumerische Tastatur ein Hinweis: Außerdem können Sie über die Gerätevorderseite auch eine CD aufnehmen (siehe Seite 35). WIEDERGEBEN VON MUSIK • Drücken Sie die Taste àBrowse à auf der Fernbedienung, um die Audio-Bibliothek aufzurufen. Bewegen Sie mit den Tasten S und T den Cursor an die entsprechende Position. • Geben Sie die Buchstaben über die alphanumerische Tastatur ein.
GUÍA DE INICIO RÁPIDO PANEL FRONTAL El panel frontal de Audio Server incluye una serie de controles. 1. Botón MENU: Pulse este botón para mostrar la pantalla de funciones principal del panel frontal en la pantalla LCD de Audio Server. 2. Teclas de acción del panel frontal: Estas cuatro teclas tienen funciones asignables, como indican las etiquetas de la parte inferior de la pantalla LCD. Por ejemplo, la tecla de acción Setup mostrará las opciones de configuración en la pantalla. 3.
REPRODUCIR MÚSICA Para Introducir Texto Con El Teclado Alfanumérico • Abra la Biblioteca de audio pulsando la tecla àBrowse del control remoto. • Utilice las teclas S y T para mover el cursor a la posición deseada. El menú Biblioteca de audio permite elegir el modo de navegar por la colección de música. Puede navegar por pista, álbum, artista, género, año, época o lista de reproducción. • Introduzca una letra con las teclas del teclado alfanumérico.
GUIDA RAPIDA PANNELLO FRONTALE Nel pannello frontale sono disponibili i controlli di comando di Audio Server. 1. Tasto MENU: premere questo tasto per visualizzare la schermata principale delle funzioni del pannello frontale all’interno del display LCD di Audio Server. 2. Tasti del pannello frontale: a questi quattro tasti sono assegnate le funzioni indicate nelle corrispondenti etichette riportate nella parte inferiore del display LCD.
RIPRODUZIONE DI MUSICA • Per immettere testo con il tastierino alfanumerico Premere il tasto àBrowse à del telecomando per visualizzare la Libreria audio. Nel menu della Libreria audio è possibile specificare come sfogliare il repertorio di musica: per brano, per album, per artista, per genere, per anno, per periodo o per sequenza di brani. • Premere i tasti U e V per passare da una categoria all’altra. • Premere i tasti S e T per spostare il cursore nella posizione desiderata.
introduction Composite video output Congratulations on purchasing your Audio Server from Crestron. The Audio Server is a revolutionary way of filling your home with music. • Output level........................................... • Connector................................................... 1Vp-p/75W RCA jack VGA output Your Audio Server stores and catalogs your music collection, allowing you to select any album or track at the press of a key.
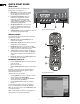
controls and connections front view 5 1 2 3 4 This section provides information about the controls and connections available on your Audio Server. 6 11 12 13 15 16 7 8 9 10 14 c / e button When the button is pressed briefly during playback, play restarts at the beginning of the next track. When the button is held for a longer period of time the music will fast forward at high speed. DISC TRAY Discs should be inserted with the label side up.
REAR view 2 1 3 11 6 4 5 7 8 9 10 12 13 14 IR IN 15 DIGITAL OPTICAL OUT The IR IN connection allows remote control information to be carried from other devices directly into the Audio Server. The digital optical output can be used to transmit high quality audio to a device with a digital optical input (D/A converter, A/V amplifier etc.) using an optical fiber cable.
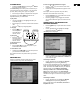
remote control s MUTE key The following diagram explains the function of the keys on your Audio Server remote control: This key currently has no function. r VOLUME keys These keys currently have no function Standby 2 1 Adagio Server 4 3 7 8 [ ALPHABETIC SCROLL key Default Out. Vol. + _ + _ Mute Browse Press this key to access the Intial Letter screen. This screen is only available if the list currently displayed is in alphabetical order.
the function menu R REPEAT (RETURN) key The main functions of your Audio Server are accessible via the Function Menu. The Repeat key has the following functions: • During playback this key toggles the repeat play setting on the Audio Server. • In text entry mode this key can be used to perform a carriage return. To Display the Function Menu • Q SHUFFLE (DELETE) key From any screen in the television user interface, press the JMenu key on your Audio Server remote control.
Recording Music • Press the OSelect key to begin recording. The CD Recording screen, with progress indicator will be displayed: Your Audio Server can make new recordings onto the hard disk by recording music directly from an audio CD placed in the CD tray. Your Audio Server can access the Internet, using either a broadband connection (via the Ethernet port) or using the built-in modem, to automatically retrieve information about the CD.
playing music This chapter explains how to play music on your Audio Server. It also explains how to search for a track in a number of alternative ways. Playing music from the audio library Press the à Browse key on your Audio Server remote control from any screen and the Audio Library screen will be displayed.
the audio library The television user interface has been designed to allow easy navigation through the Audio Library and therefore give quick and easy access to your complete music collection in a number of different ways. Each screen in the Audio Library is carefully constructed to provide the most important information about the items you are viewing.
library navigation overview Electric Avenue Navigate to the Audio Library screen described on the previous page. You can use your remote control to select a track directly, or follow the instructions below and navigate through the library interface to select a track.
Audio library navigation To play the entire album: The following sections contains a detailed explanation about selecting items in the Audio Library for playback. • To browse the Audio Library by track • • Press the OPlay key on your Audio Server remote control to begin playback immediately, or press the M Add button to add this album to the play queue. To select a particular track from this album: Use the U or V keys to highlight the Tracks option in the Audio Library Menu.
To browse the Audio Library by genre • • • Use the U or V keys to highlight the Genres option in the Audio Library Menu. Press the T key to display the Genres screen. Use the U or V keys to step between years, or press the appropriate key on the alphanumeric keypad to jump directly to that position in the list.
To browse Playlists in the Audio Library The TV screen displays a list of letters which correspond to the starting letter of the items available in the chosen list: Playlists allow you to create your own selections of tracks and save them with a name of your choice such as Party Music. For more information about creating a playlist refer to Creating a new Playlist on page 29. • • Use the U or V keys to highlight the Playlists option in the Audio Library Menu.
the search function The search function can be used from any Audio Library screen to reduce the items in the current list to only those that contain a particular word or collection of characters. To use the search function, navigate to the list in the library you wish to search and press the 9Search key on your Audio Server remote control. The below screen is displayed. Use the alphanumeric keypad to enter text and press the OOK key. A list of items containing your search criteria will then be displayed.
playback information The illustration below shows the Now Playing screen. Whenever you select an item in the Audio Library for playback, this screen is displayed. You can also choose to display this screen at any time by pressing the âNow Playing key on your Audio Server remote control. When you make this selection, your Audio Server will display the Now Playing screen for the currently selected audio output.
Switching audio outputs Shuffle and repeat playback Your Audio Server is capable of playing different music in several rooms simultaneously. If you wish to play music in a particular room, you must first choose the correct audio output. Your Audio Server lets you play selections from the Audio Library in a shuffled order to add variety to your music. You can also play selections repeatedly.
organiZing your music collection the play queue Any item in your Audio Library can be selected for playback in one of two ways: • • This chapter describes the features built into your Audio Server to help you organize the music in your music library, including information about creating playlists of your favorite tracks, deleting albums or tracks you no longer want to store, and naming albums, tracks, and artists.
editing the audio library The following screen is displayed: Your Audio Server labels the albums, artists and tracks in your Audio Library with names which identify the track you are listening to, and these help you locate items when you are browsing through the Audio Library. If you have an Internet connection, your Audio Server reads the CD information automatically from the Gracenote Music Recognition Service. You can edit these names at any stage to suit your own preferences.
The following screen is displayed: • • Use the U or V keys to scroll through the cover art images. Press the OSelect key to associate a piece of artwork with your chosen album. It is also possible to upload images from your PC to your Audio Server and apply these to albums in your Audio Library. For more information, refer to the section titled Importing Files To Your Audio Server on page 39.
system set up Current Ethernet Settings Allows you to view the current Ethernet settings being used by your Audio Server. This chapter describes the advanced settings that you can access from your Audio Server’s Set Up menu. To access the Set Up menu: • • • Press the JMenu key on your remote control to display the Function Menu. Use the U and V keys to highlight the Set Up option. Press the O Select key. The following screen is displayed: This menu is not editable and is used for reference only.
TV Settings System Information This section is used to specify if your Audio Server is configured for PAL or NTSC use. The System Information screen displays the serial number of your Audio Server and also the software version currently running. You may need to edit this setting if the television user interface is either not displayed on your televsion screen, or is displayed incorrectly. You may need to quote this information if you contact your dealer or installer for technical support.
Remote back Up Settings Media Transfer Settings This screen allows you to specify Username, Password and Location for performing a Back Up operation. Here you can enable or disable the media transfer function. For more information about the use of these settings, refer to the section titled Remote Back Up And Restore, on page 40. Crestron Network Settings Use this section to display settings used by your Crestron controller.
The front panel interface The following screen is displayed: In addition to the user interface displayed on your television screen, the Audio Server also has a user interface accessible via the LCD display and buttons on the front panel of the unit. This is an abridged version of the television user interface and provides access to a limited number of controls and functions.
Use the U and V buttons on the front panel to scroll through the following Set Up options: • Network Settings • Current Ethernet Settings • Static Ethernet Settings • Modem Settings • TV Settings • User Interface Settings • System Information • Software Update Settings • Remote Back Up Settings • CD Record Settings • Media Transfer Settings • Crestron Network Settings • Online Update Press the Select action button on the front panel to enter any of the above sections and configure
using your audio server with a home computer When you first connect to the Remote User Interface, you will recognize the Audio Library screen: Your Audio Server has a number of advanced features which can be accessed via a computer attached to your home network. the remote user interface Your Audio Server’s television user interface is accessible via a PC running on your home network. This gives you complete control of your Audio Server using a keyboard and mouse as opposed to a remote control.
media transfer This setting should be set to Enabled by default. However, if necessary, press the OEdit key and select Enabled to activate media transfer. Use the MSave key to save this setting. In addition to recording directly from the CD tray, it is also possible to transfer music and cover art images to and from your Audio Server, using a computer on your home network.
Importing Files to your Audio Server • Select the Advanced tab. • • Ensure that the option labelled Copy files to iTunes Music folder when adding to library is unchecked. • Click the OK button to confirm any changes. • Making sure you have Library displayed in iTunes, navigate to your Audio Server on the network.
Once your Media Library has been updated with the music from your Audio Server you can update your portable player as follows: • Click the Copy to CD or Device option from the Media Player toolbar. • Select the Album, Artist, Genre or Playlist you wish to copy from the Items to Copy list. • Under Items on Device select your portable player. • Click the Copy button.
THE CRESTRON TOUCHPANEL INTERFACE A friendly onscreen menu can be displayed on any Crestron touchpanel within your home. The screens discussed in this section are a typical example of an interface provided by Crestron to its dealers. Since your dealer may have customized screens for you, your screens may differ with respect to presentation, but the general topics covered should apply nonetheless. What appears on the screen depends on the size of the touchpanel.
Music Browser There are a number of ways to browse and access the music of your choice. Touching an item on the music browser allows you to view another level and displays another page on the touchpanel. The process of making a series of selections from the music browser creates a browse path. As the browse path lengthens, the items listed within the music browser should match the music of your choice.
Now Playing Want more information about what is currently playing? Simply select the Now Playing summary located at the bottom of the Music Library page (or select the Now Playing ‘jump to’ button) to open the Now Playing page, shown below. Options include: • Current song details – lists the song title, album title, and artist of the song now playing (genre is also shown on large touchpanels, 10 inches or more). • Check the queue (select the Queue ‘jump to’ button).
Playlist Manager NOTE: The Playlist Manager is only available from large touchpanels, 10 inches or more. Want to create, edit and remove playlists? Simply select the Playlist Manager ‘jump to’ button on the Music Library page to open the Playlist Manager page, shown below. Notice that the music browser is identical to the Music Library page. To make an addition to a playlist, simply use the music browser to find a particular selection (i.e., track, album, or artist).
Selection Mode Compilation albums offer an interesting ‘twist’ when browsing through your library of music, because the artists can vary from track to track on a given album. So once again you can create a browse path by selecting an artist (i.e., Nat King Cole) and compilation album (i.e., Pottery Barn Dinner at Eight), as shown below. Select the Options ‘jump to’ button and notice that there are two ‘Selection Mode’ options available: Track and Album.
TERMS & CONDITIONS Limitations of Imerge’s Liability XiVA™ SOFTWARE CUSTOMER SERVICE AGREEMENT In no event will Imerge or its suppliers be liable to you or any third party for any loss of profits, loss of data, loss of revenue, loss of or loss of use of software, loss of or loss of use of equipment, to which the Audio Server is connected, business interruption, or other indirect, consequential, special, or incidental damages of any nature arising from or relating to your use of the Software, even if Imer
Notices How you can learn what personal information we have? Any and all notices to be given by either Imerge or you to the other under these terms and conditions shall be deemed sufficiently given when sent by email or facsimile transmission in each case addressed to you at the email address or facsimile number you have given us or to Imerge at the email address or facsimile number displayed at www.xiva.com You may send us email at: support@xiva.
MICROSOFT End-User LicenSe Agreement • You have acquired a device (“DEVICE”) that includes software licensed by Imerge Ltd. from an affiliate of Microsoft Corporation (“MS”). Those installed software products of MS origin, as well as associated media, printed materials, and “online” or electronic documentation (“SOFTWARE”) are protected by international intellectual property laws and treaties.
AND SPECIAL PROVISIONS PROVIDED BELOW AND/OR OTHERWISE WITH THE SOFTWARE SHALL APPLY TO SUCH SUPPLEMENTAL COMPONENTS. MS, Microsoft Corporation or their subsidiaries reserve the right to discontinue any Internet-based services provided to you or made available to you through the use of the SOFTWARE. GRACENOTE End-User License Agreement • End User Proof of License.
Return and Warranty Policies Merchandise Returns / Repair Service For returns or repairs, please contact your CRESTRON dealer. CRESTRON Limited Warranty CRESTRON ELECTRONICS, INC.
Crestron Electronics, Inc. 15 Volvo Drive, Rockleigh, NJ 07647 Tel: 888.CRESTRON Fax: 201.767.7576 www.crestron.com ©Copyright 2007 Imerge Ltd. Part No. PK00330-02 (2014056) Specifications subject to change without notice.