Crestron MLX-3 infiNET EX™ LCD Handheld Remote Operations Guide
This document was prepared and written by the Technical Documentation department at: Crestron Electronics, Inc. 15 Volvo Drive Rockleigh, NJ 07647 1-888-CRESTRON Regulatory Compliance As of the date of manufacture, the MLX-3 has been tested and found to comply with specifications for CE marking and standards per EMC and Radiocommunications Compliance Labelling. Federal Communications Commission (FCC) Compliance Statement This device complies with part 15 of the FCC Rules.
Crestron MLX-3 infiNET EX™ LCD Handheld Remote Contents infiNET EX™ LCD Handheld Remote: MLX-3 1 Introduction ............................................................................................................................... 1 Features and Functions ................................................................................................ 2 Specifications ..............................................................................................................
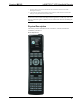
Crestron MLX-3 infiNET EX™ LCD Handheld Remote infiNET EX™ LCD Handheld Remote: MLX-3 Introduction The MLX-3 is a state-of-the-art handheld remote featuring Crestron® infiNET EX™ 2-way RF wireless communications. Its backlit LCD screen is capable of displaying dynamic text with true feedback capability, supporting scrolling menus of channels, media titles, and numerous other commands.
infiNET EX™LCD Handheld Remote Crestron MLX-3 Features and Functions • • • • • • Ergonomic handheld design Elegant high-gloss finish infiNET EX™ 2-way RF wireless technology 57 programmable buttons with blue EL backlight Backlit LCD screen with dynamic text display Operates on four AAA alkaline batteries Specifications Specifications for the MLX-3 are listed in the following table. MLX-3 Specifications SPECIFICATION LCD Display DETAILS Monochrome 1.
Crestron MLX-3 infiNET EX™ LCD Handheld Remote 1. The latest software versions can be obtained from the Crestron Web site. Refer to the NOTE following these footnotes. 2. Crestron 2-Series control systems include the AV2 and PRO2. Consult the latest Crestron Product Catalog for a complete list of 2-Series control systems. NOTE: Crestron software and any files on the Web site are for authorized Crestron dealers and Crestron Authorized Independent Programmers (CAIP) only.
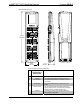
infiNET EX™LCD Handheld Remote Crestron MLX-3 MLX-3 Overall Dimensions 8.46 in (215 mm) 2.13 in (54 mm) 1.11 in (28 mm) MLX-3 Controls, Connectors, & Indicators # CONNECTORS, CONTROLS, & INDICATORS 1 POWER (1) programmable button for power functions. 2 LIGHTS (1) programmable button for lighting functions. 3 Menu Buttons 4 i, HOME, h 5 Device Control 6 USB Port 4 • infiNET EX™ LCD Handheld Remote: MLX-3 DESCRIPTION (10) programmable buttons to actuate LCD menu commands.
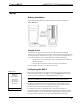
Crestron MLX-3 infiNET EX™ LCD Handheld Remote Setup Battery Installation Refer to the following illustration and install the four supplied AAA batteries. Battery Installation Identity Code The RF ID of the MLX-3 has been factory set to 03. The RF IDs of multiple MLX-3 devices communicating with the same gateway must be unique. RF IDs can be changed from the “Setup mode” on page 6, or from a personal computer (PC) via the Crestron Toolbox™. When setting the RF ID, consider the following: 1.
infiNET EX™LCD Handheld Remote Crestron MLX-3 Installation Guide (Doc. 6706) for details (www.crestron.com/manuals). “PROGRAM DEVICE” Screen PROGRAM DEVICE In Setup mode, use the menu buttons on either side of the function name displayed on the “PROGRAM DEVICE” screen to select that function. BASIC SETUP The following paragraphs describe the setup options in the order listed in the menus.
Crestron MLX-3 infiNET EX™ LCD Handheld Remote DEVICE” screen. Press HOME twice to exit the Setup mode so Toolbox can recognize the device being acquired to the gateway. If the MLX-3 is already acquired to another network, when you press h to add it to this new network, a screen message instructs you to perform a factory reset in order to acquire it to the new network. Refer to “Factory Reset Procedure” on page 11.
infiNET EX™LCD Handheld Remote - CONTRAST + - LEVEL 10 + SAVE SAVE PAGE 1/1 Crestron MLX-3 Contrast level successfully adjusted. Press > to continue. PAGE 1/1 PAGE 1/1 Press one of the menu buttons on either side of the – CONTRAST+ display to show the current setting value. Use the menu buttons to adjust the contrast as desired. The range is from MIN Level + (0), to -MAX Level (12) in single digit steps.
Crestron MLX-3 - LIGHT T/O + SAVE PAGE 1/1 infiNET EX™ LCD Handheld Remote - 5.0 SAVE PAGE 1/1 + Backlight Timeout successfully adjusted. Press > to continue. PAGE 1/1 Press one of the menu buttons on either side of the – LIGHT T/O+ display to show the current setting value. Use the menu buttons to adjust the value. The range is from Light Off + (0.0 seconds), to -MAX Timeout (30 seconds) in 0.5 second steps. The default is 5.0 seconds.
infiNET EX™LCD Handheld Remote “VIEW TSID” Screen VIEW TSID 0x0034ad97 Crestron MLX-3 View TSID From the “PROGRAM DEVICE” screen, press one of the menu buttons on either side of the VIEW TSID option. The display shows the TSID number (32-bit number derived from the unit serial number). Press h to continue. The display returns to the “PROGRAM DEVICE” screen. Press > to continue.
Crestron MLX-3 RF Channel Screen To block a RF channel, press the key to the right of that channel in the following list. To unblock a channel, press the key to the left. Press > to Continue. infiNET EX™ LCD Handheld Remote RF Channel From the “PROGRAM DEVICE” screen, press one of the menu buttons on either side of the RF CHANNEL option. This option allows you to block or unblock the available channels. The display, shown to the left, provides basic instructions.
infiNET EX™LCD Handheld Remote Crestron MLX-3 Programming Software Have a question or comment about Crestron software? Answers to frequently asked questions (FAQs) can be viewed in the Online Help section of the Crestron Web site. To post a question or view questions you have submitted to Crestron’s True Blue Support, log in at www.crestron.com/support. First-time users will need to establish a user account.
Crestron MLX-3 infiNET EX™ LCD Handheld Remote Locating the CEN-RFGW-EX in the Device Library Locating the MLX-3 in the Device Library The system tree of the control system displays the device in the appropriate slot with a default RF ID as shown in the following illustration. Operations Guide – DOC.
infiNET EX™LCD Handheld Remote Crestron MLX-3 C2Net Device, Slot 9 2. If additional MLX-3 devices are devices are to be added, repeat step 1 for each device. Each MLX-3 is assigned a different RF ID number as it is added. 3. If necessary, double click a device to open the “Device Settings” window and change the RF ID, as shown in the following illustration. “Device Settings: Crestron MLX-3” Window NOTE: The ID code specified in the SIMPL Windows program must match the RF ID of each unit.
Crestron MLX-3 infiNET EX™ LCD Handheld Remote Programming with VisionTools Pro-e The MLX-3 LCD screens should be created in VisionTools Pro-e (VT Pro-e) to allow selection of functions, and control of system devices. Note that the MLX-3 design permits the 57 buttons to be programmed individually per project or for each page in a project. The result is almost limitless functionality, with real time feedback of commands.
infiNET EX™LCD Handheld Remote Crestron MLX-3 Uploading and Upgrading Crestron recommends using the latest programming software and that each device contains the latest firmware to take advantage of the most recently released features. However, before attempting to upload or upgrade, it is necessary to establish communication. NOTE: Only firmware upgrades can be uploaded directly to the MLX-3. Firmware is loaded to the MLX-3 using the USB cable included in your MLX-3’s packaging.
Crestron MLX-3 infiNET EX™ LCD Handheld Remote Projects and Firmware Projects and firmware files may be distributed from programmers to installers or from Crestron to dealers. Firmware upgrades are available from the Crestron Web site as new features are developed after product releases. One has the option to upload programs and projects via the programming software or to upload and upgrade via the Crestron Toolbox.
infiNET EX™LCD Handheld Remote Crestron MLX-3 Operation Operation of the MLX-3 is determined by the program developed for the system in which it is used. NOTE: To ensure best possible signal transmission during operation, avoid holding the MLX-3 in the area of the screen or resting the unit in the lap. The antenna is located at the rear of the unit, behind the screen and is subject to interference from body parts. 18 • infiNET EX™ LCD Handheld Remote: MLX-3 Operations Guide – DOC.
Crestron MLX-3 infiNET EX™ LCD Handheld Remote Problem Solving Troubleshooting The following table provides corrective action for possible trouble situations. If further assistance is required, please contact a Crestron customer service representative. MLX-3 Troubleshooting TROUBLE POSSIBLE CAUSE(S) CORRECTIVE ACTION The MLX-3 does not function. Batteries are not installed properly, or need replacement. Check battery orientation. If necessary, install new batteries (polarity marked in compartment).
infiNET EX™LCD Handheld Remote Crestron MLX-3 Cable Length Equation 40,000 L< RxP Where: L = Length of run (or chain) in feet R = 6 Ohms (Crestron Certified Wire: 18 AWG (0.75 mm 2 )) or 1.6 Ohms (Cresnet HP: 12 AWG (4 mm 2 )) P = Cresnet power usage of entire run (or chain) Make sure the cable length value is less than the value calculated on the right side of the equation.
Crestron MLX-3 infiNET EX™ LCD Handheld Remote Check the Crestron Web site periodically for manual update availability and its relevance. Updates are identified as an “Addendum” in the Download column. Operations Guide – DOC.
infiNET EX™LCD Handheld Remote Crestron MLX-3 Appendix: Firmware Upgrades NOTE: Only firmware upgrades can be uploaded directly to the MLX-3. Firmware is loaded to to the MLX-3 using the USB cable included in your MLX-3’s packaging Use Crestron Toolbox for communicating with the MLX-3. Refer to the Crestron Toolbox help file for details. USB Communication for MLX-3 Remote Firmware ONLY PC Running Crestron Toolbox USB MLX-3 1.
Crestron MLX-3 infiNET EX™ LCD Handheld Remote Return and Warranty Policies Merchandise Returns / Repair Service 1. No merchandise may be returned for credit, exchange, or service without prior authorization from CRESTRON. To obtain warranty service for CRESTRON products, contact an authorized CRESTRON dealer. Only authorized CRESTRON dealers may contact the factory and request an RMA (Return Merchandise Authorization) number.
Crestron Electronics, Inc. 15 Volvo Drive Rockleigh, NJ 07647 Tel: 888.CRESTRON Fax: 201.767.7576 www.crestron.com Operations Guide – DOC. 7134 (2022658) 09.10 Specifications subject to change without notice.