Crestron APAD Wall Mount LCD Controller Operations & Installation Guide
This document was prepared and written by the Technical Documentation department at: Crestron Electronics, Inc. 15 Volvo Drive Rockleigh, NJ 07647 1-888-CRESTRON All brand names, product names and trademarks are the property of their respective owners. ©2006 Crestron Electronics, Inc.
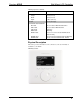
Crestron APAD Wall Mount LCD Controller Contents Wall Mount LCD Controller: APAD 1 Introduction ............................................................................................................................... 1 Features and Functions ................................................................................................ 1 Specifications .............................................................................................................. 2 Physical Description............
Crestron APAD Wall Mount LCD Controller Wall Mount LCD Controller: APAD Introduction Features and Functions • Stylish, affordable wall mount controller • Pleasing white-on-black LCD graphic display • Translucent white backlit “softkey” pushbuttons • Intuitive navigation wheel with “key click” audible feedback • Cresnet® communications — 2-Series compatible Graphic Display The white-on-black LCD display presents the user with a large amount of information in a small space.
Wall Mount LCD Controller Crestron APAD True-Feedback Simplified connectivity using the Crestron® 4-wire Cresnet control bus makes installation a breeze. Fully bidirectional communications enables true-feedback for display of current status of audio, lighting, or climate control settings. Versatile Mounting Options Several mounting options are available for the APAD to facilitate a clean, attractive installation in any wall or similar flat surface.
Crestron APAD Wall Mount LCD Controller APAD Specifications (continued) SPECIFICATION DETAILS Dimensions Height 4.8 in (12.2 cm) Width 4.9 in (12.5 cm) Depth 1.94 in (4.93 cm) Weight 9.2 oz (257.
Wall Mount LCD Controller Crestron APAD APAD Overall Dimensions 4.9 in (12.5 cm) 1.94 in (4.93 cm) 4.8 in (12.2 cm) 0.59 in (1.50 cm) 3.74 in (9.50 cm) 0.43 in (1.09 cm) 0.33 in (0.83 cm) 1.67 in (4.27 cm) 0.62 in (1.57 cm) 3.58 in (9.08 cm) 3.95 in (10.03 cm) 4.16 in (10.56 cm) 0.43 in (1.09 cm) 4.06 in (10.30 cm) 0.78 in (1.96 cm) 3.36 in (8.53 cm) 4 • Wall Mount LCD Controller: APAD Operations & Installation Guide – DOC.
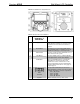
Crestron APAD Wall Mount LCD Controller APAD Front and Rear Face (Bezel Removed) APAD Controls, Connectors, & Indicators # CONNECTORS, CONTROLS, & INDICATORS DESCRIPTION 1 Display Screen Programmable display shows pages, menus, and soft button functions of a project used to control one or more devices in a Cresnet system. 2 Reset Button Used alone to reset system defaults. When pressed while another soft button is pressed, APAD immediately goes into Setup mode.
Wall Mount LCD Controller Crestron APAD Industry Compliance As of the date of manufacture, the APAD has been tested and found to comply with specifications for CE marking and standards per EMC and Radiocommunications Compliance Labelling. NOTE: This device complies with part 15 of the FCC rules.
Crestron APAD Wall Mount LCD Controller Setup Network Wiring When wiring the network, consider the following: • Use Crestron Certified Wire. • Use Crestron power supplies for Crestron equipment. • Provide sufficient power to the system. CAUTION: Insufficient power can lead to unpredictable results or damage to the equipment. Please use the Crestron Power Calculator to help calculate how much power is needed for the system (http://www.crestron.com/calculators).
Wall Mount LCD Controller Crestron APAD Mounting Options for the APAD (continued) PRECONSTRUCTION OPTION POSTCONSTRUCTION OPTION MODEL NUMBER Trim Mount Kit (accessory) DOCUMENT NUMBER TMK-1000L 6063 Wall Mount Kit – Mud WMKM-1000L 6062 Wall Mount Kit – Trim WMKT-1000L 6063 Wall Mount Kit – Bracket * WMKB-1000L 6283 *One set of brackets is supplied with the APAD NOTE: Pre-construction refers to framed walls prior to hanging drywall.
Crestron APAD Wall Mount LCD Controller APAD Cutout Dimensions (1 of 2) 4.17 in (10.60 cm) TEMPLATE - 0V40087 FOR LC–1000, CT–1000 OR APAD ( 1 OF 2 ) 4.27 in (10.85 cm) CUT ALONG THIS EDGE APAD Cutout Dimensions (2 of 2) TEMPLATE - 0V40087 FOR LC–1000, CT–1000 OR APAD ( 2 OF 2 ) CUT ALONG THIS EDGE 4.27 in (10.85 cm) 4.17 in (10.60 cm) Operations & Installation Guide – DOC.
Wall Mount LCD Controller Crestron APAD 1. Locate an area on the wall that is free of studs and miscellaneous wiring. 2. Make a small hole near the middle of the designated site, and verify that the location is suitable. 3. Using masking tape (or equivalent), fasten the template to the wall; verify that the template is level, and trace the opening shape on the wall. 4. Remove the template, and then cut out and remove the traced shape to produce the required opening.
Crestron APAD Wall Mount LCD Controller NOTE: If it becomes necessary to remove the APAD from the mounting surface, the original mounting brackets may fall into the wall and will have to be replaced. Additional brackets are available in the optional Wall Mount Kit – Bracket, Model Number WMKB-1000L. 1. Pull the bezel away from the APAD. 2. Loosen and remove the two screws that secure the top of the APAD to the mounting surface. 3.
Wall Mount LCD Controller Crestron APAD Configuring the APAD Project not Found Screen MAIN MENU Prior to normal operation, it is necessary to configure the unit using a series of setup screens. If the project for the APAD has not been loaded prior to configuring the APAD, the screen shown to the left is displayed instead of the MAIN MENU.
Crestron APAD LCD Brightness Wall Mount LCD Controller LCD Brightness Use the Nav Wheel to select the desired brightness percentage value, from 01 to 99, in single digit steps (01, 02, 03, etc.), or use the << and >> soft buttons to change the number in most significant digit steps (10, 20, 30, etc.). Note that holding any of the soft buttons for more than 10 seconds while going into setup mode will reset the brightness to the default (22%).
Wall Mount LCD Controller Crestron APAD Programming Software Have a question or comment about Crestron software? Answers to frequently asked questions (FAQs) can be viewed in the Online Help section of the Crestron website. To post a question or view questions you have submitted to Crestron’s True Blue Support, log in at http://support.crestron.com. First-time users will need to establish a user account.
Crestron APAD Configuration Manager Wall Mount LCD Controller Configuration Manager is the view where programmers “build” a Crestron control system by selecting hardware from the Device Library. • To incorporate the APAD into the system, drag the APAD from the Wired Keypads folder of the Device Library and drop it in the System Views.
Wall Mount LCD Controller Crestron APAD “APAD Device Settings” Window • Programming Manager The ID code specified in the SIMPL Windows program must match the Net ID of each unit. Programming Manager is the view where programmers "program" a Crestron control system by assigning signals to symbols. The symbol can be viewed by double clicking on the icon or dragging it into Detail View. A description for each signal in the symbol is described in the SIMPL Windows help file (F1).
Crestron APAD Wall Mount LCD Controller Uploading and Upgrading Crestron recommends using the latest programming software and that each device contains the latest firmware to take advantage of the most recently released features. However, before attempting to upload or upgrade, it is necessary to establish communication. Establishing Communication Use Crestron Toolbox for communicating with the APAD; refer to the Crestron Toolbox help file for details.
Wall Mount LCD Controller Crestron APAD Operation Operation of the APAD is determined by the program developed for the system in which it is used. 18 • Wall Mount LCD Controller: APAD Operations & Installation Guide – DOC.
Crestron APAD Wall Mount LCD Controller Problem Solving Troubleshooting The following table provides corrective action for possible trouble situations. If further assistance is required, please contact a Crestron customer service representative. APAD Troubleshooting TROUBLE Project cannot be uploaded to keypad: 1. Screen is black. POSSIBLE CAUSE(S) CORRECTIVE ACTION 2. Communications error. APAD is powered down. Incorrect COM port specified. Verify that power is supplied to the APAD.
Wall Mount LCD Controller Crestron APAD power usage of that unit is the Cresnet power usage of the entire run. The wire gauge and the Cresnet power usage of the run should be used in the following equation to calculate the cable length value on the equation’s left side. Cable Length Equation L< 40,000 RxP Where: L = Length of run (or chain) in feet. 2 R = 6 Ohms (Crestron Certified Wire: 18 AWG (0.75 MM )) P = Cresnet power usage of entire run (or chain).
Crestron APAD Wall Mount LCD Controller Future Updates As Crestron improves functions, adds new features, and extends the capabilities of the APAD, additional information may be made available as manual updates. These updates are solely electronic and serve as intermediary supplements prior to the release of a complete technical documentation revision. Check the Crestron website periodically for manual update availability and its relevance. Updates are identified as an “Addendum” in the Download column.
Wall Mount LCD Controller Crestron APAD Return and Warranty Policies Merchandise Returns / Repair Service 1. No merchandise may be returned for credit, exchange, or service without prior authorization from CRESTRON. To obtain warranty service for CRESTRON products, contact an authorized CRESTRON dealer. Only authorized CRESTRON dealers may contact the factory and request an RMA (Return Merchandise Authorization) number.
Crestron APAD Wall Mount LCD Controller This page intentionally left blank Operations & Installation Guide – DOC.
Crestron Electronics, Inc. 15 Volvo Drive Rockleigh, NJ 07647 Tel: 888.CRESTRON Fax: 201.767.7576 www.crestron.com Operations & Installation Guide – DOC. 6455 (2014585) 04.06 Specifications subject to change without notice.