Crestron BB-1700CW Wall Mount Back Box for STX-1700CW Installation Guide
This document was prepared and written by the Technical Documentation department at: Crestron Electronics, Inc. 15 Volvo Drive Rockleigh, NJ 07647 1-888-CRESTRON All brand names, product names and trademarks are the property of their respective owners. ©2002 Crestron Electronics, Inc.
Crestron BB-1700CW Wall Mount Back Box for SmarTouch Contents Wall Mount Back Box for STX-1700CW: BB-1700CW 1 Introduction ............................................................................................................................... 1 Installation ................................................................................................................................. 2 Installation During Construction .............................................................................
Crestron BB-1700CW Wall Mount Back Box for STX-1700CW Wall Mount Back Box for STX-1700CW: BB-1700CW Introduction The BB-1700CW back box is wall-mounted hardware that is used to secure the DA-1700CW docking assembly (sold separately).
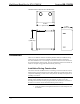
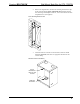
Wall Mount Back Box for STX-1700CW Crestron BB-1700CW Back Box Enclosure Physical Views and Dimensions 5.99 in (15.21 cm) 3.75 in (9.53 cm) 6.63 in (16.85 cm) Installation There are two different methods of installing the BB-1700CW; installation during construction or post-construction installation. Installation during construction describes installation into a room during construction when the room is framed and the gypsum board has not been hung.
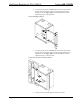
Crestron BB-1700CW Wall Mount Back Box for STX-1700CW 2. Refer to the diagram below. Position the mounting bracket at the edge of the stud. Through the upper and bottom-most mounting bracket slots and using a #2 Phillips screwdriver, secure the bracket to the stud using four screws (not supplied). Secure Mounting Bracket to Stud 3. Orient the back box enclosure as shown below (notch for manual unlatching upwards) and remove an appropriate knockout for the Cresnet wiring.
Wall Mount Back Box for STX-1700CW 4. Crestron BB-1700CW As shown below, loosely install four pan head screws with washers through the inside of the enclosure into the support bracket holes. Tighten screws only finger-tight so that final adjustments may be made during step 7 of this procedure. Loosely Install Support Bracket 5. As shown below, loosely install four pan head screws with washers through the inside of the enclosure into the mounting bracket holes.
Crestron BB-1700CW Wall Mount Back Box for STX-1700CW NOTE: To be properly installed, the cutout area of the gypsum board must be cut to within 1/8-inch (0.32 cm) of the outline of the back box enclosure. NOTE: The next step is performed after the gypsum board is hung. The only tools required are a ruler and a #2 Phillips screwdriver. 7. After the gypsum board is hung, refer to the diagram below. Using a ruler, adjust the back box to approximately 1/16-inch (0.
Wall Mount Back Box for STX-1700CW Crestron BB-1700CW 2. Using a stud finder (or equivalent), locate the right-edge of a stud within the installation area. 3. Align the left dashed, vertical line (labeled STUD EDGE) of the supplied template with the right-edge of the stud. Refer to “Appendix: Cutout Detail of Supplied Template” on page 10 for an illustrative reference. 4. Using masking tape, fasten the supplied template to the wall; verify that the cutout is level. 5.
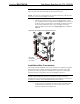
Crestron BB-1700CW Wall Mount Back Box for STX-1700CW 9. Orient the back box enclosure as shown below (notch for manual unlatching upwards) and remove an appropriate knockout for the Cresnet wiring. Back Box Enclosure Orientation NOTCH FOR MANUAL UNLATCH TAB ACCESS REMOVED KNOCKOUT 10. As shown below, loosely install four pan head screws with washers through the inside of the enclosure into the support bracket holes.
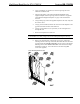
Wall Mount Back Box for STX-1700CW Crestron BB-1700CW 12. Making sure that the support bracket is behind the gypsum board, position the enclosure into the cutout area. 13. As shown below, loosely install four pan head screws with washers through the inside of the enclosure into the mounting bracket holes. Tighten screws only finger-tight so that final adjustments may be made during the next step of this procedure. Loosely Secure Enclosure to Mounting Bracket 14.
Crestron BB-1700CW Wall Mount Back Box for STX-1700CW Further Inquiries If after reviewing this Installation Guide for the BB-1700CW, you cannot locate specific information or have questions, please take advantage of Crestron's award winning customer service team by calling: • In the US and Canada, call Crestron’s corporate headquarters at 1-888-CRESTRON [1-888-273-7876]. • In Europe, call Crestron International at +32-15-50-99-50. • In Asia, call Crestron Asia at +852-2341-2016.
Wall Mount Back Box for STX-1700CW Crestron BB-1700CW Appendix: Cutout Detail of Supplied Template Crestron recommends that the template supplied with the BB-1700CW be used to avoid any error. However, if the template becomes lost or unusable, the dimensions of the cutout area are shown below. NOTE: Depending on the specific installation, the BB-1700CW may be installed either on the left or right side of a stud. 6.14 in (15.61 cm) APPROXIMATELY 6-9/64 in TEMPLATE - OV40053-1 CUT ALONG LINE 6.
Crestron BB-1700CW Wall Mount Back Box for STX-1700CW Return and Warranty Policies Merchandise Returns / Repair Service 1. No merchandise may be returned for credit, exchange, or service without prior authorization from CRESTRON. To obtain warranty service for CRESTRON products, contact the factory and request an RMA (Return Merchandise Authorization) number. Enclose a note specifying the nature of the problem, name and phone number of contact person, RMA number, and return address. 2.
Crestron Electronics, Inc. 15 Volvo Drive Rockleigh, NJ 07647 Tel: 888.CRESTRON Fax: 201.767.7576 www.crestron.com Installation Guide – DOC. 6105 08.02 Specifications subject to change without notice.