
User Guide


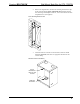

Wall Mount Back Box for STX-1700CW Crestron BB-1700CW
2. Using a stud finder (or equivalent), locate the right-edge of a stud
within the installation area.
3. Align the left dashed, vertical line (labeled STUD EDGE) of the
supplied template with the right-edge of the stud. Refer to “Appendix:
Cutout Detail of Supplied Template” on page 10 for an illustrative
reference.
4. Using masking tape, fasten the supplied template to the wall; verify that
the cutout is level.
5. Using a preferred method, transfer the cutout area of the template to the
gypsum board at the location of the back box.
6. Using a gypsum board saw (or equivalent), cut the rectangular area
through the wall.
7. Remove the template and cutout area.
NOTE: To prevent the mounting bracket from falling into the wall cavity, it is
recommended to tie a safety string to the bracket when performing the next step.
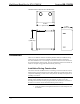
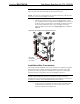
8. Refer to the diagram below. Through the cut out area, position the
mounting bracket at the edge of the stud (flush with the back-side of the
gypsum board) and vertically centered in the cut-out area. Through the
mounting bracket slots closest to the center of the bracket and using a
#2 Phillips screwdriver, secure the bracket to the stud using four
screws (not supplied).
Secure Mounting Bracket to Stud
6 • Wall Mount Back Box for STX-1700CW: BB-1700CW Installation Guide – DOC. 6105