Crestron C2N-DB6, C2N-DB8 & C2N-DB12 Decorator Keypads Operations & Installation Guide
. Regulatory Compliance As of the date of manufacture, the C2N-DB6, C2N-DB8, and C2N-DB12 have been tested and found to comply with specifications for CE marking. Federal Communications Commission (FCC) Compliance Statement This device complies with part 15 of the FCC Rules. Operation is subject to the following conditions: (1) This device may not cause harmful interference and (2) this device must accept any interference received, including interference that may cause undesired operation.
Crestron C2N-DB6, C2N-DB8 & C2N-DB12 Decorator Keypads Contents Decorator Keypads: C2N-DB6, C2N-DB8 & C2N-DB12 ... 1 Introduction ...................................................................................... 1 Features and Functions .......................................................... 3 Specifications ......................................................................... 3 Physical Description .............................................................. 5 Setup.........................
Crestron C2N-DB6, C2N-DB8 & C2N-DB12 Decorator Keypads Decorator Keypads: C2N-DB6, C2N-DB8 & C2N-DB12 Introduction Crestron® C2N-DB6, C2N-DB8, and C2N-DB12 Decorator Keypads deliver simple, versatile push button control for a broad range of residential and commercial applications. Clean, contemporary styling lends an attractive and unimposing appearance to any interior design and affords convenient electrical box installation in perfect harmony with other wall mount devices.
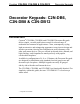
Decorator Keypads Crestron C2N-DB6, C2N-DB8 & C2N-DB12 Keypad Model Availability MODEL NUMBER C2N-DB6A-* C2N-DB6-A-S* C2N-DB8A-* C2N-DB8-A-S* C2N-DB12A-* C2N-DB12-A-S* C2N-DB6B C2N-DB8B DESCRIPTION 6-, 8-, or 12-Button Keypad, Smooth Almond 6-, 8-, or 12-Button Keypad, Smooth Black C2N-DB12B C2N-DB6W-* C2N-DB6-W-S* 6-, 8-, or 12-Button Keypad, Smooth White C2N-DB8W-* C2N-DB8-W-S* C2N-DB12W-* C2N-DB12-W-S* * The almond smooth (-A-S) and white smooth (-W-S) finishes currently offered are not the same
Crestron C2N-DB6, C2N-DB8 & C2N-DB12 Decorator Keypads operation. Every button and LED is fully programmable for virtually any custom functionality, making C2N-DB6/8/12 Decorator Keypads perfect for controlling room lighting and shades, audio and video equipment, or any other application that demands simple, immediate one-touch control. NOTE: The keypads are supplied with blank push buttons. As an option, custom engraved buttons can be designed and obtained by using the Crestron Engraver software.
Decorator Keypads Crestron C2N-DB6, C2N-DB8 & C2N-DB12 C2N-DB6/8/12 Keypad Specifications (Continued) SPECIFICATION Enclosure Chassis Mounting Faceplate Dimensions Height Width Depth Weight Available Accessories CCR-L-1 CRESNET-HP-NP CRESNET-NP CRESNET-P DB6/8/12-BTN-A-S DB6/8/12-BTN-B DB6/8/12-BTN-W-S DETAILS Plastic Mounts in a 1-gang or larger electrical box or mud ring Requires decorator style faceplate (not included) 4.16 in (106 mm) 1.79 in (46 mm) 1.53 in (39 mm) without connector* 2.
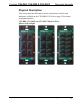
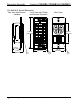
Crestron C2N-DB6, C2N-DB8 & C2N-DB12 Decorator Keypads Physical Description This section provides information on the connections, controls, and indicators available on the C2N-DB6/8/12. Refer to page 12 for button arrangement details. C2N-DB6, C2N-DB8, and C2N-DB12 Physical Views (Shown Left to Right) Operations & Installation Guide - DOC.
Crestron C2N-DB6, C2N-DB8 & C2N-DB12 Decorator Keypads C2N-DB6/8/12 Overall Dimensions Side View with Buttons Front View with Divider Installed and Buttons Removed Back View 2.70 in (69 mm) 4.16 in (106 mm) 1.07 in (27 mm) 1.53 in (39 mm) 1 6 • Decorator Keypads: C2N-DB6/8/12 1.79 in (46 mm) 2 1.67 in (43 mm) 3 Operations & Installation Guide - DOC.
Crestron C2N-DB6, C2N-DB8 & C2N-DB12 Decorator Keypads Connectors, Controls, and Indicators # CONNECTORS,* CONTROLS, and INDICATORS 1 Buttons 2 LED Indicators 3 NET DESCRIPTION 6, 8, or 12 (depending upon model) programmable push buttons (1 per button) red LED, programmable, softwareadjustable intensity (1) 4-pin 3.5 mm detachable terminal block; Connects to Cresnet control network; 24: Power (24 Vdc) Y: Data Z: Data G: Ground * Interface connector for NET port is provided with the unit.
Decorator Keypads Crestron C2N-DB6, C2N-DB8 & C2N-DB12 Setup Network Wiring When wiring the Cresnet network, consider the following: • Use Crestron Certified Wire. • Use Crestron power supplies for Crestron equipment. • Provide sufficient power to the system. CAUTION: Insufficient power can lead to unpredictable results or damage to the equipment. Use the Crestron Power Calculator to help calculate how much power is needed for the system (www.crestron.com/calculators).
Crestron C2N-DB6, C2N-DB8 & C2N-DB12 Decorator Keypads Supplied Hardware The hardware supplied with the C2N-DB6/8/12 keypad is listed in the following table.
Decorator Keypads Crestron C2N-DB6, C2N-DB8 & C2N-DB12 CAUTION: Excess wire pinched between the keypad and electrical box could short out. Make sure that all excess wire is completely inside the electrical box and not between the box and the side of the keypad. 4. Using the screwdriver, attach the keypad using the supplied 1-inch pan head screws. 5. Attach the faceplate (sold separately). 6. Turn control network power ON. Installation View (Single-Gang Electrical Box Shown) 2.
Crestron C2N-DB6, C2N-DB8 & C2N-DB12 Decorator Keypads Button Replacement Replacing or changing the removable buttons in a keypad is a simple process. Refer to the illustration on the following page and the following procedure. 1. Turn control network power OFF. 2. If the keypad is installed in an electrical box, remove the two 1-inch screws and carefully pull the keypad from the electrical box. 3. Disconnect the Cresnet cable from the NET port. 4.
Decorator Keypads Crestron C2N-DB6, C2N-DB8 & C2N-DB12 7. Attach the divider using the four screws removed in step 4. Button Replacement Button Unit Removable Buttons (Refer to CAUTION on page 11.) Divider LED Window 16 2-28 x 3/16 in Pan Head 8. Reinstall the keypad in the electrical box. 9. Turn control network power ON. 12 • Decorator Keypads: C2N-DB6/8/12 Operations & Installation Guide - DOC.
Crestron C2N-DB6, C2N-DB8 & C2N-DB12 Decorator Keypads Uploading and Upgrading Crestron recommends using the latest programming software and that each device contains the latest firmware to take advantage of the most recently released features. However, before attempting to upload or upgrade it is necessary to establish communication. Once communication has been established, files (for example, programs, projects, or firmware) can be transferred to the control system (or device).
Decorator Keypads Crestron C2N-DB6, C2N-DB8 & C2N-DB12 Programs and Firmware Program or firmware files may be distributed from programmers to installers or from Crestron to dealers. Firmware upgrades are available from the Crestron website as new features are developed after product releases. Options are available to upload programs via the programming software or to upload and upgrade via the Crestron Toolbox.
Crestron C2N-DB6, C2N-DB8 & C2N-DB12 Decorator Keypads Problem Solving Troubleshooting The following table provides corrective action for possible trouble situations. If further assistance is required, please contact a Crestron customer service representative. C2N-DB6/8/12 Keypad Troubleshooting TROUBLE POSSIBLE CAUSE(S) The keypad does The wrong power not function. supply is in use. The unit is not receiving power, or is receiving insufficient power. There is a loose connection in the network.
Decorator Keypads Crestron C2N-DB6, C2N-DB8 & C2N-DB12 C2N-DB6/8/12 Troubleshooting (Continued) TROUBLE All LEDs are blinking at a slow rate. All LEDs are blinking at a fast rate. Feedback indicators do not light. POSSIBLE CAUSE(S) CORRECTIVE ACTION Firmware is loading. Wait until firmware load is complete. Reload firmware. The keypad has reverted to its bootloader firmware. The keypad is in TSID mode. Indicator intensity is set too low. Press any button to complete the TSID action.
Crestron C2N-DB6, C2N-DB8 & C2N-DB12 Decorator Keypads When calculating the length of wire for a particular Cresnet run, the wire gauge and the Cresnet power usage of each network unit to be connected must be taken into consideration. Use Crestron Certified Wire only. If Cresnet units are to be daisy chained on the run, the Cresnet power usage of each network unit to be daisy chained must be added together to determine the Cresnet power usage of the entire chain.
Decorator Keypads Crestron C2N-DB6, C2N-DB8 & C2N-DB12 Further Inquiries To locate specific information or resolve questions after reviewing this guide, contact Crestron's True Blue Support at 1-888-CRESTRON [1-888-273-7876] or, for assistance within a particular geographic region, refer to the listing of Crestron worldwide offices at www.crestron.com/offices. To post a question about Crestron products, log onto Crestron’s Online Help at www.crestron.com/onlinehelp.
Crestron C2N-DB6, C2N-DB8 & C2N-DB12 Decorator Keypads Return and Warranty Policies Merchandise Returns / Repair Service 1. No merchandise may be returned for credit, exchange or service without prior authorization from Crestron. To obtain warranty service for Crestron products, contact an authorized Crestron dealer. Only authorized Crestron dealers may contact the factory and request an RMA (Return Merchandise Authorization) number.
Crestron Electronics, Inc. Operations & Installation Guide – DOC. 6154C 15 Volvo Drive Rockleigh, NJ 07647 (2008093) Tel: 888.CRESTRON 03.14 Fax: 201.767.7576 Specifications subject to www.crestron.com change without notice.