
User Guide


Crestron C2N-DB6/8/12 Decorator Wall Panels
Operations & Installation Guide - DOC. 6154 Decorator Wall Panels: C2N-DB6/8/12 • 9
“Troubleshooting Communications” section in the respective Operations
Guide for the control system.
There are two different methods—Method A or Method B—for setting
the wall panel NET IDs:
Method A (Cresnet address-settable ID), described below, applies to all
wall panels in a Cresnet system. This method requires that a single wall
panel be the only network device connected to the control system.
Method B (Touch Settable IDs), which begins on page 10, applies to
wall panels in a Cresnet system with 2-Series control system upgrade file
(CUZ) version 3.008 or later. These upgrades enable Touch Settable ID
(TSID) functionality, which makes it possible for the control system to
recognize a network device via its serial number, which is stored in the
device’s memory. This method does not require that any devices be
disconnected from the network; NET IDs may be set with the entire
Cresnet system intact.
Use the appropriate method to set the wall panel NET ID.
Method A (Cresnet address-settable ID)
1. Ensure that the wall panel is the only device connected to the
control system.
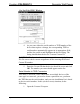
2. Open the Crestron Viewport.
3. From the Viewport menu, select Functions | Set Network ID.
The software checks the baud rate and then opens the "Set
Network ID" window.
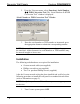
4. In the "Set Network ID" window, select the C2N-DB12 from
the Current Network Devices text window.
5. Select the new NET ID for the wall panel from the Choose the
new network ID for the selected device (Hex): text box.
6. Click Set ID to initiate the change. This will display the "ID
command has been sent" window.
7. In the "Command Complete" window, click OK.
8. In the Current Network Devices text window, verify the new
NET ID code.
9. In the "Set Network ID" window, click Close.