
User Guide


Scan Converter Card for C2N-MMS Crestron C2N-MMS-SC
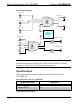
C2N-MMS-SC Installation – Remove C2N-MMS Cover Screws
3. Remove the C2N-MMS cover by raising it upwards.
4. Using a #2 Phillips screwdriver, loosen and remove the two
screws adjacent to the C2N-MMS motherboard connector.
Refer to the following diagram for screw locations.
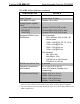
C2N-MMS-SC Installation – Remove Motherboard Screws
NOTE: These two screws must be removed prior to installing the
C2N-MMS-SC
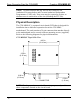
5. Align the pins on the connector of the C2N-MMS-SC with the
C2N-MMS motherboard connector. DO NOT force pins into
connector. Press the C2N-MMS-SC until the pins are fully
seated. Make sure that the mounting posts of the card align with
6 • Scan Converter Card for C2N-MMS: C2N-MMS-SC Operations & Installation Guide - DOC. 6138