
Installation guide


802.11a/b/g Wireless Access Points Crestron CEN-WAP-ABG
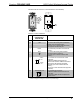
To mount the access point into a low-voltage bracket or electrical box (refer to the
illustration below):
1. Orient the access point properly, and then place the device into the bracket or
electrical box.
2. Attach the access point to the bracket or electrical box using the two #6-32 x ¾”
Phillips pan head screws included with the access point.
3. Attach the desired Decora
®
faceplate (not included).
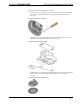
CEN-WAP-ABG-1G Wall Mounting (Low-Voltage Bracket Shown)
#6-32 x ¾”
Phillips Pan Head
Screws
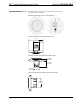
Rack Mounting
The CEN-WAP-ABG-1G mounts horizontally into a rack and occupies 1U
(1.75 inches) of rack space.
NOTE: It is recommended that the access point be mounted into a rack only if the
connected Wi-Fi devices are to be used less than 20 feet away from the access point
and have line of sight to the access point.
NOTE: For the best possible range, it is recommended that you mount the device
into the topmost rack space.
To mount the unit, use the Middle Atlantic HBL1-722243 or equivalent rack mount
panel. For ordering information, contact Middle Atlantic Products, Inc.
(http://www.middleatlantic.com).
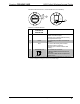
Mounting the CEN-WAP-ABG-CM
The CEN-WAP-ABG-CM mounts into a one-gang low-voltage bracket or electrical
box in the ceiling. The recommended depth of the electrical box is a minimum of
two inches. The maximum voltage of the access point is 48 VDC.
NOTE: To increase airflow, it is recommended that a low-voltage bracket be used
instead of an electrical box.
NOTE: For the best possible range, it is recommended that you mount the device as
far away as possible from metal.
12 • 802.11a/b/g Wireless Access Points: CEN-WAP-ABG Operations & Installation Guide – DOC. 6695C