
User Guide


Crestron CNRACKX-DP CNX Dual Processor Modular Control System
If communications with the CNRACKX-DP was not established, follow the steps in
this section to help remedy the problem. After performing each step, repeat step 7 in
“Obtaining Communications” on page 20 again.
1. Try repeating step 7 from “Obtaining Communications” to attempt to
establish communications.
2. Verify that the cable being used is correct. It should be a straight-
through cable. That is, pin-1 on one end is connected to pin-1 on the
other end. Pin-2 connects to pin-2, etc. To work properly, pins-2, 3, and
5 must be connected.
3. Verify that the proper COM port on the PC has been selected. Some
PCs have more than one COM port, some of which may be internal
(e.g., for a modem). If verification can not be made, consult the user’s
manual or contact the PC manufacturer.
4. Check the NET and ERR LEDs on the front of the CNRACKX-DP. If
either LED is illuminated, unplug the unit and reapply power after a
few seconds. If either LED illuminates again, call Crestron technical
support. Refer to “Further Inquiries” on page 33.
5. If steps 1 through 4 have failed to result in communications, the last
series of steps to perform is an overload/reset on the active processor.
Complete the following steps to do so:
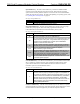
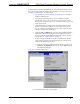
5a. While the Viewport is displayed as shown on the next page, select
Functions | Set Baud Rate (alternatively, depress F8) to open the
Set Baud Rate dialog box.
Accessing the Set Baud Rate Dialog Box
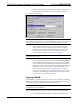
5b. Set the baud rate to 9600, as shown below.
Operations Guide - DOC. 8151 CNX Dual Processor Modular Control System: CNRACKX-DP • 23