
User Guide


Crestron CNRACKX-DP CNX Dual Processor Modular Control System
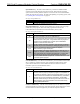
Crestron Viewport Outgoing and Incoming Windows
NOTE: The exact text received depends on the given CNRACKX-DP hardware.
5f. Remove power from the unit again and reapply power without holding
the RESET button down. Wait a few seconds and perform step 7 in
“Obtaining Communications” on page 20.
NOTE: If after trying all these procedures, communication can not be established,
contact Crestron technical support for assistance. Refer to “Further Inquiries” on
page 33.
Loading the System Program
NOTE: In order for the CNRACKX-DP to be fail-safe operational, both CNXCPUs
must contain identical SIMPL Windows programs. The following procedure must be
performed on the currently active processor, the processors must be electronically
switched, and the procedure repeated for the other processor. To switch processors
from the Viewport, select Diagnostics | Switch Processors (CNRACKX-DP). To
switch processors from the front panel default LCD display, press the DP button then
CPU and the CNRACKX-DP will reset and make the other CNXCPU active.
To load the system program into the CNRACKX-DP, use the Crestron Viewport or
the Transfer Program option in SIMPL Windows. For consistency, the following
procedure uses the Viewport. To upload a BIN file into the CNRACKX-DP,
complete the following steps in the order provided:
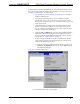
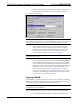
1. If the Crestron Viewport is not open, select Tools | Viewport to open
the Viewport dialog box.
2. Select File Transfer | Send Program (alternatively, depress Alt+P) to
open the Cresnet Simpl Program dialog box.
3. Use the Browse button to locate the supplied BIN file.
4. As shown below, click the Send Program button to initiate program
upload to the CNRACKX-DP. A Transfer in Progress dialog box
opens, but no response is required. If SIMPL+ files are present and the
Operations Guide - DOC. 8151 CNX Dual Processor Modular Control System: CNRACKX-DP • 25