Crestron CNX-BN12 and CNX-BF12 Numeric and Function Keypads Operations & Installation Guide
This document was prepared and written by the Technical Documentation department at: Crestron Electronics, Inc.
Crestron CNX-BN12 & CNX-BF12 Numeric & Function Keypads Contents Numeric and Function Keypads: CNX-BN12 and CNX-BF12 1 Introduction......................................................................................1 Features and Functions ..........................................................1 Specifications.........................................................................2 Physical Description ..............................................................3 Industry Compliance.............
Crestron CNX-BN12 & CNX-BF12 Numeric & Function Keypads Numeric and Function Keypads: CNX-BN12 and CNX-BF12 Introduction Features and Functions Numeric (CNX-BN12) and function (CNX-BF12) keypads are wallmounted user interfaces that can be part of a Crestron Home™ total control system. The keypads are standard Cresnet devices, and provide finger-tip control when the control system is properly programmed using SIMPL™ Windows.
Numeric & Function Keypads Crestron CNX-BN12 & CNX-BF12 The keypads feature backlit capable ergonomic buttons (white and almond only) and are each designed for wall mounting in a standard single-gang electrical box. The keypads colors can be used to accent a home’s colors, wall coverings, or décor. The buttons have fixed text. A kit with addition source buttons for the CNX-BF12 is also provided (see illustration on page 5).
Crestron CNX-BN12 & CNX-BF12 Numeric & Function Keypads 3. CNX update files are required for either CNMSX-AV/PRO or CNRACKX/-DP. Filenames for CNX update files have a UPZ extension, and ST-CP files are in one EXE or zipped UPZ file. To avoid program problems, make sure you are using the update file with the correct suffix letter (e.g., S, V, W, X). 4. The depth of the Keypad is listed without the Cresnet connector (approximately 0.45 in) plus clearance for the wiring.
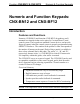
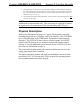
Numeric & Function Keypads Crestron CNX-BN12 & CNX-BF12 CNX-BN12 and CNX-BF12 Physical Views CNX-BN12 (Black Color) CNX-BF12 (White Color) Side Views of CNX-BN12 and CNX-BF12 Front View CNX-BN12 1.067 in 2.710 cm 2.912 in 5.568 cm 1.536 in 3.902 cm 4.762 in 12.096 cm CLEAR ENTER 1 2 3 4 5 6 7 8 9 0 LED window 4 • Number & Function Keypads: CNX-BN12 & CNX-BF12 Operations & Installation Guide - DOC.
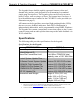
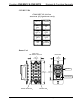
Crestron CNX-BN12 & CNX-BF12 Numeric & Function Keypads CNX-BF12 Kit CNX-BF12 kit for source (6) buttons only DSS 2 TUNER SAT TV SAT 2 DVD FM 2 VCR AM HDRIVE Button Unit Front View with buttons removed Back View 1.567 in 3.980 cm 1.696 in 4.308 cm TOP Speaker 3.644 in 9.256 cm 2.696 in 6.848 cm NET Cresnet port 24 Y Z G Rubber Membrane Operations & Installation Guide - DOC.
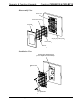
Numeric & Function Keypads Crestron CNX-BN12 & CNX-BF12 Disassembly View Button unit Removable buttons Faceplate Single gang detent plate LED window Divider Installation View Single gang electrical box (2.5 in. depth recommended) Button unit 1 in. panhead 6 • Number & Function Keypads: CNX-BN12 & CNX-BF12 Operations & Installation Guide - DOC.
Crestron CNX-BN12 & CNX-BF12 Numeric & Function Keypads Industry Compliance As of the date of manufacture, the keypads have been tested and found to comply with specifications for CE marking and standards per EMC and Radiocommunications Compliance Labelling (N11785). NOTE: This device complies with part 15 of the FCC rules.
Numeric & Function Keypads Crestron CNX-BN12 & CNX-BF12 The required wire gauge should be chosen such that the resistance value is less than the value calculated in the resistance equation. Refer to the table below. Wire Gauge Values RESISTANCE (R) WIRE GAUGE 4 16 6 18 10 20 15 22 13 Doubled CAT5 8.7 Tripled CAT5 NOTE: All Cresnet wiring must consist of two twisted-pairs.
Crestron CNX-BN12 & CNX-BF12 Numeric & Function Keypads NOTE: Since the following procedure is the same for the CNX-BN12 and CNX-BF12, the CNX-BN12 will be used. 1. Ensure that the keypad is the only device connected to the control system (verify that the software is running). 2. Open the Crestron Viewport. 3. From the Viewport menu, select Functions | Set Network ID. The software checks the baud rate and then opens the "Set Network ID" window. 4.
Numeric & Function Keypads Crestron CNX-BN12 & CNX-BF12 Installation Tools/hardware required Keypad Cresnet network cable Phillips screwdriver Two 1 in. panhead phillips screws (supplied) After the Cresnet network wiring has been installed and verified, use the following procedure to install the keypad in a standard, single-gang electrical box (refer to illustrations on pages 5 and 6): 1. Turn Cresnet system power OFF. 2.
Crestron CNX-BN12 & CNX-BF12 Numeric & Function Keypads Programming You can create a program that allows you to control the keypad through a Crestron control system using the Crestron programming tools Crestron Application Builder™ (AppBuilder) and SIMPL Windows. These tools are intended for users with different levels of programming knowledge. The flexibility of each tool is proportional to the degree of programming expertise (i.e., the more flexible, the more a programmer needs to know and account for).
Numeric & Function Keypads Crestron CNX-BN12 & CNX-BF12 The Crestron AppBuilder accesses these tools behind the scenes, enabling you to easily create robust systems. NOTE: While the keypads can be used to control any device in your system, Application Builder provides specialized templates for the Audio Distribution and Audio/Video Distribution plug-ins.
Crestron CNX-BN12 & CNX-BF12 Numeric & Function Keypads The System Views lower pane displays the PRO2 system tree. This tree can be expanded to display and configure the communications ports. Expanded PRO2 System Tree C2Net-Device Slot in Configuration Manager The C2Net-Device Slot can accept a CNX-BN12. Once a CNX-BN12 is configured in a C2Net-Device Slot, the slot allows Cresnet communication between the CNX-BN12 and the control system.
Numeric & Function Keypads Crestron CNX-BN12 & CNX-BF12 Double-click the CNX-BN12 icon in the upper pane to open the “Device Settings” window (shown below). This window displays CNX-B12 device information. The Net ID can be changed in this window using the Net ID tab. Device Settings Window NOTE: SIMPL Windows automatically resets the default NET ID values of a device added to a program if a duplicate device or a device with the same default NET ID already exists in the program.
Crestron CNX-BN12 & CNX-BF12 Numeric & Function Keypads Detail View of the CNX-BN12 symbol in SIMPL Windows’ Programming Manager The two tables on the next page list inputs and outputs, respectively, and their functional descriptions. NOTE: All signals listed in the tables are DIGITAL signals unless noted. A digital signal can be high (logic level of 1), low (logic level of 0), and also have rising edge (when it goes from low to high) and falling edge (from high to low transitions).
Numeric & Function Keypads Crestron CNX-BN12 & CNX-BF12 Keypad Symbol Input Signal Descriptions INPUT fbck1 through fbck12 DESCRIPTION Activates feedback LEDs 1-12. High/1=function feedback On Low/0=function feedback Off Enable_Temp_Rpt Enables temperature reporting to control system. High/1=reporting enable Low/0=reporting disable Temp_Format Controls temperature format. High/1=Fahrenheit Low/0=Celsius BackliteON Activates backlight.
Crestron CNX-BN12 & CNX-BF12 Numeric & Function Keypads Keypad Symbol Output Signal Descriptions OUTPUT press1 through press12 PlayingSound Temp(x10) (analog) DESCRIPTION Notifies control system of button press (1-12). High/1=pressed Low/0=released Notifies control system that sound file is playing. High/1=playing Low/0=not playing Reports ambient temperature every 2 seconds (Enable_Temp_Rpt must be High/1). Units are tenths of a degree, e.g. 685 is 68.5 degrees.
Numeric & Function Keypads Crestron CNX-BN12 & CNX-BF12 Example Program An example program for the keypads is available from the Crestron FTP site (www.ftp.crestron.com). Select the Examples folder and search for CNX-BNF12.SMW. Programming with VT Pro-e To play WAV files, a CNX-BN12 or CNX-BF12 project must be created in VT Pro-e, with WAV files and correct join numbers added to the project using Tools | Sound Manager. For more information, refer to the VT Pro-e help file.
Crestron CNX-BN12 & CNX-BF12 Numeric & Function Keypads Problem Solving Troubleshooting The table below provides corrective action for possible trouble situations. If further assistance is required, please contact a Crestron customer service representative. Keypad Troubleshooting TROUBLE Keypad does not function when a button is pressed. POSSIBLE CAUSE(S) Keypad is not receiving power. Keypad Net ID is not correct. Keypad Net ID is not set to match the Net ID set in the SIMPL Windows program.
Numeric & Function Keypads Crestron CNX-BN12 & CNX-BF12 Further Inquiries If after reviewing this Operations and Installation Guide, you cannot locate specific information or have questions, please take advantage of Crestron's award winning customer service team by calling: • In the US and Canada, call Crestron’s corporate headquarters at 1-888-CRESTRON [1-888-273-7876] or 1-201-767-3400. • In Europe, call Crestron International at +32-15-50-99-50. • In Asia, call Crestron Asia at +852-2341-2016.
Crestron CNX-BN12 & CNX-BF12 Numeric & Function Keypads Software License Agreement This License Agreement (“Agreement”) is a legal contract between you (either an individual or a single business entity) and Crestron Electronics, Inc. (“Crestron”) for software referenced in this guide, which includes computer software and, as applicable, associated media, printed materials, and “online” or electronic documentation (the “Software”).
Numeric & Function Keypads Crestron CNX-BN12 & CNX-BF12 If You are a business or organization, You agree that upon request from Crestron or its authorized agent, You will within thirty (30) days fully document and certify that use of any and all Software at the time of the request is in conformity with Your valid licenses from Crestron of its authorized agent.
Crestron CNX-BN12 & CNX-BF12 Numeric & Function Keypads Return and Warranty Policies Merchandise Returns / Repair Service 1. No merchandise may be returned for credit, exchange, or service without prior authorization from CRESTRON. To obtain warranty service for CRESTRON products, contact the factory and request an RMA (Return Merchandise Authorization) number. Enclose a note specifying the nature of the problem, name and phone number of contact person, RMA number, and return address. 2.
Crestron Electronics, Inc. 15 Volvo Drive Rockleigh, NJ 07647 Tel: 888.CRESTRON Fax: 201.767.7576 www.crestron.com Operations & Installation Guide - DOC. 8185 05.02 Specifications subject to change without notice.