
User Guide


Crestron CNX-BN12 & CNX-BF12 Numeric & Function Keypads
NOTE: Since the following procedure is the same for the CNX-BN12
and CNX-BF12, the CNX-BN12 will be used.
1. Ensure that the keypad is the only device connected to the
control system (verify that the software is running).
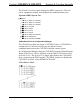
2. Open the Crestron Viewport.
3. From the Viewport menu, select Functions | Set Network ID.
The software checks the baud rate and then opens the "Set
Network ID" window.
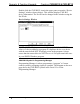
4. In the "Set Network ID" window, select the CNX-BN12 from
the Current Network Devices text window.
5. From the Choose the new network ID for the selected device
(Hex): text box, select the new NET ID for the keypad.
6. Click Set ID to initiate the change. This will display the "ID
command has been sent" window.
7. In the "Command Complete" window, click OK.
8. In the Current Network Devices text window, verify the new
NET ID code.
9. In the "Set Network ID" window, click Close.
NOTE: The new NET ID code may also be verified by selecting
Diagnostic | Report Network Devices in the Viewport (alternately,
select F4).
10. Repeat this procedure for each keypad to be added to the
system.
Operations & Installation Guide - DOC. 8185 Number & Function Keypads: CNX-BN12 & CNX-BF12 • 9