CRESTRON Contents CNX MIDI Interface Expansion Card: CNXMIDI 0 Description Functional Description Physical Description Leading Specifications Setup Installation Preparation for Use Programming with SIMPL Windows How the Program Works How to Create the Program Problem Solving Troubleshooting Further Inquiries Return and Warranty Policies Merchandise Returns / Repair Service CRESTRON Limited Warranty 0 0 0 0 0 0 0 0 0 0 0 0 0 0 0 0 Operations Guide - DOC.
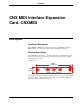
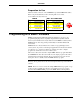
CRESTRON CNX MIDI Interface Expansion Card: CNXMIDI Description Functional Description The CNXMIDI, a MIDI Interface Expansion Card provides MIDI IN, OUT, and THRU interface. Use with devices such as mixers and lighting equipment. Physical Description The CNXMIDI, shown below, is a circuit board fastened to an aluminum faceplate. The card is manufactured to easily fit into an unoccupied slot in a Crestron CNX Generation Control System. CNXMIDI Faceplate OUT IN 0.980 in (24.89 mm) THRU 5.000 in (127.
CRESTRON Leading Specifications The table below provides a summary of leading specifications for the CNXMIDI. Dimensions and weight are approximations rounded to the nearest hundredth unit. Leading Specifications of the CNXMIDI SPECIFICATIONS Connectors Power Requirements SIMPL™ Windows® CNX Operating System CNX Monitor Dimensions: Height Width Depth DETAILS (3) 5-pin DIN connectors 24VDC, network power; 4 Watts Version 1.21.03 or later Version 5.01.29x or later Version 2.05x or later 0.98 in (24.
CRESTRON Preparation for Use The three female connectors on the CNXMIDI accept standard MIDI male cables. Refer to the pinout table below if the connecting cable is to be made.
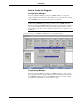
CRESTRON How the Program Works A basic CNXMIDI SIMPL program is shown in block diagram form below. For this example, the CNXMIDI occupies slot #1 of a CNMSX-PRO. This example plays three notes on a MIDI keyboard. A note is turned on for 0.05s and then there is silence for 0.05s before the next note is played. The sequence is triggered when a certain note is received from the keyboard, and stopped at the end of the sequence.
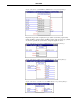
CRESTRON How to Create the Program Configuration Manager Use the Configuration Manager workspace in SIMPL Windows to select and configure all the devices that need to be included into the system. For this example, add a CNXMIDI to slot #1 of the control system, shown below. NOTE: SIMPL Windows v1.21.03 or later is required to program the CNMSX-AV or PRO with a CNXMIDI card. If using an earlier version of SIMPL Windows, Crestron recommends a SIMPL Windows and operation system upgrade.
CRESTRON Graphical Detail View of ST-LT/MIDI in SIMPL Windows’ Programming Manager Expand the Logic folder to display the logic symbols used in this program. They include Oscillator, Set Reset Latch, and Ring Counter symbols. Some logic symbols are shown in optional sub system folders. Assign the signals as shown.
CRESTRON Problem Solving Troubleshooting The table below provides corrective action for possible trouble situations. If further assistance is required, please contact a Crestron technical support representative. CNXMIDI Troubleshooting TROUBLE CNXMIDI does not function. POSSIBLE CAUSE(S) CORRECTIVE ACTION CNX Control System is Verify power to CNX Control System. not receiving power. Circuit card is not Verify CNXMIDI is properly inserted into properly seated in slot.
CRESTRON Return and Warranty Policies Merchandise Returns / Repair Service 1. 2. 3. No merchandise may be returned for credit, exchange, or service without prior authorization from CRESTRON. To obtain warranty service for CRESTRON products, contact the factory and request an RMA (Return Merchandise Authorization) number. Enclose a note specifying the nature of the problem, name and phone number of contact person, RMA number, and return address.