Crestron CNECI-4A Electrical Control Interface with AC Operations Guide
This document was prepared and written by the Technical Documentation department at: Crestron Electronics, Inc. 15 Volvo Drive Rockleigh, NJ 07647 1-888-CRESTRON All brand names, product names, and trademarks are the property of their respective owners. ©1999 Crestron Electronics, Inc.
Crestron CNECI-4A Electrical Control Interface with AC Contents Electrical Control Interface with AC: CNECI-4A 1 Description................................................................................................................................. 1 Functional Description ................................................................................................ 1 Physical Description....................................................................................................
Crestron CNECI-4A Electrical Control Interface with AC Electrical Control Interface with AC: CNECI-4A Description Functional Description The Electrical Control Interface with AC, CNECI-4A, is a wall-mounted interface for AC powered devices such as drapes, screens, and lifts. It is nearly identical to the CNECI-4 but the exception is that it draws operating power from an AC line that is independent of Cresnet system power.
Electrical Control Interface with AC Crestron CNECI-4A Physical Description The CNECI-4A is housed in a gray, metal enclosure with silk-screened labels on the front cover. All connections are made to the internal PCB through enclosure conduit knock-outs that are located on the top, left-side, and bottom of the enclosure. Also supplied is one 4-position terminal block and one 9-position terminal block.
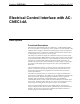
Crestron CNECI-4A Electrical Control Interface with AC CNECI-4A Internal PCB Components 4 NO 4 PCB MOUNTING SCREWS (X6) COM COM 3 NC RELAY LEDs 3 NO COM 2 COM NC RELAY TERMINAL BLOCKS 1 2 NO COM COM AC FUSE NC 1 NO COM COM NC AC VOLTAGE SELECTOR SWITCH AC POWER TERMINAL BLOCK L L N G 115 230 CRESTRON LOW VOLTAGE SECTION DUST COVER NET L H 8 G ID CODE 7 6 3 1 2 Z G Y 24 5 LOCAL INPUTS NET 4 POWER MODEL: CNECI-4A POWER INDICATOR (AC or +24V) ID CODE (NET ID) INDICA
Electrical Control Interface with AC Crestron CNECI-4A Leading Specifications of the CNECI-4A SPECIFICATION Power Requirements DETAILS 24VDC, load factor of 5.0 watts, 100 -125VAC or 220 - 250VAC, 50 - 60Hz AC Fuse Type & Rating Slo-Blo, 5 x 20mm, glass; 250V, 160mA Relay Closure Rating 5A, 1/3HP @ 125 or 250VAC, 10A @ 30VDC Default Network ID 7F SIMPL Windows Version 1.30.01 or later1 with the addition of smwlib45.exe and smwlib45.txt CNX Operating System Version 5.01.
Crestron CNECI-4A Electrical Control Interface with AC should be used in the following resistance equation to calculate the value on the right side of the equation. Resistance Equation R < 40,000 L x PF Where: R = Resistance (refer to table below) L = Length of run (or chain) in feet PF = Power factor of entire run (or chain) The required wire gauge should be chosen such that the resistance value is less than the value calculated in the resistance equation.
Electrical Control Interface with AC Crestron CNECI-4A NOTE: Review the Network Interconnection Diagram (latest revision of Doc. 5411) when making 4-wire connections.
Crestron CNECI-4A Electrical Control Interface with AC 1. Make sure that the Cresnet system and AC power circuits to be installed are turned off. 2. Remove the four CNECI-4A enclosure front cover screws. 3. Remove the six PCB mounting screws (do not remove the low voltage section dust cover) and remove the PCB. 4. Mount the CNECI-4A to the desired wall location. 5. Re-install the PCB with the six mounting screws. 6.
Electrical Control Interface with AC Crestron CNECI-4A SIMPL Windows Programming SIMPL (Symbol Intensive Master Programming Language) is an easy-to-use programming language that is completely integrated and compatible with all Crestron system hardware. The objects that are used in SIMPL are called symbols. SIMPL Windows offers drag and drop functionality in a familiar Windows® environment. SIMPL Windows is Crestron Electronics' software for programming Crestron control systems.
Crestron CNECI-4A Electrical Control Interface with AC CNECI-4A SIMPL Program Operations Guide - DOC.
Electrical Control Interface with AC Crestron CNECI-4A How to Create the Program Configuration Manager Use the Configuration Manager workspace (Project | Configure System) in SIMPL Windows to select and configure all the devices that need to be included into the system. For this example, from the Control Systems folder in the Device Library, select CNMSX-AV. From the Touchpanels (Wired) folder, drop and drag the CT-3000 symbol into System Views and set the NET ID to 03.
Crestron CNECI-4A Electrical Control Interface with AC Programming Manager Use the Programming Manager workspace (Project | Program System) in SIMPL Windows to select symbols and assign their respective signals. For this example, CT-3000 and CNECI-4A symbols were added automatically when the devices were added to the system in the Configuration Manager workspace.
Electrical Control Interface with AC Crestron CNECI-4A To assign signals to the four toggle symbols, follow the example shown below. The signals shown below are toggle symbol S-1 signals for relay 1. Toggle symbols S-2 through S-4 are assigned similar signal names using relay2, 3, 4 and input2, 3, 4, respectively.
Crestron CNECI-4A Electrical Control Interface with AC Problem Solving Troubleshooting The table below provides corrective action for possible trouble situations of the CNECI-4A. If further assistance is required, please contact a Crestron customer service representative. WARNING: Disconnect power before working on this unit. While power is connected, there are live components inside. WARNING: Relay terminals 1, 2, 3, and 4 may still contain voltage even after AC power is disconnected.
Electrical Control Interface with AC Crestron CNECI-4A Return and Warranty Policies Merchandise Returns / Repair Service 1. No merchandise may be returned for credit, exchange, or service without prior authorization from CRESTRON. To obtain warranty service for CRESTRON products, contact the factory and request an RMA (Return Merchandise Authorization) number. Enclose a note specifying the nature of the problem, name and phone number of contact person, RMA number, and return address. 2.
Crestron CNECI-4A Electrical Control Interface with AC This page intentionally left blank. Operations Guide - DOC.
Crestron Electronics, Inc. 15 Volvo Drive Rockleigh, NJ 07647 Tel: 888.CRESTRON Fax: 201.767.7576 www.crestron.com Operations Guide – DOC. 8149 07.99 Specifications subject to change without notice.