
Specifications


Crestron CNECI-4A Electrical Control Interface with AC
Programming Manager
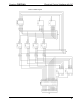
Use the Programming Manager workspace (Project | Program System) in SIMPL
Windows to select symbols and assign their respective signals. For this example,
CT-3000 and CNECI-4A symbols were added automatically when the devices were
added to the system in the Configuration Manager workspace. Expand the Network
Modules folder and double click on the CT-3000 and CNECI-4A for detail views
(alternatively CTRL+D or drag and drop into Detail View). Assign the signals as
shown after this paragraph.
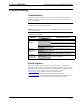
Detail View of the CT-3000 in SIMPL Windows’ Programming Manager
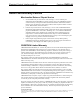
Detail View of the CNECI-4A in SIMPL Windows’ Programming Manager
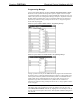
All logic symbols necessary for the SIMPL Windows program must be added from
the Symbol Library in the Programming Manager workspace. In this example, drag
and drop four TOGGLE symbols from the Memory folder, two BUFFER and two
AND symbols from Conditional folder into the Logic folder in Program View.
Expand the Logic folder and double click on symbol icons for a detail view
(alternatively CTRL+D or drag and drop into Detail View). Assign signals as shown
on the next pages.
NOTE: For more descriptive symbol names, as shown in the illustrations above,
right mouse click on the symbol icons in the Logic folder in Program View and
select Edit Symbol Comment (alternatively, highlight the icon and depress Ctrl+R
or Tab). Enter new descriptive names in the “Enter Symbol Comment” dialog boxes
and click OK.
Operations Guide - DOC. 8149 Electrical Control Interface with AC: CNECI-4A • 11