
User Guide


Wall Mount LCD Controller Crestron APAD
1. Locate an area on the wall that is free of studs and miscellaneous wiring.
2. Make a small hole near the middle of the designated site, and verify that the
location is suitable.
3. Using masking tape (or equivalent), fasten the template to the wall; verify
that the template is level, and trace the opening shape on the wall.
4. Remove the template, and then cut out and remove the traced shape to
produce the required opening.
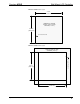
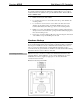
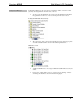
APAD Mounting Example (Mounting Surface Not Shown)
Mounting
Screws
Mounting
Brackets
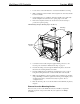
5. Connect the Cresnet cable, using the supplied mating connector, to the
Cresnet port as described in “Hardware Hookup” on page 11.
6. Insert the mounting screws through the APAD front plate as shown and
thread into the mounting brackets a few turns.
7. Insert the APAD into the mounting hole and tighten the screws evenly to
bring the mounting brackets into contact with the back of the drywall.
8. Make sure the APAD is positioned squarely in the mounting hole, and then,
using a #1 Phillips screwdriver, tighten the mounting screws slightly, about
an additional 1/2 turn, to hold the unit securely in position. Do not
overtighten screws.
9. Place the bezel in position over the unit. The bezel is held firmly in place by
magnets.
Removal from the Mounting Surface
If it is necessary to remove the APAD after it has been installed, complete the
following steps in the order provided. The only tool required is a #1 Phillips
screwdriver.
10 • Wall Mount LCD Controller: APAD Operations & Installation Guide – DOC. 6455