
User Guide


Crestron C2N/C2NI-CB Series Cameo
™
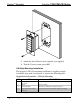
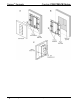
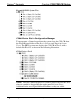
Keypads
Button Caps
and Spacers
Bezel
Assembly
Ground
Wire
LED
Holes
LEDs
Bracket
Rear Housing
and Switch
Assembly
Plastic Button
Support
Cover
Screw
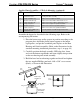
3. Hold the bezel and rear housing together
4. Install and tighten the two supplied Phillips pan head,
4-40 x 3/16” cover screws (black), as shown in the illustration.
5. Press each button to be certain that you feel the press and
release to ensure that the button caps move freely.
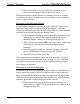
After the Cresnet network wiring has been installed and verified, use the
following procedure to install the keypad in a standard, single-gang
electrical box (not supplied).
1. Turn Cresnet system power OFF.
2. Connect the Cresnet cable to the keypad’s Cresnet port, using
the supplied mating connector.
CAUTION: Excess wire pinched between the keypad and electrical box
could short out. Make sure that all excess wire is completely inside the
electrical box and not between the box and the keypad.
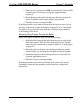
3. Attach the ground wire to the ground screw of the electrical
box.
4. Make sure the keypad is oriented properly, place it in the
electrical box, and attach using the supplied 7/8 in. pan head
screws.
Operations & Installation Guide - DOC. 6346A Cameo™ Keypads: C2N/C2NI-CB Series • 17