
User Guide


Crestron C2N-FTB FlipTop Control Center with Cresnet
®
NOTE: The new Net ID code may also be verified by selecting Diagnostic |
Report Network Devices in the Viewport (alternately, select F4).
10. Repeat this procedure for each additional network device requiring a
Net ID change.
Method B (Touch Settable ID)
Before using this method, you should have a list of all current network devices
and their Net IDs, to avoid assigning duplicate IDs.
Set Net ID by TSID
These procedures are for TSID-enabled network devices during the initial
configuration of a Cresnet system or when such devices are being
added/replaced.
1. Ensure that all network devices are connected to the control system.
2. Open the Crestron Viewport version 3.35 or later.
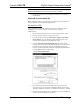
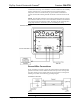
3. From the Viewport menu, select Functions | Assign Cresnet ID by
Serial Number. The “Set Net ID by TSID” window appears. The
window is first displayed with the data fields empty.
4. Click the Search for Touch Settable Devices button. The system
searches the network and lists all TSID-enabled devices found. The list
is similar to the report produced by pressing F4 (Report Network
Devices); the first eight digits of each line constitute the TSID number
(hexadecimal form of the serial number).
“Set Net ID by TSID” Window
5. Enter either the serial number or TSID number of the device that
requires a change. The list scrolls to and highlights the device listing.
The listing should show the device’s default Cresnet ID (a.k.a. Net ID).
6. Enter the Cresnet ID that the device should be set to and click OK. The
number you enter should appear on the list.
Operations & Installation Guide – DOC. 6338 FlipTop Control Center with Cresnet
®
: C2N-FTB • 9