
User Guide

IR Gateway/Receiver Crestron C2N-IRGW-1G
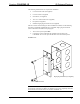
3. Attach the C2N-IRGW-1G to the electrical box using the supplied two ¾ in.
combo head screws.
4. Attach faceplate.
5. Turn Cresnet system power ON.
Hardware Hookup
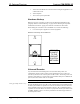
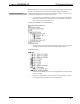
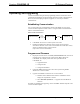
Make the necessary connection as called out in the illustration that follows this
paragraph. Refer to “Network Wiring” on page 5 before attaching the 4-position
terminal block connector. Apply power after the connection has been made.
When making the connection to the C2N-IRGW-1G, consider the following:
• Use Crestron power supplies for Crestron equipment.
Hardware Connection for the C2N-IRGW-1G
CRESNET:
CONNECT
TO THE
CRESNET
CONTROL
NETWORK
Universal Remotes
Any universal remote transmitting RC5 code (and some Sharp codes) can
communicate with the Crestron control system and allow the user to select and
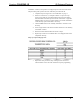
activate any function in the control system. An RC5 code is 14 bits long. Each code
includes a 5-bit address (or system) and a 6-bit command. Sharp uses a different IR
protocol, but some of their codes are acceptable.
NOTE: The Philips Pronto contains built-in RC5 commands for out-of-the-box use.
Setting up a Philips Pronto is easy!
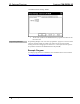
If using the Philips Pronto, select RC5 code communication. For the Philips Pronto,
the RC5 system number is equivalent to Crestron's Transmitter ID code, which is a
unique identifier assigned to each transmitter. Likewise, RC5 command number is
equivalent to Crestron's Button ID, which is synonymous with the join number used
in SIMPL Windows. There is no need to perform the two multi-step procedures in
the subsequent sections.
8 • IR Gateway/Receiver: C2N-IRGW-1G Operations & Installation Guide – DOC. 6468